Forcing Bulbs – Now is the Time to Prepare for Early Spring Blooms
Winter came early to Cornish Flat this year with a heavy snow in late October. I love the snow and cold, but don’t need six months of it – which could happen this year if we have snow from October till April. I am, after all, a gardening guy. I love flowers and fresh vegetables from the garden. One of the things I do to keep my spirits up is to plan for those late winter blues, the time when winter seems endless. I plant bulbs in pots each November, forcing them to bloom indoors before Mother Nature would tell them to bloom outside. I recommend it.
Forcing bulbs is easier, by far, than planting spring bulbs outdoors (there is no digging required), and you are almost certain to succeed – they are safe from predation by deer, and can easily be protected from any rodents that might be looking for a winter snack. I store my pots with bulbs for forcing in a cold cellar, one that has, on occasion, harbored mice and even red squirrels. In fact, I have learned the hard way that indoor rodents can – and will – dig up and eat bulbs – indoors or out. So now I keep my pots covered with hardware cloth (a fine-mesh metal screening available at hardware stores). But wear gloves if you cut hardware cloth to size – the edges are as sharp as razor wire.
Your first job, if you wish to force bulbs to bloom indoors next spring, is to select those that are early bloomers. Each bulb contains the information needed to decide when to bloom. You can affect that timing, but choose packets of bulbs that say “early bloomer” rather than late. I need blossoms in March, not May.
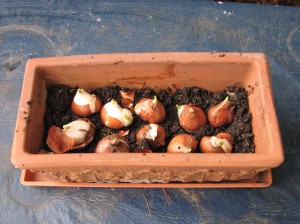
Next, select containers that will accommodate ten or more bulbs. I have some nice Italian terra cotta containers that are about 14 inches long, 7 inches wide and 6 inches deep. For daffodils or tulips, they are right for about a dozen bulbs because I plant the bulbs pretty much shoulder-to-shoulder. I don’t leave much space between bulbs the way I would if planting outside. My favorite container for forcing, however, is my cedar window box that is 3 feet long and 9 inches wide. I fill it with 30 or more daffodils each fall, and come spring it is glorious.
For the planting medium, I use a 50-50 mix of commercial potting soil and my own compost. Garden soil generally is not a good choice – it can hold too much water , which can lead to bulb rot. I put a couple of inches of planting mix in the bottom of my container, and then arrange the bulbs. I cover the bulbs with more mix, pat the surface with a hand, and if the soil mix is dry, I water lightly.
You can double your production of blooms by planting two layers of bulbs in a container. Plant big bulbs deep in the pots, add soil, and then plant a layer of crocus or other small bulbs above them. To avoid planting the little guys right over the big boys, you can mark the location of the deeper bulbs with straw from a broom. That way they won’t get pushed over as the daffodils come up.
Planted now, bulbs will extend their roots and get them well established, and then they should go dormant. To achieve dormancy, you need a cold, dark location for the container. But not too cold. You can’t leave them outside or the bulbs will be ruined. Bulbs planted in the ground never get extremely cold – they are insulated against the cold by soil and snow (unlike those put on your deck, for example). One winter, as an experiment, I shoveled the snow off a section of my vegetable garden and dug into the soil. Using a temperature probe I learned that in a winter with plenty of snow, the soil was about 35 degrees just three inches down.
I recently received several e-mail inquiries about where to store containers of bulbs for forcing. If you don’t have a cold basement, do you have an unheated mudroom or a cold attic? An attached, unheated garage might do – basically any space that gets below freezing, but not much below is good. If you have a bulkhead that is closed off to the basement it probably stays cold enough. If temperatures get much colder than 20 degrees you risk damage to some bulbs.
The time a bulb needs to be dormant varies. Tulips need at least 12 weeks, though early daffodils and most small early bulbs – crocus, snowdrops, scilla – only need 8 weeks. Years when I plant bulbs for forcing early in the fall I often leave them for sixteen weeks. If you bring your bulbs up into the warmth of the house too early they will send up greenery, but may not bloom.
To get your bulbs to bloom, bring them into the warmth of the house and water lightly. Once their little green noses appear, put the containers in a sunny window and they will perform. I rotate the containers every few days, as the stems may lean toward the sun.
Winter can be oppressive for gardeners. Getting bulbs ready for indoor blooming in mud-season is cheaper than flying to the tropics – though I’ve been known to do that, too!
Henry Homeyer can be reached at P.O. Box 364, Cornish Flat, NH 03746 or henry.homeyer@comcast.net. His Web site is www.Gardening-Guy.com
Quick Fixes for the Garden & Kitchen
Quick Fixes for the Garden and Kitchen
There is always so much to do in the garden that sometimes I can’t keep up with it all. Right now there is weeding, pruning, dividing, garden clean-up and more. So I’m always looking for ways to save time and energy. Last fall I experimented with a “Quick Fix” for planting bulbs, and I’m pleased to report it worked just fine.
For the past 30 years or so I’ve been planting bulbs each fall so that I can enjoy big punches of color in the spring. Most years I plant 100 tulips as annuals – I find that they go down hill each year, with fewer and fewer blossoms. So I buy them in bulk and don’t worry if they return, and often plant new tulips in a big bed that already has tulips. By treating them as annuals I get a great show each year – and plenty of tulips to give away.
The backbone of my bulb collection, however, is my display of daffodils – from early to late. Daffodils are foolproof. Rodents won’t eat them – they are vaguely poisonous – and deer ignore them. They will grow in full sun, but will also flower reliably in a hardwood forest. Daffodils can get enough sunshine to recharge themselves in a forest since they get a start before leaves are on the trees.
When I was a boy we had hundreds of daffies that bloomed in our woods, year after year. Eventually we had to dig them up, divide and replant with the addition of bulb booster or slow acting fertilizer. We did that because the woods had so many trees with hungry roots that eventually they needed added minerals.
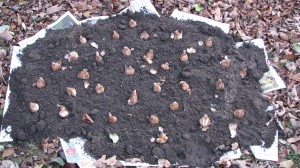
But digging holes for a couple of hundred bulbs can be a lot of work. So last year I tried a new method: I simply planted them above ground and covered them with soil and compost. Here is what I did: I mowed the lawn so that the grass was very short where I planned to plant. Then I put down a thick layer of newspapers and covered that with an inch and a half of compost. I arranged bulbs on that base, pointy end up. I placed the bulbs close together in order to fit in as many as possible – they were almost touching shoulders. Then I covered the bulbs with a 50-50 mix of topsoil and compost. The directions that come with most big bulbs like tulips and daffodils suggest a 6-inch layer of soil over the tips of the bulbs. I didn’t add that much soil – it was more like 4 inches. But then I put down mulch over the fresh soil, which acted much like soil.
I didn’t write about this technique last year as I didn’t know how well it would work. I shouldn’t have worried – it was a success. My bulbs planted above ground bloomed beautifully, and this past summer I planted some annual flowers in the same soil. Next spring? Who knows how they’ll do. Until I’ve had success for a few years I only will recommend it provisionally. Rodents, for example, may find this technique to their liking – to the detriment of the bulbs.
And the mounded beds may look, to the neighbors, like grave sites. The bed I made was large enough for a dog, but if I wanted more bulbs it might raise eyebrows. I can imagine the gossip at the store: What ever happened to Henry’s crazy Aunt Mathilda, anyway?
As I clean up the garden I look for time savers, too. Instead of cutting back my hostas, I wait until we’ve had a few hard frosts. Frost will turn the leaves into mush, so instead of cutting back the plants I can pull the leaves, or just rake them up. I’ve been known to use an electric hedge trimmer to cut back big beds of phlox or other tall perennials. Hedge trimmers are fast, but require one to bend over for a long time with a machine that is considerably heavier than pruners or hedge shears. If you use electric trimmers, be sure to use a GFCI outlet for your cord. Those are the outlets with with re-set buttons to prevent your from getting hurt if you cut off your cord – which I’ve been known to do.
In the kitchen have some quick fixes, too. I freeze sliced apples in pie pans now and when they’re frozen I remove the contents and store in big zipper bags. Later, come winter, I’ll make a crust, put in those frozen apples and add the spices. They will thaw and cook in the oven, taking just a little longer to cook.
To save time I have a couple of wonderful tools for slicing apples. The first looks like a 6-inch metal wagon wheel with wire spokes. Push down on the tool and it slices an apple into 8 or 10 wedges (though the skins stay on). I have another tool that both slices and peels apples. It bolts down onto the edge of the kitchen counter, you spear an apple onto the pointy end of the machine, turn a crank, and lickety-split the apple is peeled and sliced. I found one like mine at the Vermont Country store (www.vermontcountrystore.com or 802-776-5730) for about $30.
If you have some good time savers, be sure to write me. We all need to get our chores done so we can settle into winter and relax with a good book.
Write Henry Homeyer at P.O. Box 364, Cornish Flat, NH 03746 or henry.homeyer@comcast.net or visit his Web swite www.Gardening-guy.com.


