-

Now available for $24.95 including shipping. -

Now available for $21.00 including postage. Vendors I Like
 Click Here to buy from Cobrahead
Garlic Is As Good as 10 Mothers
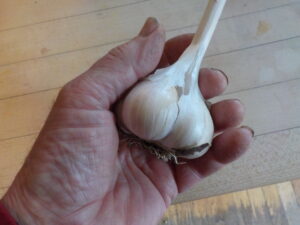
This big bulb of hard necked garlic has just 5 cloves
One of my favorite fall appetizers is take whole heads of garlic and roast them in oven-safe ramekins or small dishes at 375 degrees for 45 minutes or so. First, I peel off outer layers of the head of garlic, cut off the tips of the head and drizzle it with olive oil. When done the cloves of garlic are soft and easily squeezed out of their skins after cooling. I like to serve this on crackers or a baguette spread with goat cheese.
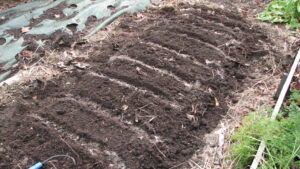
A garlic bed ready for planting
I plant garlic in a wide raised bed. I loosen the soil with a garden fork or my CobraHead weeder down to a depth of six inches. Then I add some good quality compost, either homemade or purchased, and stir it in. I make furrows eight inches apart and add some organic fertilizer like Pro-Gro into the furrow. I work it in with my single-tined CobraHead weeder. Or you can sneak cloves into a flower bed individually using a hand trowel.
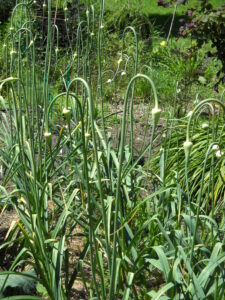
Garlic that is near ready to pull
Garlic plants are handsome, especially in July when they send up tall flower scapes that twist and turn in great shapes. Think creatively, you can find a space to plant some. I often cut the scapes and use them in flower arrangements, and they are also good sliced and sautéed in a stir fry.
Garlic Needs to Be Planted Now!
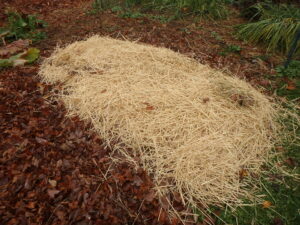
This thick layer of hay helps to prevent weeds in the garlic
The last step is to mulch your garlic. I use mulch hay or straw and put almost a foot of fluffy material over the bed. Fall rains and winter snows will cause the hay to settle – I end up with about 4 to 6 inches of material in the spring.
Planting Garlic
Garlic is one of those magical flavors that give foods depth of flavor and the richness of another world. Italian food, French food, Indian food – these all include liberal use of garlic. Why the English decided on fish and chips and boiled dinners as their staples is a mystery to me. Maybe they can’t grow garlic. But I’ve been growing garlic for my kitchen for decades. It’s easy to grow and now is the time to plant it for next year.

Hard neck garlic
Your first task is to find some garlic suitable for planting. You can’t just go the grocery store and buy some. Most commercial (non-organic) garlic has been treated with chemicals to keep it from sprouting. Instead, go to your garden center to buy some – or get a few heads of garlic from a farm stand or a friend who grows it.
Here in New England the recommended type of garlic is called ‘hard neck garlic’ and it survives our cold weather nicely. Soft neck garlic, commonly grown in California, is less cold tolerant. It is the type that can be braided and hung in the kitchen. Hard neck garlic sends up a stiff stalk, called a scape, which grows out of the middle of the bulb – a stiff neck, if you will.
Hard neck garlic generally has a stronger, richer flavor with more bite. It also comes in a wide range of flavors – just as different varieties of tomatoes and sweet corn have distinct flavors. Hardneck garlic is often classified as either rocambole, porcelain or purple stripe. Rocambole garlic has a tan outer covering and usually produces up to a dozen cloves per bulb. Porcelain garlic has a satiny white wrapper and tend to produce larger cloves with as few as four per bulb. Purple stripe garlic is one of my favorites – it is productive, tasty and generally a nice, plump size.
I like to say that everyone would be a gardener if growing all vegetables were as easy as growing garlic. There are just three steps to growing garlic: planting it, mulching it, and harvesting it. That’s right, if you mulch well it will grow well and you will never – or rarely – need to weed.
I grow garlic (and all my vegetables) in wide, mounded beds. Each bed is 30 to 36 inches wide, and mounded up 4 to 6 inches above the walkways. A short-tined garden rake or hoe is useful for shaping the beds, and to gather up loose soil from the walkways.
The first step when planting garlic is to remove any weeds from the soil. Then I enrich the soil by adding 3 or 4 inches of compost on top of the bed I am planting it in. I use a garden fork or my CobraHead hand weeder to loosen the soil and stir the compost into the top few inches of soil. Rototilling would mix the compost in deeper – good for drainage in a clay soil if you have it, but away from the roots of my garlic.
Rows of garlic need to be spaced 6 to 8 inches apart. Most years I plant short rows across my wide beds, but sometimes I will plant rows down the length of the beds – it really doesn’t matter which way you do it. I create furrows with a hand tool in the fluffy soil of my bed and sprinkle on some bagged organic fertilizer, then mix that in.
It is important to plant your garlic right side up. If you look at a bulb of garlic, you should be able to see roots, or where the roots have been cut off. The top of each clove has a slightly pointy tip, and the bottom has a small, flat scar. And of course, when looking at a bulb of hard neck garlic you can see where the scape grew. If you plant the cloves upside down, they use up a lot of energy trying to get started and grow toward the sun.
To plant, just push each clove into the prepared soil about 4 inches away from its nearest neighbor. The top of the clove should be 2 to 3 inches beneath the soil after you cover it up. Pat the soil with your hands to firm it up.
The last step is to mulch. I use mulch hay because it is inexpensive, but straw is fine, and should have fewer seeds. I put a thick, fluffy layer of hay over the entire bed – and about a foot deep. Fall rains and winter snows will compact the mulch to a 3 to 4 inch thick layer of mulch that should keep out all weeds – while allowing the garlic scapes to push through in the spring.
Garlic is ready to pick in July or August. The scapes will curl and dance as they grow, and are wonderful in a vase with flowers. The scapes are also tasty – you can chop them and add to stir fries or omelets. Store your garlic crop in a cool dark place for best storage. And don’t eat it all! Save some for planting your next crop.
I’ve been told that garlic has cancer-fighting compounds, and that it’s best to chop or press you garlic 10 minutes before cooking it to preserve the best effects. And it’s supposed to be good for keeping away vampires, not just cancer. Me? I find it necessary for a good spaghetti sauce!
Henry Homeyer is a garden designer, coach and the author of 4 gardening books. His web site is www.Gardening-Guy.com.
Garlic
Everything has its season; for me, this is garlic season. In early to mid-August each year I harvest 60-100 garlic plants, each bulb or head with 6 to 8 cloves. I tie them in bundles of 10 and hang them in a cool dry location, whole plants including the tops. A month later I trim off the tops, but I’ve been told that curing them with their tops on allows certain nutrients to flow back into the cloves from the foliage. If you haven’t picked your garlic, you should. If you wait too late the outer skin of the garlic will break down and the garlic will not store as well.

Garlic ready to cure
And what, you might fairly ask, does one do with 100 heads of garlic? For starters, I will save the best 15 heads or more for re-planting. I don’t buy seed garlic, I use my own, year after year. Planting time is not until October, but I select the best garlic and set it aside for planting. That means, over time, that I am developing strains that are best for my soil and climate. Now, after 25 generations of doing so, I grow garlic that is well adapted to my specific conditions.
Then there is pesto. I planted a bed of basil about 4 feet square this spring from plants I started indoors. Recently I cut most of that basil about 8 inches from the soil line and processed it all at once for pesto – the plants will grow new leaves for other uses later. I’ve tried a lot of recipes, and have decided this one, below, is the best. I used pine nuts for it, instead of walnuts or almonds, even though those nuts cost me $22/pound. But 6 batches of pesto only used 3 cups of pine nuts, which translates to about $8 for the nuts. This is a treat, and will last for months if spaced out between meals and not consumed on toast with tomatoes for breakfast, which is what I did the day after making pesto.
Henry’s Pesto Supremo
2 cups basil, well packed down in the measuring cup
1/3 cup pine nuts, roasted
3-6 large cloves of garlic according to your taste
1/3 to ½ cup olive oil
½ cup grated Romano cheese (or Parmesan if you prefer)
salt and pepper to taste
I began by browning the raw pine nuts in a cast iron fry pan at medium heat. The pan had been oiled and then wiped with a paper towel to remove the excess. I find roasting improves the flavor considerably.
Remove basil from stems, wash, spin dry and then pat the leaves dry with a cloth towel. You need enough basil to fill a 2 cup measuring cup with leaves packed down firmly, which is a lot of leaves.

Pesto Frozen in Ice Cube Trays
Place leaves in a food processor and add 1/3 cup of pine nuts and pulse a few times. Mince the garlic in a garlic press, add to blender and then pulse. Add oil slowly with the processor running. Finally add the cheese and pulse a few times. Taste immediately on toast!
Looking for other ideas I called Bill Howard, Executive chef at Three Tomatoes Trattoria (my favorite Italian restaurant) which is located in downtown Lebanon. He started by reminding me that different strains of garlic have different flavors, some with lots of “bite”, others quite mild.
Bill likes a mild strain called “Music.” He roasts it in a 350 degree oven for an hour or so, caramelizing the sugars in it and making it suitable for spreading on toast. I’ve done this in the past by putting whole heads of garlic (skins on) in a small, oven-safe baking dish with a little olive oil. When the garlic is roasted I let it cool, take scissors to snip off the tops, and then squeeze out the soft inner mush onto toasted bread. Sometimes I first lather the toast with a soft goat cheese and then spread the roasted garlic and top with a slice of fresh tomato. Oh boy!
Bill Howard also told me that sometimes when using garlic that has a lot of bite he slices it, and then poaches it in milk, which mellows it out. That seems truly bizarre to me, but I’ve never eaten one of his dishes I didn’t like. Not only does he use the garlic, he makes a garlic-infused béchamel (white sauce) sauce using the milk, butter and flour.
Garlic keeps best in a cool location with low humidity. I keep garlic on an “orchard rack” in the mudroom, a place that stays cool. I got the rack a few years ago from Gardeners Supply (www.gardeners.com) and use it for winter squash and onions, too. It is made from hardwood slats, so there is good air circulation. If you just have a few heads of garlic I suppose you could keep it in a basket in the kitchen, or perhaps in the fridge.
Garlic is believed to cure or prevent all manner of ailments. I learned from herbalist Nancy Phillips (author of The Village Herbalist) that one should mince or chop garlic and then let it sit for 10 minutes before cooking with it. She says this allows certain anti-cancer compounds to develop full potency before use. I have been doing it for years – it can’t hurt.
I do know that garlic adds great flavor to almost any dish. And who knows, I might poach some in milk and use the milk on my cereal. That would be an interesting way to start the day!
Henry Homeyer’s new children’s book will be available in September. Look for Wobar and the Quest for the Magic Calumet from Bunker Hill Publishing.