-

Now available for $24.95 including shipping. -

Now available for $21.00 including postage. Vendors I Like
 Click Here to buy from Cobrahead
What You Should Be Doing Now in the Vegetable Garden
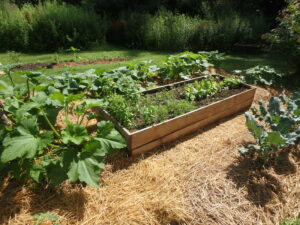
Raised beds need more water than plants in the ground.
The most vulnerable plants are those that have just been transplanted or installed. I recently moved some small Swiss chard plants from a somewhat shady place to a raised bed in full sun. Gravity works on water, not just Newton’s apple. Raised beds tend to drain of water and dry out faster than beds in the ground. The soil is warmer, too. So those Swiss chard seem to need water every day now.
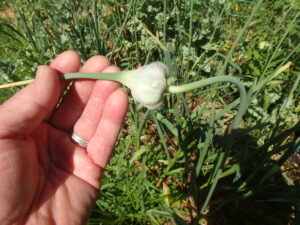
Garlic scapes like this are tasty when chopped and added to a stir fry.
I’m harvesting garlic now, too. Not the entire crop as yet. I just pull one or two for cooking as needed. I’ll pull them all in August when the leaves start to brown up. When I pull the main harvest I leave the tops on and hang them in the cellar upside down to cure. I’ve read that the bulbs will absorb additional nutrients from the leaves and stem while they cure.
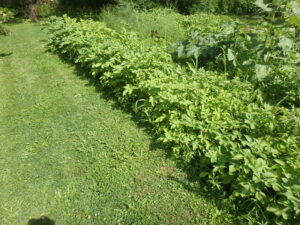
Potatoes will be ready early this year. Start digging them after they flower.
I seem to be having a great year for potatoes (I have not seen a single potato bug), and should have plenty to eat and share. I planted 100 chunks of potato, and each plant should give me one to two pounds of spuds. I will start harvesting a few after they have blossomed. I like to slip my hand under a plant and “steal” a potato or two for dinner before I start the harvest. If you grow potatoes, be sure to let your children or grandkids help you when you harvest them. All kids are excited by the buried treasure!
Planting Garlic
Growing garlic involves less work than anything else I grow. There really are only 3 steps: plant it, mulch it, and harvest it. It’s also the least expensive, once you have an established bed of garlic. I will plant this year’s crop from last year’s crop, and that one I planted from the crop of the year before. You really only have to buy garlic once – so long as you save some each year for planting.
There are basically just two kinds of garlic: soft neck garlic, which is what you probably get at your grocery store, and the stuff we grow here in the Northeast called hard neck garlic. Most soft neck garlic comes from California and keeps nearly forever. Hardneck garlic has a stiff stem in the middle of each bulb, and has a much more complex flavor (in my opinion). It will keep in a cool place until spring, but not much longer. Then it either sprouts or dries up.
Planting Garlic
October is the time to plant garlic. If you don’t have any seed garlic, you might be able to get some at your farmers market. Don’t plant grocery store garlic, even if you can find hard neck garlic, because it is often treated so that it will not sprout. By now most catalog-sellers of garlic have sold out.
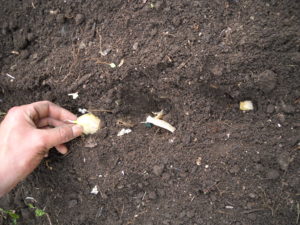
Take a bulb (or head) of garlic and separate it into the cloves that surround the hard “neck” or flower scape. Depending on the variety of garlic, you might have just five cloves, or as many as a dozen. I like big cloves, as they are easier to peel and use. So each year I select for big cloves and plant them. Over the years my crop has produced bigger bulbs and bigger cloves.
Garlic needs full sun (defined as 6 hours of sun) and rich soil. I always add compost to my garlic bed and some organic bagged fertilizer. I rake soil from the walkways into a raised bed that is perhaps 30 inches wide and six inches higher than my walkways. Ideally, by adding compost, your soil will be rich and fluffy.
To plant, I draw furrows about 8 inches apart with my CobraHead weeder, a single-tined tool that is curved like a bent finger. I loosen the soil about 6 inches deep withit, than push cloves into the soil so that they are 3 inches apart and about 3 inches deep. Always plant them with the pointy end up. Afterwards I pat the soil down with my hands to firm the soil.
The last step is to mulch your garlic. I use mulch hay or straw and put almost a foot of fluffy material over the bed. Fall rains and winter snows will cause the hay to settle – I end up with about 4 to 6 inches of material in the spring.
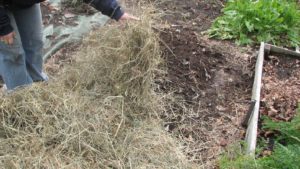
Garlic Mulch
The mulch keeps the soil from freezing until January, allowing roots to get well established before the garlic cloves go dormant. It also prevents most weeds from germinating and growing next year, though I weed the bed before planting. Garlic is tough stuff and will push right through my layer of mulch, though most weeds do not.
Depending on the weather and when you plant, your garlic may send up green stalks this fall. Don’t fret if it does. Those sprouts will die back in winter, but the garlic will send up new ones in the spring.
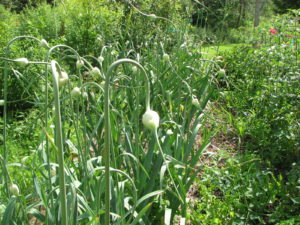
Garlic Scapes
In early summer the scape, or flower stalk, will perform for you, “dancing” to create loops, swoops and circles of green. I use these in flower arrangements. Each scape produces a flower on top of the scape that will, if left, produce seeds. Those seeds are not useful for the average gardener, as they will not produce edible garlic for 2 years. But the stems and flowers are great for early summer stir fries. Garlic scapes are a taste treat.
Some believe that cutting off the scapes early on will produce bigger cloves of garlic, but I have never been able to tell if that is true or not, though it makes sense. Producing flowers and seeds uses energy that might otherwise go to producing bigger bulbs.
Next July the garlic you planted this year will be ready to harvest. Each bulb grows about 7 long pointy leaves that also surround the cloves and protects them. When 3 or 4 leaves have turned brown and started to dry up, it’s time to harvest. If you wait too long, all the leaves will have dried up and the garlic will not store as well – it will dry out too soon.
I’ve been told that after harvesting that garlic should be cured in a cool shady place for a week or two before you cut off the tops. Why? Because nutrients in the leaves – some of which are allegedly good for preventing cancer – will migrate to the bulbs and be absorbed.
You can store garlic best in a cool, dry place. Ideally 50 degrees with moderate humidity. I recently read an article produced at the University of California at Davis that you can freeze garlic instead of storing it at room temperature. Separate the cloves, but don’t peel them. You can freeze them in a zipper bag or jar for a year or more. I shall try that. Don’t store garlic at room temperature in oil, as it can produce deadly botulism.
Garlic may or may not repel vampires and viruses. I do know it makes food taste better, and is full of vitamins and minerals. So I grow it, and you should, too.
You can reach Henry at henry.homeyer@comcast.net. Read his blogs at https://dailyuv.com/gardeningguy.
Mid-Summer in the Vegetable Garden

Romanesco Zucchini
Summer squash of all sorts are ripening up nicely, so I know it’s mid-summer in the vegetable garden. Soon gardeners will be dropping off bags of squash in unlocked cars, on porches, and, occasionally, on seats of buses and in public libraries. When you’re not distributing the booty in creative ways, here are some suggestions for tasks in your vegetable garden now.
If you see lower leaves of tomato plants browning up, snip them off with a sharp pair of scissors and dispose of them in your trash, not the compost. It’s a good year for tomatoes, so far. No late blight, not much early blight for most of us. On a recent tour of my 32 tomato plants, I only found a few that had any discolored leaves at all. This may be due to the fact that when I installed tomato cages in June, I cut off lower leaves that might touch the ground. Most leaf diseases are soil-borne and spread by splash-up. So removing lower leaves, even now, is a good practice. Mulching with leaves, straw, hay, pine needles or grass clippings helps prevent disease, too.
I’m eating edible-pod peas and freezing some for the winter. I blanch them briefly – about 60 seconds- and drop them into cold water before patting them dry on cotton towels, and then freezing them in zipper bags. Once the crop is finished I’ll have a nice 10-foot section of wide raised garden bed for planting late season veggies. Here are some possibilities of ways to use that bed:
1. Fall radishes. I buy seeds for one called ‘Red Meat’ in the Johnny’s Seeds catalog that I love. It only works if you plant it in mid-to late-summer. It is very mild, and pretty on a plate. Pink centers are surrounded with a band of white, then green – just like a watermelon. It is tasty even if grown 3 to 4 inches in diameter. I serve it with a vinaigrette sauce. At the Cornish General Store I found seeds by Agway for a fall radish called Chinese White Winter; the packet says to plant after August 15. It grows to 5 inches long or more, stores well, and is mild. I shall try it.

Broccoli Starts
2. Late season broccoli. Start some by seed now in cell packs, transplant into the garden when they are 2-3 inches tall. You’ll have full sized heads in 55-65 days. Or buy seedlings now if you can find them. Broccoli produces well into the fall as it is very frost hardy.
3. Bush Beans. I have 2 plantings already, but I could do a third planting for the freezer. ‘Provider’, a reliable variety, takes just 50 days from planting to harvest, and will produce for 3 weeks or more. If you plant today, you should be able to harvest plenty before frost.
4. Lettuce. Fall lettuce is crisp and tasty. Plant directly in the soil, or if you have no space now, plant in cell-packs, and plant when you have space.
Other tasks now? Scratch in a little rock powder or wood ashes around pepper plants. Peppers produce late in the summer, and can be stimulated to be more fruitful, sooner, with a dose of rock powder now – a quarter cup per plant. For more information on rock powders, see my latest book (Organic Gardening (not just) in the Northeast: A Hands-On, Month-by-Month Guide), which should be available at your local library or bookstore. Azomite is the name of one commercially available rock powder.
Your asparagus patch should not be ignored, just because the season is over. Make sure grasses and weeds don’t take over the bed, and water weekly in dry times. I mulched mine with ground branches I got from a local arborist. The chips keep down weeds and hold in moisture.
Make pesto. Basil is more productive if you keep picking leaves or even cutting off the top third of the plant. There is only so much basil you can put in a salad or on a sandwich, so make some pesto and freeze it for the winter when we all crave green things from the garden. The basic recipe contains basil, garlic (lots), parmesan cheese, olive oil and pine nuts. In recent years, pine nut prices have peaked over $20/pound, so I have been using walnuts or hazel nuts, both of which taste just fine.

Garlic Scapes
My garlic is getting mature earlier than usual this year. When the tops, called scapes, curl around in loops it is time to harvest those scapes and use in stir fries. Chop and sauté in olive oil to add to other vegetable dishes. The heads, or bulbs, will continue getting bigger for a few more weeks- but I have already nabbed a couple to use now. When you do harvest your garlic, it is best to let it cure for a couple of weeks in a shady, breezy location before you cut off the tops.
It’s easy to get lackadaisical in the heat of the summer, but weeding is still important if you want your best production. It is also important to keep weed seeds out of the soil to minimize your work next year. So keep weeding, but at the end of the day settle into an Adirondack chair near the garden and admire your handiwork as the sun goes down.
Henry Homeyer is a garden consultant, teacher, coach and the author of 4 gardening books. His web site is www.Gardening-Guy.com.