Holiday Gifts for the Gardener
Posted on Wednesday, December 2, 2020 · Leave a Comment
I love the holiday season: the lights, the carols, the cookies and more. It’s a good antidote to the news, and to the gray and chilly weather. Last summer many gardening necessities sold out as so many people were quarantined at home and took to gardening. So I recommend getting presents now, before everything is sold out. Here are some ideas for presents to gardeners.
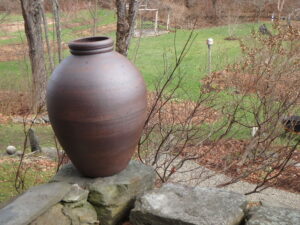
Stephen Proctor pot enhances the garden
Nice pots are good presents, both for growing plants on the deck or just for their sheer beauty. For my birthday this year my wife gave me an urn made by Brattleboro, Vermont potter Stephen Procter. It is 20 inches tall, a foot wide in the middle and tapering to a 6-inch neck. His website,
www.stephenprocter.com, shows mostly huge pots, some 6-feet tall, but he makes smaller things like mine, too. And your garden center will offer a wide variety of nice pots for growing things, too.
We all need hand tools, and sometimes we lose them. So you can always give a weeder to your loved one. The best of these, in my opinion, is the CobraHead weeder with its curved single-tine that is great for teasing out roots of grasses and invasive weeds, or for use at planting time to loosen the soil. Available locally or from CobraHead.com for about $28 including shipping. Made in America.

A 4 way splitter provides for hoses going in different directions
Last summer was dry, so watering devices and accessories were hard to buy locally much of the time. One item that is a bit of luxury, for me, is a 3-way or 4-way splitter for the hose. Look for a good, heavy duty metal one at your local garden center. Why 4-way? One for each hose. No more disconnecting and reconnecting hoses. Price? Around $30. Give a 5 or 6-foot hose to go with it, to attach to the spigot and the splitter. Under $10.
Another watering device is a watering wand. Dramm is the best because their wands deliver a lot of water in a gentle fashion. I like a 30-inch wand with a built in on-off controller. Around $25.
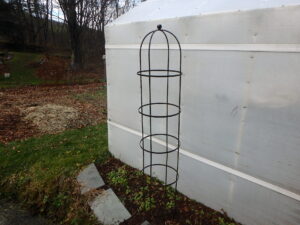
Essex Round Trellis
I like adding height to the garden, and an easy way to do this is with Gardeners Supply’s “Essex Round Trellis”. It comes in 5-foot and 7-foot heights, and I selected the taller one to grow my morning glories next year. Metal, easy to assemble, $60 or $80. It will look good in the garden all winter, too.
Also from Gardener’s Supply I got some metal edging. It comes in a variety of lengths and assembles and installs easily. Sold as 12 to 24-foot kits in a variety of metals and finishes for $43 to $80. These bend nicely, and create a finished look for a flower bed.
Organic-Gardening-book-cover.pdfI love gardening books. I realize that the web has a lot of information, but nothing beats a book in my hands as I settle in on a cold and snowy day.
Norwich, Vermont garden designer Bill Noble came out with a beautifully illustrated book this year, Spirit of Place: The Making of a New England Garden (Timber Press, $35). It is a lovely description of his gardens – and the thought processes that went along with doing this over a long period of time.
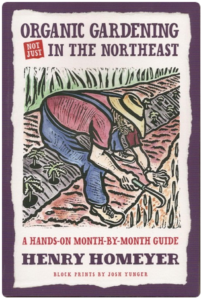
Organic Gardening book cover
I have a few cases of my last book, Organic Gardening (not just) in the Northeast: A Hands-On, Month-by-Month Guide (Bunker Hill Publishing, 2015) collecting dust. It came out at $17.50 in paperback, but I am offering it now at $15 including shipping. It’s a collection of my best articles arranged by month. Send me a check at PO Box 364, Cornish Flat, NH 03746.
Storey Publications (
www.storey.com) is one of my favorite publishers for garden books, not only because their books are practical and well written, but many are in paperback and very affordable. Their
Vegetable Gardener’s Bible by Ed Smith ($24.95 in paper) is a classic, and a must-have even for experienced gardeners.
New to me this year are these, all looking interesting. Best of all is a great book on soil by Dianne Miessler, Grow Your Soil: Harness the Power of the Soil Food Web to Create Your Best Garden Ever. It explains very well how soils work, what soil test results mean, and how to correct deficiencies. You don’t need to be a scientist to read this one. ($16.95 in paper)
The Gardener’s Weed Book and The Gardener’s Bug Book, both by Barbara Pleasant ($14.95 each) are very useful No color illustrations, but the drawings are fine. Written for organic gardeners.
Saving Container Plants by Alice and Brian McGowan is a useful book for all of us in New England that want to winter over tender perennials that we have grown in pots on the deck all summer, but that can’t survive the winter outdoors. A stocking stuffer at $9.95 in paper.
Lastly, give your loved one a pile of … manure. Farmers and garden centers sell hot-composted or aged manure that is great for the garden. It will improve the soil and nurture soil organisms. Three yards is a small dump truck load, or you can go get a load in a pick-up truck.
All my best to you, my readers, in this holiday season. Don’t be naughty, and Santa may bring you what you want.
Holiday Gifts for the Gardener
Posted on Monday, November 25, 2019 · Leave a Comment
Bad news: I hear you can’t depend on Santa to deliver presents to your favorite gardener this year as he is vastly overworked – and pretty cranky. Last I heard, he is planning on give coal to almost everyone over the age of eight. But here are some of my recommendations that you could give to your favorite gardener.
Tools are always good. I recently bought a harvest knife, a Barnel BLK730. This is a lightweight curved blade on a wooden handle that is great for cutting back perennials and grasses by pulling it through a clump of vegetation. Best yet? The price. Only $7.10 from OESCOinc.com or 800-634-5557. This is a tool supplier in Conway, MA that has an amazing assortment of good tools.
Also from OESCO I borrowed two “anvil” type pruners to try out. I always thought that anvil pruners were just low-cost pruners sold in big box stores for $10 or so. But these pruners are made by a German company, Lowe (with 2 dots over the O, not to be confused with Lowe’s, the American retailer), and cut very well. Their blades are sharpened on both sides, and are thinner than the blades on by-pass pruners so they take noticeably less effort to cut.
For people with small hands, I like the Lowe mini-anvil, L5.127 for $40. It weighs just 6 ounces and cuts stems up to 5/8 inch in diameter. For bigger hands like mine, I like the Lowe Ergo Anvil L8.107 for $64. These weigh just 8 ounces and compare with my Felco 5 pruners that weigh 11 ounces.
Of course every gardener needs a good weeding tool. My favorite is the CobraHead, and has been for years. They now have a mini-Cobrahead which is designed for smaller hands. Available from CobraHead.com or 866-962-6272 or at your local garden center. It has a single curved tine like a steel finger that will tease out roots from below while you tug a weed from above.
Last summer I installed a garden during a dry time, and used a watering kit from Gardeners Supply called “Snip and Drip” (Item 8587044). I loved it. It comes with hose, soaker hose, and all the fittings needed for watering a small garden. I ran soaker hose around each shrub or cluster of perennials, then regular hose to the next planting. The fittings are easy to install and go together quickly. The basic kit costs $52.95 from Gardeners.com or 1-888-833-1412.
A good wheelbarrow is a nice present, though pricey. My favorite is the Smart Cart (
www.smartcarts.com or 207-591-4250). It is great for heavy and bulky loads. The axle is centered under the load so that it feels light to the touch and turns easily on its two wide 16-inch diameter wheels. It has a tubular aluminum frame and a big plastic bin (7 cubic feet).
You can easily remove the bin from the frame so that you can wash the dog in it, or carry compost in the back of your car. My model (with wide wheels) is rated for 600 lbs; the wire wheel version is rated for 400 lbs. At $299 with free shipping, it is a lifetime investment. I’ve had mine for about 20 years, and never had a problem.
If a wheelbarrow costs too much, you could get a small blue plastic tarp. My partner, Cindy Heath, loves hers to drag away weeds. Go to your local hardware store and get a six by eight foot tarp for under $10. Not perfect for everything, but very economical.
Books are great present, too. Go to your local family-owned bookstore and pull some gardening books off the shelf. Find a chair, sit down and have a look. It helps if you know what the recipient of your gift is focused on – shrubs, perennials, learning to compost, etc.
A book I liked this year is Mini Meadows: Grow a Little Patch of Colorful Flowers Anywhere around Your Yard by Vermont gardener Mike Lizotte. (Storey Publishing, paper, $16.95). It is full of practical easy ways to get more flowers to attract pollinators – and supply the table with bouquets.
A wonderful book by Vermont garden designer Julie Moir Messervy and architect Sarah Suskana is Outside the Not So big House: Creating the Landscape of Home (Taunton Press, $34.95). Wonderful photos, lots of good design ideas.
I start a lot of seeds each spring, and I’m tired of buying disposable plastic 6-packs. Gardeners Supply has an alternative: heavy-duty planting trays that can be washed in the dishwasher and re-used for years. Called the GrowEase system, there are two sizes: the 24-cell tray with 2-inch deep cells and a 15-cell tray with 3.5 inch deep cells. Both come with clear plastic domes and self-watering wicking systems.
As I get older I look for ways to save my knees, back, and energy levels. There are lots of kneelers on the market, and I’ve found one I like. Also by Gardeners Supply, it allows me to kneel just a few inches off the ground on a padded shelf, and has very sturdy side handles that allow me to use my arms to push myself up to a standing position. It weighs 9 pounds, and is very sturdy. Flipped over, you can sit on it. Item 40-009.
Santa may be cranky and unresponsive this year, but we don’t have to be. Send me your ideas, particularly for books you like – I need winter reading. Enjoy the holidays!
It’s Time to Harvest and Store Root Crops
Posted on Saturday, September 1, 2018 · Leave a Comment
I sometimes wonder if I’m part squirrel. No, I don’t bury acorns for winter, but I do love putting up food for winter, especially potatoes. They’re the ultimate “comfort food” as far as I am concerned, and I rarely have too many. If you haven’t already done so, now is the time to harvest and store your potatoes for winter.
If you haven’t dug your potatoes yet, don’t worry. Potatoes store well in on ground right up to frost, and even after frost. But don’t try to overwinter them in the ground – they’ll get soft and unappealing. By now the leaves on my potato plants have yellowed and begun to die back, so there is no point in waiting- they won’t get any bigger. And if I wait too long, the mice may find them.
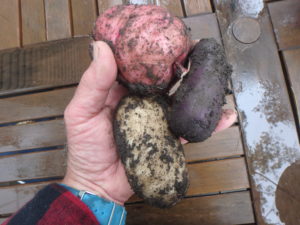
Kennebec Red Pontiac and Magic Molly potatoes just harvested
It’s important to be careful when digging potatoes so that you don’t damage any. I use a potato fork that has been in my family for decades. It’s like an ordinary garden fork, but the tines are at a right angle to the long handle, and are sharp and long. To harvest I pull the soil to one side with the potato rake. Then I plunge my fingers into the loose soil to find the spuds. If I spear a potato it goes into a pile destined for immediate consumption.
It is generally accepted that one should not wash potatoes fresh from the soil. Their skins are soft and easily damaged right after digging them. Most experts suggest hardening the skins by spreading them out in a cool place out of the sun for about a week. I do this on a north-facing deck, and turn over the potatoes after 2 or 3 days so both sides get hardened off.
Storing potatoes is best done by keeping them in a dark location with high humidity that stays between 35 and 50 degrees. Storing them in a warmer place will turn some of the starches in the potatoes into sugars. This will cause the potatoes to burn easily if you make French fries, so commercial growers keep them cool.
Potatoes need to breathe while in storage. They are living organisms that respire, so putting them in a sealed plastic bag will suffocate them, ruining them. Traditionally potatoes were stored in a cool basement with a dirt floor, but losses to mice or rats was often a problem.

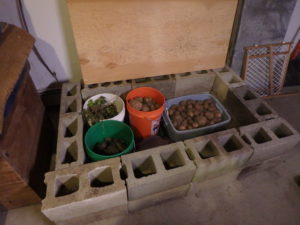
Cool box storage bin
I have a cool basement with a cement floor, and I have built a box there to contain buckets of potatoes and other root crops. It consists of two layers of blocks arranged in a rectangle, three blocks long and two wide. On top I have a piece of half-inch plywood. I call this my cool box, or root cellar. It will hold 6 buckets at a time. And so far, the rodents have not found a way in.
Carrots store well in my cool box. Like potatoes, they need a cool humid location for storage. I put an inch of moist sand in the bottom of each bucket to keep up the humidity.
Unlike potatoes, however, carrots will store well in the ground. In the past I have covered my carrots in the garden with a layer of straw or hay, then leaves. This acts as insulation and keeps the ground from freezing, allowing me to go out, shovel away the snow, and dig carrots in winter. Mice or voles have been an occasional problem, however. I put a stake in the ground at each end of the carrot bed so that I can find it in deep snow.
What else stores well in my cool box? Rutabagas, kohlrabi and celeriac – three less common root crops that I like – all store well cool, with high humidity. But onions do not store well in my cool box. They like a cool environment, but low humidity.
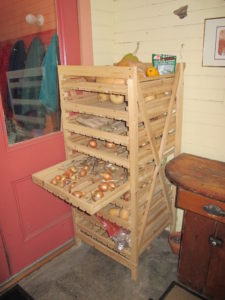
Orchard rack from Gardener’s Supply Co.
I store my onions and garlic in an area near the mudroom that stays cool but dry. I use a wooden “orchard rack” that I got from Gardener’s Supply many years ago. I also use it for winter squash. It has 6 large slatted drawers that pull out, allowing me to select what I need for dinner. It has excellent air circulation.
An old Vermont farmer I knew stored his winter squash upstairs under the bed in the guest room. He said he kept the radiator turned off so the room stayed cold, but above freezing. The humidity is naturally low in winter in most houses.
Last but not least, I have an ancient General Electric refrigerator in the basement that is not “frost-free”. This vintage fridge does not remove the moisture the way modern ones do, so ice will sometimes build up, requiring me to defrost it. But any vegetable that stores well in high humidity will do much better there than in a modern fridge which creates low humidity except in the two drawers at the bottom.
Part of my joy in gardening is spending time outdoors growing flowers and vegetables. Each fall I get busy putting up the vegetables for use in the kitchen all winter. And each time I make a stew with food I grew, I know my food is chemical-free and it tastes better to me because I grew it.
Henry Homeyer is a UNH Master Gardener and the author of 4 gardening books. See his blog posts at https://dailyuv.com/henryhomeyer.
How to Build a “Cold Cellar” or Vegetable Storage Bin
Posted on Tuesday, December 5, 2017 · Leave a Comment
I had a banner year for root crops this year, and storage is a problem. For the past few years I had been storing root crops in a spare fridge, or in an old 25-gallon crock with a plywood lid in my cold basement. This year I went back to using a cement block bin that accommodates more produce. I call it my “cold cellar”.
There are two impediments to storing root crops for winter: maintaining the proper temperature, and keeping mice from getting at the food. My house was built in 1888 as a Creamery, or butter factory, and has a stone foundation – which will always make it possible for determined mice and squirrels to get in.
The building was built into a hillside and 3 sides are above grade level – which makes for a cold basement in winter months, as I only heat it when the temperature outside is below zero.
Cold Cellar Storage Bin
This year I built a cold cellar for potatoes that uses 22 cement blocks. Cement blocks are readily available and relatively inexpensive. Blocks that are 16 inches long, 8 inches wide and 8 inches tall generally cost about $2 each. In addition to the blocks all you need is a piece of plywood to cover it.
So here is what you need to do if you want to build a bin for storing vegetables. First, select a place where the temperature can be kept above freezing. Your garage might work, or a cold basement like mine. But you need to make sure it isn’t too cold, as you don’t want produce to freeze.
If temperatures drop below freezing during the coldest part of winter, you have a couple of options: you can carry your buckets of produce to a mudroom or unheated pantry for a few weeks, or you can add heat.
In an earlier version I used a drop light with a 75-watt incandescent bulb to provide heat in my storage bin. I kept an indoor-outdoor remote sensor in it that I could read upstairs, and plugged in the drop light when temperatures inside the bin dropped to 35 degrees.
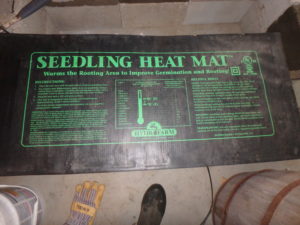
A seedling heat mat can provide heat if needed
Another alternative, and probably a better one, is to install a heat mat. I have one that is designed for helping seeds to germinate by providing a gentle bottom heat. Most heat mats are small, just big enough for one flat, but I have one is 48 inches by 21 inches and uses 107 watts of energy. It should provide plenty of heat for the coldest of times. These are available at garden centers or from Gardeners Supply Company (www.gardeners.com) on-line.
Don’t set up a cold storage bin on a dirt floor. The mice will dig under the fortifying cement block wall, and get to your potatoes and carrots. Build it on a smooth cement floor. You can build any size you want, but I made mine 3 blocks long (4 in the front) and 2 blocks wide. And mine is 2 courses of blocks high, so I used a total of 22 blocks. It is big enough to accommodate six 5-gallon pails, but of course you can make a smaller one.
Root crops store best with high humidity. Winter air in New England is very dry, so I put an inch or two of moist sand in the bottom of each bucket. I do not use plastic lids on the buckets because the vegetables are living organisms that breathe slightly. They need air circulation, too, to keep mildew at bay.
For a lid to the storage bin, you can use plywood. Three quarter-inch plywood would be best, as it is least likely to warp. But five-eighths or even half inch will work. I recommend placing a few heavy objects or extra blocks on the outsides of the plywood to weight it down and minimize warping. Mice can get in through the smallest imaginable spaces.
Bernice Johnson of Cornish Flat, may she rest in peace, once told me a funny story about an elderly and mentally impaired neighbor who grew a lot of potatoes. He had a basement that was full of mice and rats. He stored his potatoes in a pile on the dirt floor and placated the rodents by going to town once a week and buying as many packages of week-old donuts as he could. He’d stand at the top of the stairs and then throw down donuts to feed them, making them promise to leave his potatoes alone. And it worked, he claimed!
Even in a dark, cool storage bin, potatoes somehow know when spring arrives. So I try to finish up eating – or sharing – most of my potatoes by the end of March. But I will save some until June so that I can plant them and start next year’s crop with them. I once went 20 years without buying potatoes, though that meant I had none during the early summer months. When my first new potatoes were ready to eat, I felt like a king at a royal banquet.
You may reach Henry at PO Box 364, Cornish Flat, NH 03746. Please include a SASE if you wish a reply by mail. Better yet, e-mail him at henry.homeyer@comcast.net. You may read his blog at https://dailyuv.com/gardeningguy.
Starting Seedlings Indoors
Posted on Wednesday, February 29, 2012 · Leave a Comment
Before we launch into this week’s article…
Gardening Classes with Henry
Lebanon College: Gardening: A Practical Workshop. Garden writer Henry Homeyer will teach you the basics of organic vegetable and flower gardening. From garden design to seed-starting , planting, watering, weeding, mulching, and harvesting, this course will give each student practical knowledge of gardening. Tuesday nights from 6:30-8:30 for 5 weeks, April 3-May 2.Contact Lebanon College to reserve a spot for this5-part workshop www.lebanoncollege.edu or call 603-448-2445.
AVA Gallery, Lebanon. Henry will teach 3 classes at AVA Gallery this spring. You may sign up for one or all of these workshops:
Sculpting the Living Landscape: Starting Flowers from Seed
April 9; Monday, 6:30–8:30pm; One 2-hour class
Sculpting the Living Landscape: Perfect Perennials for the Upper Valley Garden
April 23; Monday, 6:30–8:30pm; One 2-hour class
Sculpting the Living Landscape: Organic Techniques for Enriching Soil and Managing Pests
May 7; Monday, 6:30–8:30pm; One 2-hour class
For more information go to www.avagallery.org or call 603-448-3117.
Starting Seedlings Indoors
As winter morphs into spring, I get antsy. I want to start growing things. Even though it is still too early for starting most things by seed, it is the right time to plant artichokes, onions, peppers and leeks indoors. Tomatoes? Not until April. Squash? Not until May.
Whatever and whenever you start, there are several variables that need to be controlled: light level, moisture, available fertilizer and temperature. Pay attention to these factors and you will do well. The first thing I do each year is get out my lights. Starting seedlings on windowsills really doesn’t work for most things. Little seedlings get tall and leggy, reaching for light if all they get is a few hours of sunshine in a window.

6-Packs and covers
My lights were an investment, but have paid for themselves many times over the years. I start 200-300 seedlings each year and seeds are much cheaper than seedlings bought in 6-packs at the nursery. And I often start 20 kinds of tomatoes and half a dozen types of hot peppers – most of which I would never find for sale.
This year I have upgraded my lights. The old T-12 (fat style) fluorescent tubes lose their potency over time, and are less efficient than the modern, thinner T-8 tubes. And the T-12 lights are being phased out due to federal energy regulations. So if you have old lights, think about upgrading. LED lights are also available, and while considerably more expensive than fluorescents, they are more energy efficient. I got some from Sunshine Systems (www.sunshine-systems.com or 866-576-5868).
If you don’t want to invest in a plant stand, a card table will do if you’re not starting too many plants. Still, I like my stand because it will hold 2 flats of plants on each shelf, and has 3 shelves – that’s enough for about 200 seedlings. Gardener’s Supply (www.gardeners.com or 888-833-1412) has some nice plant stands, but they are not cheap. Try your local garden center, too, or think about making your own. If buying, look for a stand that allows you to raise the lights as plants grow – 6 inches above the plants is ideal. One last thing: only run your lights 14 hours a day. They need their beauty rest, too.
When seeds first germinate they are very sensitive to drying out, so I like the clear plastic covers that are sold to fit over flats. They hold the moisture like little greenhouses. If you use them, plant things that germinate at the same rate in any given flat – germination times can vary from 3 to 18 days, depending on the plant species. Remove the covers as soon as plants touch them.
Don’t keep your seedlings soggy. Let the potting mix dry out before watering. You may need to water lightly every day as plants get bigger, however.
 If you buy potting soil or seed starting mix, it is mostly peat moss, which has little nutrition to offer a plant. It is used for its ability to hold moisture. I suggest mixing it 50-50 with compost – either your own homemade stuff or the kind that comes in a bag.
Even with compost added to the mix, as your plants get bigger, you will need to offer some plant food. I don’t recommend using the chemical versions. My plants, once in the garden, will have to grow without chemical fertilizer, so I don’t want to give them any now. I believe that my seedling’s root systems will be more vigorous if they are not given lots of soluble chemical fertilizer.
The options for natural fertilizers are many. You can buy fish or seaweed fertilizers such as Neptune’s Harvest. Some fish fertilizers (made as emulsions) have an odor that may offend the nostrils of sensitive people. Neptune’s Harvest claims theirs is not stinky due to their special hydrolyzing process. Mega Green is another brand of fish fertilizer made by hydrolysis; it combats odor with natural mint essences, too.

Heat mat for seedlings
Temperature is a key factor, too. I have electric heat mats that I place under my flats – bottom heat helps germination. These mats are sold at garden centers and may seem expensive, but if you grow peppers, for example, they really help. Once seedlings are up and growing I remove the mats– too much heat will push growth too fast (though sometimes I keep my peppers on them longer – they love heat).
I like 65-70 degrees during the day and 10 degrees cooler at night. A spare bedroom is a good place to grow things – you may be able to regulate the temperature by opening a window or turning off the radiator.
Finally, I like to move tomato and pepper seedlings into 2 or 3 inch pots once they are 4-6 weeks along. This allows the plants to have bigger root systems and minimizes root crowding. Our seasons can be cut short by fall frosts, so I like to give my plants any advantage I can.
You may reach Henry Homeyer at henry.homeyer@comcast.net
Making Houseplants Happy In Winter
Posted on Wednesday, October 26, 2011 · Leave a Comment
Making Houseplants Happy in Winter
I’m sure you’ve had the same problem I do now: aphids on your houseplants. We’ve had them outside all summer, and they never showed signs of any aphids. But bring them inside and we have those little bugs sucking their juices out (because there are no good bugs inside eating those pesky aphids). Aphids are less than a quarter of an inch long, often clear or light brown, and leave stickiness all over the leaves. What’s a person to do?
First, you should wash the plants before they move indoors. I put them on the lawn and spray them with a vigorous stream of water from the hose. Not enough to rip leaves, but a good strong spray. It is important to get both sides of the leaves washed, the stems, and the soil surface. That’s right, turn the plant on its side and spray the soil to wash off eggs or aphids lurking there.

Inspect Houseplants Carefully
If you have already brought in your plants, inspect them daily for signs of aphids. I know the plants that, year after year, are most susceptible to aphids. I keep them in isolation, even if I have washed them off. I love my potted Impatiens that I have on the north-facing deck all summer, and want to keep them over from one year to the next – but I know I will have aphids on them. And someone gave me a potted Meyer lemon tree – in part because it is a magnet for aphids.
Another technique to minimize aphids only works on things like rosemary, which is somewhat frost hardy: leave them outside to go through a few frosts before bringing them in. That will allow Mother Nature to kill off the aphids for you. But be careful – it’s easy to kill off plants if it gets too cold.
Then there is the “let-it-go-dormant” approach to tender plants. Many houseplants were originally from Africa or other tropical places. If they go dormant in their native country during the dry season, you can probably let them go dormant for you here. I have let my oxalis and ginger plants get completely dry for months at a time, and they come back to life when watered in the spring. They should not be kept in a warm room, however, so try to keep them at about 50 degrees, and preferably in a dark room – or in a brown paper bag.
Plants that have been outside all summer get cranky when brought inside, but you can help their attitude by providing the right amount of light and water. Too much water is a common cause of root rot and plant death or decline. Outdoors there are nice breezes to evaporate excess water in the soil, summer temperatures are warmer, and sunshine is stronger. So water only when the soil is dry to the touch an inch down. If you know your plants and pots, you can tell if water is needed just by hefting the pot.
If you have city water, it has chlorine in it, and many plants do not like chlorine. But that’s easy to fix: plan ahead. Fill a pitcher of water in the evening, and most of the chlorine will evaporate by the next night. Or you can use brook water, rain water – or heck, Perrier, if you want!
Light is another issue. The glass of your windows absorbs a lot of energy of the sun – it’s why you cannot get a tan indoors, even lying in the sun room all day with the Sunday New York Times. Sun-loving plants are the hardest to please. This year I have set up some LED lights over three of my large plants. These lights use much less energy than fluorescent lamps (28 watts to get the equivalent of 250 watts of standard incandescent light), and are sold specifically for growing plants. Mine are from Sunshine Systems (www.sunshine-systems.com or 866-576-586), their Glow Panel 45. Each panel has 112 little red or blue LED lights. I put mine on a timer so they will turn on and off automatically. They are not inexpensive, but should last for 50,000 hours. I shall see this year if that supplemental light will make a big difference to my plants.
South facing windows are best for sun-loving plants. Get your plants as close to the glass as you can, I put several pots in a big window in a rubber boot tray that I got from Gardeners Supply Company (www.gardeners.com or 888-833-1412). The tray keeps spills from getting onto the floor.
Humidity is a problem for some plants in winter, especially orchids. You can increase the moisture around your plant by putting the pot in a saucer filled with gravel. Keep water in the saucer and it will evaporate, while avoiding the problem of roots sitting in standing water, which is almost universally bad for plants.
Knowing your houseplants and what their needs are is half the battle of having nice ones. The best book I have encountered on caring for houseplants, and the specifics on individual plants is no longer in print, but is readily available in used bookstores. It’s called Making Things Grow: A Practical Guide for the Indoor Gardener by Thalassa Cruso.
If do get aphids, even after washing them outdoors, spray them with Safer Soap, a product that is safe and easy to use – or or take them with you the next time you shower!
Henry’s new book is Organic Gardening (not just) in the Northeast: A Hands-On, Month-by-Month Guide. His Web site is www.Gardening-guy.com.
The Value of Gardening
Posted on Wednesday, October 19, 2011 · Leave a Comment
The Value of Gardening
There is, I believe, great value in gardening. I am healthier for the exercise I get gardening and for the food from it. I believe that there is a spiritual component too. I can feel at one with the world when I garden, and a connection to the generations before and after me. I can feel my grandfather (some of whose tools I still use) with me in the garden at times. And in this day and age, it makes financial sense to have a garden.
I recently chatted with Alice Elliott of Richmond, Maine. Alice is by nature a record keeper, and for the past two years she has counted, weighed and measured the produce from her garden. Her garden is not large – just a space about 20 feet by 25 feet – but in 2010 she harvested 642 pounds of veggies, with a value of $2,102.48. Each week she gets the average market price for organic vegetables from MOFGA (the Maine Organic Farmers and Gardeners Association) and, using the state average price, figures out how much her garden has earned for her.

Foley Food Mill
Alice also keeps track of her expenses – seeds, potting soil, row covers, fertilizer and mulch. She has, by her own admission, “A seed habit. I can’t pass by a pretty seed packet,” she told me. She likes to try new kinds of tomatoes every year – and grows a dozen different varieties. Last year she spent $317 dollars – including an amazing $176 in seeds. One could have a much bigger garden and spend just a fraction of her seeds costs – especially if you save seeds from open pollinated plants like tomatoes and beans.
So what does Alice do with all the veggies she grows? She and her husband eat from the garden every day of the year – which means that she preserves, stores or freezes vegetables now for use when the garden no longer is producing. She has a blog that shares her garden successes (and failures) and has recipes, photos of the garden, cost/benefit analysis of the garden and more. Go to www.henbogle.com to see her garden.
Here is an interesting recipe from Alice’s blog (see her “Yankee Pantry” dropdown for others), a good one for this time of year when our gardens are winding down for the summer, but sage and other herbs are still plentiful:
Sage Butter Sauce with Parmesan
- 4 Tablespoons butter
- 20 fresh sage leaves
- 4 Tablespoons stock, broth or wine
- 5 Tablespoons grated Parmesan cheese
- Fettuccine or linguine for 4, cooked
Over medium low heat, melt butter then add sage leaves and cook until edges curl and butter is dark amber (5-6 minutes). Drain crisped sage on paper towels. Add stock and bring to a boil. Remove from heat and stir in parmesan. Serve over pasta, fresh sautéed vegetables, or roasted butternut squash; garnish with crumbled sage leaves.
One of the most important steps you can take when preparing food for winter use is to develop systems that will save you time. Alice and I agreed that doing large batches of food at once is a time saver. Buy a big blanching pot instead of a small one if you want to freeze large quantities of kale, for example. (Kale and many other veggies need to be blanched by immersing briefly in boiling water before freezing).
Alice makes lots of tomato sauce, and starts by roasting the tomatoes in a 400 degree oven for 30-50 minutes. That reduces the quantity of liquid and imparts a nice flavor, she said. She just cuts tomatoes into 2-4 chunks, and cooks them in Pyrex pans (oiled to keep the tomatoes from getting glued to the pans) until the skins turn dark and much of the moisture is gone. She then runs them through a tomato press to get rid of the seeds and skins. I found the one she uses at Gardeners Supply for about $70. I have an ancient Foley Food Mill, which does the same thing. Finally she freezes or cans the sauce – she uses a pressure cooker for canning to save time and reduce the chance of botulism. She suggests reading about botulism – a horrible illness that can be fatal – at the Web site for the National Center for Home Food Preservation at http://www.uga.edu/nchfp/how/can_home.html.
A tip I shared with Alice is that I use my grandmother’s wooden chopping board when cutting up tomatoes. It is long enough to span one of the two basins of my sink, allowing me to chop without making a mess. With a flick of the wrist I can push juice, seeds or waste into the basin of the sink, reducing mess. When making sauce, I core the tomatoes and squeeze out most of the seeds and juice before tossing them in the Cuisinart for pureeing. And I do that all right at the sink.
I’ll never be as organized as Alice. I will never count, weigh and calculate the value of the food I get from my garden, this I know. But there is great satisfaction in preparing dinner –as I did last night – using all my own ingredients. Now if I could just grow my own salt and pepper!
Henry’s new book is Organic Gardening (not just) in the Northeast: A Hands-On, Month-by-Month Guide. His Web site is www.Gardening-guy.com.
Filed under Article · Tagged with butter sauce, garden record keeping, gardener's supply, henbogle.com, maine organic farmers association, mofa, national center for food preservation, parmesan, sage, value of gardening, winter food storage, yankee pantry


 Click Here to buy from Cobrahead


