-

Now available for $24.95 including shipping. -

Now available for $21.00 including postage. Vendors I Like
 Click Here to buy from Cobrahead
Planting a Tree
I fell in love this summer. With a tree, that is. The Northern catalpa (Catalpa speciosa) is a fast-growing tree that blooms beautifully in late June in my part of the world. The flowers, about 2 inches long and wide, are white with 2 lobes and purple or lavender stripes inside. They are deliciously fragrant. I got a 10-foot tall specimen at E.C. Brown Nursery in Thetford, Vermont.
It is very important to find the “trunk flare” before planting a tree. That is the lower part of the trunk that flares out above ground in the trees planted by Mother Nature. The flare is waterproof, but if buried in soil or mulch it will rot and the important cambium layer can be damaged, injuring the tree. When young trees are put in pots the flare is often covered by 3 inches of soil or more.
If not corrected, trees with buried trunk flare often die in 6 to 10 years because their trunks are essentially girdled by the rot. If you have a tree with a trunk that doesn’t flare at ground level, pull back some soil until you can see the trunk flaring out. Cut away the little roots you will encounter.
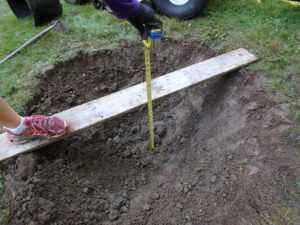
The hole should be wide not deep
It’s important to dig the hole for a tree the proper depth. You want to place the root ball on unexcavated earth so that it will not settle into a lower position that will fill in with soil or mulch, covering the trunk flare. The hole should be wide, not deep. I uncovered the trunk flare in my catalpa, which was just an inch or so below the soil line in the pot. There were plenty of small roots in that inch of soil I removed, and I just cut them away.
I also looked for roots encircling the root ball because it’s important to cut those back, and to tease out roots from the root ball before planting. I used my fingers to loosen roots at the edge of the root mass after removing the tree from its plastic pot.
Next, I measured the root ball. It was 16 inches wide and 12 inches deep. I dug a hole 3 times the width, and just an inch or two deeper than the depth of the root ball. I dug the hole with sloping sides down to the bottom. I used a hoe to scrape the bottom of the hole to make it flat.
As I dug, I placed the soil from the hole in wheelbarrows. One wheelbarrow was for topsoil, another for the poor-quality subsoil I encountered at the bottom of the hole. I was fortunate to find just a thin layer of subsoil – heavy clay, then sand beneath that. The sand will ensure good drainage.
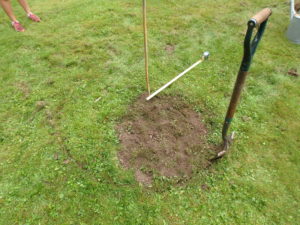
Dig a hole 3x as wide as the pot the tree came in
If you have only a shallow layer of decent topsoil, you may want to replace some of the subsoil you encounter with topsoil that you purchase in bags. But don’t replace all your soil, even if it’s not of good quality. Mix topsoil 50-50 with the crummy soil only if most of the soil is of poor quality.
A teacher at Vermont Technical College once told me to imagine a tree as a wine glass sitting on a dinner plate. The wine glass is the tree we see, the dinner plate is the root system. So the tree needs to spread its roots far and wide. Creating a planting hole full of compost and rich topsoil will encourage the roots to stay in the original hole instead of spreading out. That’s known as the “bathtub effect.”
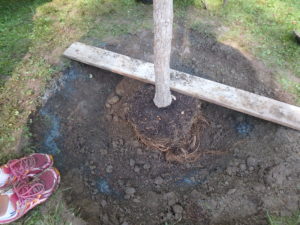
Make sure the tree is straight in all directions
To dig the hole the proper depth, I use a board (or a rake handle) to span the hole, measuring from time to time as I approached the proper depth. I dug down 14 inches for my 12 inch rootball, and in the bottom of the hole I added some of the better topsoil I’d dug up. I packed that down so it wouldn’t settle later.
Mother Nature does not use fertilizer when she plants trees. I don’t either. Fertilizers contain nitrogen, which stimulates fast green growth. But I want my tree to get established, spread its roots, and grow at a moderate rate. But I did add 2 mineral products that I bought in bags.
First, I added trace minerals in a mix sold as Azomite. It is a mix of some 70 minerals from volcanic and sea sources, mined and packaged in Utah. I have found it to add vigor and resistance to stress in plantings. The other product is called green sand. It is mined from a formerly undersea deposit in New Jersey. It is a good source of potassium and trace minerals. Potassium helps build strong cell walls.
I also paid attention to the north-south orientation of the tree when planting. Trees develop thicker bark on their south sides because they get more sun there. If a tree is planted with the north side from the nursery facing south at your house, the bark can develop sun scald in winter, crack, and damage the tree. Trees generally have more branches on the south side, so I planted the bushier side facing south.
Watering trees is important the first year, and even in dry times during the second year. I made a ring of soil around the tree to keep water from running away. And an inch or two of ground bark mulch will help to keep the soil from drying out.
Planting trees is not rocket science. Take time, do it well, and your tree will please you for the rest of your life.
Read Henry’s blog posts at https://dailyuv.com/
Shady Ladies: Hostas and Other Wonderful Shade Plants
It took me a long time to appreciate hostas. When I was a young gardener, I wanted bright flowers with lots of pizazz. Roses. Daffodils. Peonies. But over time I have come to appreciate the subtle colors of green, the soothing textures, the dependable nature of hostas. Let’s look at a few.
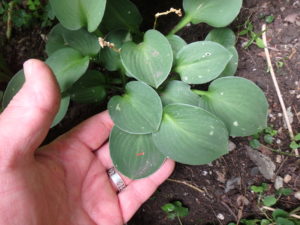
Blue Mouse Ears
I took a walk around my gardens and counted about a dozen different kinds of hostas. The smallest, ‘Blue Mouse Ears’ has little leaves just 2 inches long. My largest hosta is probably Hosta montana, ‘Stephen Parish’ from Cider Hill Gardens in Windsor, VT (www.ciderhillgardens.com). It stands 3 feet tall in a clump 5 wide – even though I divided it in half 3 years ago. I have to admit I don’t know the names of many of my hostas, having gotten divisions from friends, or just plain lost the tags.
Some basics: hostas do well in shade and thrive in rich, dark well-drained soil that never dries out. That’s a tough demand. But they will grow and survive even in shade with dry, poor soil. They just won’t get as big or look as impressive.
I have my biggest hosta growing in 2 different locations. The first is the ideal soil described above, the second place is in shade with dry soil and plenty of tree roots competing. The difference is remarkable. The plants in ideal soil are a full foot taller, and much more vigorous. One might even think they are different species.
I shudder when I drive past a house with hostas growing in full sun. It’s like tying up your dog in full sun, in August, with no water bowl. Inhumane. The hosta leaves bleach out, develop brown edges and practically scream at their owners. Some morning sun is fine for many hostas, but afternoon sun is brutal for most. That said, it’s almost impossible to kill a hosta, so they survive.
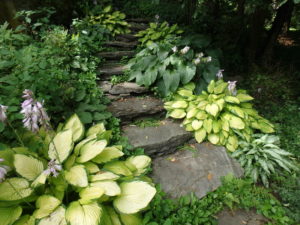
Henry’s stone steps with hostas
Most hostas are hardy to Zone 3 (minus 40 in winter) or Zone 4 (minus 30). So unless you live in the arctic, you can grow hostas. Having selected a nice spot with gentle sun, enrich the soil with plenty of compost and a little organic bagged fertilizer mixed in. Always water right after planting, and once a week or so until the plant is well established.
Problems? Slugs love hostas, and so do deer. When the leaves come up in the spring, rolled up like cigars, squirrels and chipmunks will eat them like asparagus. I once spayed liquid fish fertilizer on those early rodent treats, and was rewarded with the sounds of a squirrel screaming after taking just one bite! I was working in a public garden, and got a serious glare from a patron who thought I’d poisoned the poor thing.
As to slugs, some years are worse than others. There are chemical slug remedies, but I’m not sure even the so called organic one, which uses iron phosphate, is safe. According to one report I read, the “inert ingredients” which are not listed, may actually be toxic to the slugs – and us. I say pick off the slugs and put them in soapy water, or let them munch your hostas. Saucers of beer are attractive to slugs, too, and will drown them. But that might be too good a demise for slugs.
I recently went to see Gary and Sarah Milek of Cider Hill Gardens in Windsor, VT because I have gotten many of my favorite hostas from them, and they have splendid display gardens. Here are a few of the hostas I liked:
Gold Regal. Large leaves, all of a yellow-green.
Gold Standard. Large yellow-gold leaves with green edges.
Sagea. Large, dark green leaves with white or yellow edges
Brother Stephan. Yellow/chartreuse leaves with dark green edges
Curly Fries. This name is worthy of a giggle. The leaves are very narrow and long, green and white, with scalloped edges.
Empress Wu. Nice rich green leaves. Gary says it is the largest of all hosta plants, sometimes standing 5 feet tall!
Hosta leaves will shade out most weeds, so they can be used as ground covers. Jewell weed will grow up through hostas, however. I like to plant daffodils between clumps of hostas as I don’t need to cut back the daffodil leaves – the hostas will obscure them by the time they are getting old.
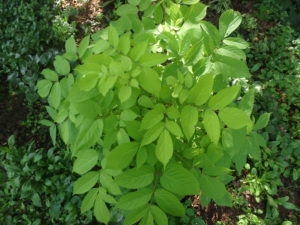
Spikenard Sun King looks great in shade
While at Cider Hill I also got a chartreuse spikenard (Aralia cordata) that really looks great in shade. It’s a variety called ‘Sun King’ and I also got one last year. This year it is a nice large plant that does not attract slugs, and has maintained its color all summer.
I also got a nice creeping sedge for a shady groundcover while at Cider Hill. It has leaves 8 to 12 inches long, green with white edges. It’s a variegated Carex. I’m hoping it will out-compete the spotted deadnettle (Lamium spp.) that is currently taking over empty places in my shade garden.
So don’t ignore those shady places. Hostas and plenty of other plants will grow just fine there.
Reach Henry by e-mail at henry.homeyer@comcast.net or by writing him at P.O. Box 364, Cornish Flat, NH 03746. Please include a SASE if you wish a mailed response. See his multi-weekly short blogs about gardening at https://dailyuv.com/gardeningg
Getting Ready for Winter
Here it is, early August and I’ve just picked my first tomatoes, but I’m already thinking about winter. No, I don’t anticipate frost until mid-October or later, but I depend on my garden to feed me much of the year. So I start early getting food processed for storage. I freeze, dehydrate, can and store veggies for winter. Let’s look at tricks you can use to save you time and labor as you save your harvest.
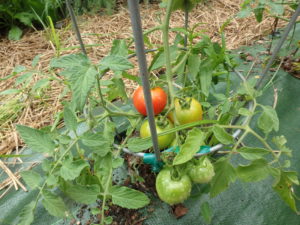
Tomatoes are ripening
Tomatoes are key to almost any soup, stew or stir fry I make, and I don’t want to be buying tomatoes in February, or to depend on cans of sauce processed in factories in California. I want to cook with tomatoes that I grew myself, or that are from a local farmer I trust.
If you grow just a few tomato plants for sandwiches and salads, or even if you planted half a dozen ‘Romas’ for making some sauce, you can have a wealth of tomatoes for freezing if you talk to your local farmer. Most sell “field grade” or “canners” by the bushel at very reasonable prices. They are not as pretty as top grade fruits, but I’ve bought a bushel – 50 pounds –in years when my own crop succumbed early to blight.
Many farmers now grow tomatoes in hoop houses which means they get tomatoes earlier than we do, and they largely avoid blight. So there are times when farmers are practically swimming in tomatoes. That’s when to buy them.
What can you do with 50 pounds of tomatoes? I would freeze most of them. Wash and dry the fruit, then fit them into freezer-grade plastic bags, not storage bags. Freezer-grade bags cost just pennies more per bag, but are much better for the job.
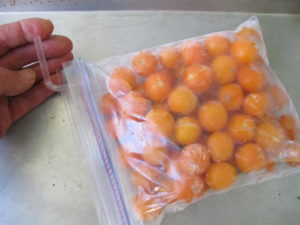
A straw used to remove air from a bag of cherry tomatoes
Suck out any excess air from the bags with a common drinking straw. Just close the bag 99% of the way, suck out the air and snap it closed with 2 fingers – just as you pull out the straw.
Later, to get them ready for use, I run each frozen tomato under hot water while rubbing it gently so that the skin comes right off. After I set it aside for 5 minutes it softens enough for me to cut out the stem attachment point. Then I quarter it, chop it, and put it in the pan.
If you like to make homemade sauce but hate the canning process, just freeze it. Cook up your tomatoes with fresh herbs and onions, and let it cool. Then pack in freezer bags or plastic containers.
I’ve had both front-opening freezers and chest freezers, and I recommend the front-opening ones. It is easy to lose track of what is buried in the bottom of the chest-type freezers. But you’ll find the last bag of kale if it’s on a shelf where you can easily see it. And after a year or two in a freezer, food loses its flavor and often becomes unappealing.
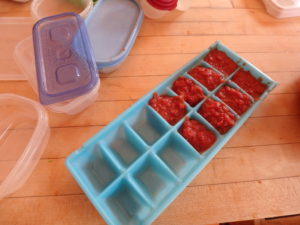
Cube trays
I also freeze ice cube trays filled with my homemade tomato paste. I use my less-perfect tomatoes for paste, which I freeze in ice cube trays. To make paste, I wash tomatoes, and then core them with a paring knife. I squeeze out the seeds and extra juice, which makes for less boiling time and fewer seeds. Then I quarter them and puree them, skins and all, in my food processor.
I cook the puree at low heat in a big enameled cast iron pot (which helps prevent scorching on the bottom of the pot). I know it’s done when I can literally stand up a soupspoon in the paste – after 3 hours or more. I let it cool overnight (or 8 hours) with the cover off the pot, allowing a little more moisture to evaporate. Then I spoon the paste into the ice cubes trays. After they are frozen, I remove the cubes and put them in freezer bags.
Most years I dehydrate several bags of “sun-dried tomatoes”. Except they aren’t sun-dried. They are dried in an electric food dryer. Mostly I dry cherry tomatoes, a variety called ‘Sun Gold’. I cut them in half and place them face up on the screens. It takes from 12 to 24 hours to do a batch, depending on which kind of machine you use, and how juicy your tomatoes are.
I have 2 brands of dryers, a NESCO American Harvester and an Excalibur. The Excalibur uses less electricity (660 watts per hour vs. 1,000 watts per hour) and is more efficient because the flow of hot air goes across the drying screens, not from top to bottom as the NESCO dryer does. But it costs roughly 3 times as much, depending on the model. Both brands are very good.
I also use my dehydrators to dry apples, pears, hot peppers and more. I especially like drying hot peppers because I can get them brittle, and then grind them up in my coffee grinder. That allows me to just add a little in a dish – or a lot if I’m not having company.
So don’t wait until fall. Start putting up food for winter like the proverbial squirrel. Winter is just around the corner.
Henry is the author of 4 gardening books. His web site is www.Gardening-Guy.com. See extra photos for his newspaper articles at https://dailyuv.com/