-

Now available for $24.95 including shipping. -

Now available for $21.00 including postage. Vendors I Like
 Click Here to buy from Cobrahead
A Garden Year in Review
I had a great gardening year in 2016. Of course, I’m a mad-dog gardener, so that means I was born optimistic and wired to remember success, not failure. So I suppose I had some of both. But the weather was largely sunny and I got a great yield from most of my vegetables, especially my precious tomatoes. I have enough food put away that if all my newspapers fired me tomorrow, I could probably survive just eating out of my freezers and cold cellar all winter.
Tomatoes are bothered by early blight and late blight. Late blight is the bad one, the one with spores that float in on the wind, killing everything and turning fruit into mush. When it comes early, we don’t get tomatoes, but I dodged it this year. I did have some early blight, but less than most years, probably because of the dry weather.
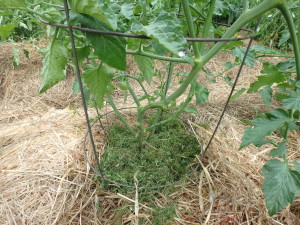
Mulched Tomato Plant
I also mulched my tomatoes with hay early on, and cut off any diseased branches once or twice a week, reducing the spread of late blight. My Sun Gold cherry tomatoes produced hundreds of tomatoes each, I dehydrated them using my Excalibur brand dehydrator, and will enjoy them in soups and stews all winter.
I had great success with the one tomato plant in a raised bed made by Gardeners Supply, something they call a “VegTrug”. The tomato I planted in it was virtually disease free, and what’s more, the green tomatoes I picked from it before frost ripened perfectly and did not rot. I ate a few good tomatoes each week until Thanksgiving. The tomato was one called, “Summer Sunrise” and I got the seeds from Hudson Valley Seed Library. I shall grow it again, for sure. It had good flavor, right up to the end.
Kale is always a winner in the garden. It is easy to grow and this year I used a lot of it in green smoothies made with fresh mint, lettuce, a banana, blueberries, some juice and/or water, fresh ginger and half a lime. I’m still picking kale for smoothies, even though the greens are frozen when I pick them.
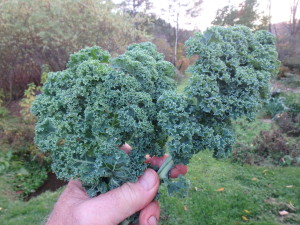
Winterbor Kale
I grew 4 kinds of kale this year as I wanted to see if I liked anything as well as Winterbor and Ripbor, the two curly kale varieties I usually grow. No. Next year I will just grow one or the other of those two – they are tasty and so long-lasting in the garden. They are easy to store in the freezer – while keeping their character and flavor.
I grew 2 non-heading broccoli relatives this year, Happy Rich from Johnny’s Selected Seeds, and Piricicaba from Hudson Valley Seed Library. Both produce earlier than broccoli and continue-producing little shoots well past frost. They produced so much food that I will plant fewer, just 2 or 3 plants of each, not 6.
My potato harvest was ho-hum this year, but my grandkids had great production in their little 4-foot by 4-foot raised beds on my lawn. The difference? I tried to squeeze in too many plants in my rows, crowding them. The kids only planted 2 seed potatoes each, well apart. Even though they planted later than I did, their spuds were bigger.
I had no potato beetles at all this year, even though I looked for them every day for a while. I plant my potatoes in June, and believe (without real proof) that late planting helps to avoid the beetles.
New this year: I planted a second crop of potatoes in August from some seed potatoes that had been languishing in my cool dark cellar. I planted them in my garlic bed, after harvest. A third of those late-planted potatoes did not grow, but those that did grow produced full-sized potatoes by October.
I planted late lettuce, too. I got some 3-inch lettuce starts from a friend in early September, and planted them 6 inches apart. These did very well, and in November I moved my Gardeners Supply cold frame over the plants. They were good though November. They were helped by a layer of Reemay or row-cover over the leaves inside the cold frame.
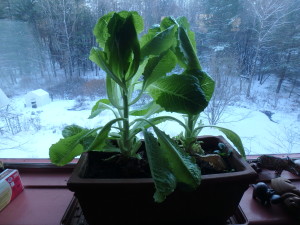
Lettuce Indoors
New this year: In mid-October I dug two nice lettuce plants and moved them into an unglazed clay planter about 6- by 12-inches and 6-inches deep. I placed a layer of fluffy compost in the bottom as planting material, and filled in around the plants with pure compost. Then I moved them into the house, sitting in an east-facing window. Great success! I have eaten 2 or 3 leaves almost every day since sometime in November. Fresh greens for my sandwich at lunch. I had to water every other day. I will finish them off by New Years.
I grew flint corn this year for the first time ever. Flint corn is dried and ground to make corn flour or meal. The corn plants were huge, but the ears were relatively small. And while I was drying them some mice got in with the ears, so I didn’t want to use them. So I am feeding the corn to the blue jays and squirrels. I used some of the stalks for Halloween decorations and gave some stalks away.
The raccoons ate all my sweet corn but for half a dozen ears. Oh well. I am enjoying frozen tomatoes, summer squash and kale. I have plenty of winter squash, garlic and onions stored in a cool dry location. And root crops galore in an old fridge in the basement. It was a great gardening year, despite a few setbacks that I had already almost forgotten about.
Read my blog posts at https://dailyuv.com/
Nine Root Crop Stew
Rutabagas? Kohlrabi? Celeriac? What does one do with these lesser known root crops? I make stew. You just need to get past the idea that they are food for “old folks” or “poor people”. There were good reasons that these vegetables – and other root crops – were the backbone of the diet in tough times. These vegetables are easy to grow, store well, and are very tasty.

Celeriac With Carrots Leeks and Brussels Sprouts
I recently made a pot of winter stew that used the three veggies mentioned above, along with potatoes, onions, parsnips, garlic, leeks and carrots. Oh my! It was delicious. But first, let’s look at what all these root crops need in order to produce well and fill your root cellar or spare fridge.
All root crops need soil that is essentially rock-free. They need to be able to grow to size without bumping into a boulder, or even a rock the size of a golf ball. So if you have rocky soil, you need to work on it, come spring.
I find a potato fork is good for finding stones. This is a tool similar to a garden fork or spading fork, but the handle is at a right angle to the metal tines. I have one that has been in my family for at least 50 years.
To get stones out of the soil, I sink the tool into the soil and pull it toward me. It acts like a big rake, loosening the soil and dragging stones to the surface. I have seen smaller ones in hardware stores, but the kind I like has tines at least 8-inches long.
I have bought the modern equivalent of my potato fork from a tool company, Howland Tools (www.farmandgardentools.com), that imports them from an Italian maker, Falci. They sell two varieties, the 4-tine hook fork and the 4-tine hook weeding fork. I have the first, but not the second, which has broader tines, like a standard fork. At about $50 each, these tools are well worth the price. Good steel, good beech handles.
What else do root crops need? Most need fluffy, well-drained soil that stays moderately moist all summer. Their requirements vary for the three main minerals, nitrogen (N), phosphorus (P), and potassium (K). Click this link for a summary of what each requires.

Kohlrabi Gigante
What does all that tell you? Root crops are fairly moderate in their needs. Potatoes require yearly addition of a balanced fertilizer. Only garlic does best with fairly dry soil, so planting it in raised beds and adding some extra compost to the soil will help. Add some blood meal to the soil for parsnips as it will provide plenty of nitrogen (13%) but little P or K.
Now the stew, (click here for the recipe) which can be vegetarian or not, depending on your preference. I’m an omnivore, and find that some beef adds flavor and depth to the stew, but you can omit it if you prefer. I use 1 to 2 cups of each of the vegetables, according to my supply and mood.
I start by selecting the vegetables and getting off all soil. Then I peel any that need peeling (potatoes, for example, don’t have to be peeled –the skins may add extra color and vitamins). In a large cast iron enameled pot I start by browning the onions and leeks in olive oil on low heat while I cut up a pound of stew beef into tiny cubes – half inch or so. I add them to the pot and add a little more oil, as the onions tend to suck up the oil fast.
When the meat is browned, I add some liquid to prevent the leeks and onions from burning. Two cups of apple cider is my preference, but either water or broth is fine, too. Then I chop up and add to the mix 3 large tomatoes from my freezer- I freeze them whole. I also add 4 ounces or so of tomato paste I made and froze last summer, and a handful or more of dehydrated Sun Gold cherry tomatoes (optional). If you don’t have frozen tomatoes, use a 28 ounce can of diced tomatoes or sauce.
Next? I cut into small cubes the carrots, celeriac, kohlrabi and rutabagas. These can simmer quite a while without getting mushy. Next the garlic goes in the pot, chopped fine, 2 to 3 cloves. Or more, depending on my whim. Potatoes I cut in bigger pieces and boil separately for 5 minutes, then add to the stew near the end. I want them firm, not mushy.
To achieve the perfect juiciness of the stew, add more liquid at this time. For spicing, I add Herbs de Provence, a tasty mixture of rosemary, thyme, basil and other spices I get at my Coop. A tablespoon is about right for me. And most importantly, I add lots of fresh ginger. I peel and grate a piece nearly the size of my thumb. And although I know people who grow ginger in the Northeast, I’ve tried and not had success, so I buy it.
I garden, in part, because I love to eat –and cook. I don’t mind spending an hour making a meal like this stew, because it will feed me for days. Oh, and by the way, you can make this stew and leave out any of the root crops you don’t have except the carrots, potatoes, onions and ginger, which are essential. Bon appetit!
Read Henry’s twice-weekly blogs about gardening, travel and more at https://dailyuv.com/
Indoor Plants for the Holidays
Florists, garden centers and grocery stores are loaded with color right now – plants that are bright, cheery, and hard to kill. They are just what we need in these dark, dreary days of early winter when the sun goes down before 5pm. Christmas cactus and poinsettias are great plants that are affordable and easy. I recommend them highly.

Poinsettias Come in Many Colors
You may think that poinsettias have big red flowers atop handsome green foliage. Wrong! The colorful parts (they now come in white, pink, plum, burgundy, cinnamon and lemon) are actually bracts, or modified leaves. The flowers are actually just pea-sized yellow blossoms in the middle of the bracts.
Poinsettias were introduced here in 1828 by President Andrew Jackson’s ambassador to Mexico, but only became popular holiday flowers in the 1960’s. A grower in California promoted them heavily on TV, giving plants to the likes of Johnny Carson who kept them on his desk during the Tonight Show.
If you buy a poinsettia, start it off right: be sure it is enclosed in a sleeve or a bag on the way home – they hate the cold. But don’t place it near a wood stove or radiator, either. The ideal temperature is 68 to 72 degrees, but my house is rarely that warm, and they do fine with daytime temps in the sixties and night-time temps a little cooler. Anything below 50 degrees is fatal – but we wouldn’t be happy then, either.

Poinsettia Flowers are Just the Center of These Colorful Cracts
Poinsettias do not require direct sunshine. In fact, bright indirect light is best; six hours is all that is required. And don’t over-water them. Root rot results from keeping roots constantly soggy. Water once a week but check the soil first by probing the top inch with your finger. If it feels moist, you can wait. Experts say it is best to water by placing the pot in a saucer or water and letting it soak up for 15 minutes, but I never do that. I water from the top and it works just fine. I often judge dryness by the weight of the pot, too. The heavier it is, the more water is in the pot. Fertilization is not recommended when they are in their bloom cycle.
Although I don’t usually do it, you can keep your poinsettia over the summer and hope to get it to produce colorful bracts next winter. These plants are photoperiodic, which means they are sensitive to daylight length. They need 14 hours of darkness each night in the fall if they are to “bloom”. Even electric lights on in their room can interfere with the coloring-up process, I’ve read.
Christmas cactus often bloom for Christmas, though if you keep them for years they may bloom at other times. Buy one now, and you’re pretty much guaranteed blossoms through the holidays. Properly cared for, a Christmas cactus can be handed down to your kids … and later, their kids.
Like poinsettias, a Christmas cactus needs bright, indirect light and moderate temperatures. Over-watering can be lethal, so if you are starting a new plant from a cutting, add some sand to the potting mix for increased drainage. One part sand to three parts potting mix is about right.
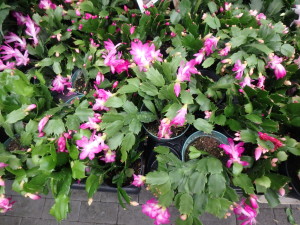
Christmas Cactus
Christmas cacti are not true cacti – they wouldn’t survive in a desert – so you shouldn’t let them get too dry, either. Feel the soil weekly – when the soil is dry an inch below the surface, it’s time to water. If you water too much or too little you will notice flower buds falling off.
A Christmas cactus does best with humidity in the 50 to 60% range. If you have a wood stove, chances are your house is drier than that in the winter. You can remedy the situation by filling a wide saucer with small stones, add water, and placing the potted plant on the stones. As the water evaporates, it adds humidity to the air around the plant.
Aside from these colorful plants, I like to add some greenery around the house in winter. I have a number of foliage plants, but also like to pick some pachysandra outdoors to keep in vases, or to fill out bouquets of flowers I buy.
Pachysandra is a shade-loving vine with year-round glossy leaves. Even with snow on the ground you can pick stems and place them in a vase of water, where they will thrive all winter. The leaves stay glossy and green and will develop good roots in a vase. In the spring I plant them outdoors in shady places as a ground cover. Right now I have a vase full of pachysandra stems with a few twigs of red winterberries, which is quite festive.
Despite my careful attention to my outdoor plants – both vegetables and flowers – I have never paid near as much attention to indoor plants. Perhaps I need a break in winter, when they are needing my care the most. So it is important to me that house plants be relatively undemanding. Poinsettias and Christmas cactus fill the bill.
Read Henry’s twice-weekly blog at https://dailyuv.com/
Winter Pruning
Traditionally farmers pruned their apple trees in late winter, but there is no reason not to do so now. Trees are dormant, and we’ve finished weeding and raking, so most of us should have time to work on our trees. Pick a sunny afternoon and get to work! Later, when the snow is deep, it won’t be so easy to prune.
Start by walking around the tree and looking at it from all angles. One of my goals in pruning is to create living sculpture, a tree with grace and elegance. A cluttered tree is never elegant to my eye. A bird should be able to fly through an apple tree – without danger of injury.
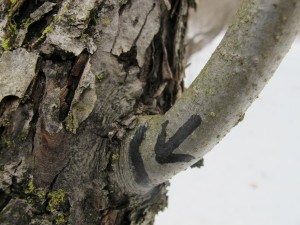
Branch Collar and Line to Show Where to Cut
Hesitant pruners often begin by nibbling away at a tree, taking dozens of small twigs and branches. I’m a bold pruner. I was taught that taking off big branches is better than tentatively snipping away at a tree. You want to open up the interior of the tree so that sunshine can get to every leaf. This creates a healthy tree. Do this by taking out the big branches if they are crowding others. More on that later.
But first, begin by looking for branches that are dead and removing them. They are doing no good for the tree and never will. If you scrape off a little bark, a live branch will show a green layer. Dead branches will only show brown. Cut the dead branch back to where it originates, but leave the branch collar.
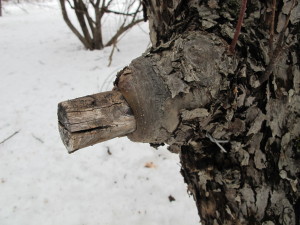
Stub Healing Back t o Branch Collar
The branch collar is a swollen area on the trunk of a tree or a larger branch where a new branch originates. The bark is often wrinkled at the collar. You don’t want to leave a stub when you remove a branch, nor do you want to cut flush to the trunk. Just leave that collar, as that is where the tree heals itself.
Low branches are the bane of many people who mow lawns. So take a look at any trees with lawn underneath, and see if you could remove a couple of low branches and make life easier. Some trees tend to shed lower branches, but most do not. Cut low branches back to the branch collar on the trunk, allowing space for you and your mower to cut the grass with ease.
Often trees, especially wild trees, grow too close to their neighbors. A single root system sometimes sends up 2 to 4 stems in close proximity. Cut out one or more to leave a single trunk. At this time of year I leave first year root suckers – those pencil thin shoots surrounding the base of apple and crabapple trees –and remove them in the spring.
So what else can you remove? Look for branches that are rubbing, crossing or growing parallel to others. Trees really are of very low intelligence. They grow branches that have no chance of growing to their full potential. They run into each other, or crowd others out. Your job is to train them to behave – with a saw! Ask yourself what a branch will be like in 5 years. If it will crowd another branch, remove it – or the other one.

Corona Pruning Saw
Using the appropriate saw is important. Don’t use that rusty old bow saw that you bought 25 years ago when Sammy was a Boy Scout. Go to your local garden center or family-owned hardware store and get a tri-cut pruning saw. These saws are sharp! You can’t sharpen them, but that doesn’t matter. The steel is so tough they will be sharp long after you have stopped pruning.
Get something with a blade a foot long or more so you can cut large branches. Small folding saw are okay for many cuts, but my favorite is a long curved saw made by Corona. It has a 21-inch blade and the big teeth with gaps to remove sawdust and prevent it from clogging up and binding the saw. It’s model RS 7160 and is available from OESCOINC in Conway, MA for about $47; I have the sheath for it, which costs another $35, but really is needed for a saw with teeth that could hurt you when carrying it. It’s my alternative to a chain saw for large branches.
If you are removing a heavy branch, you need to make 3 cuts, not one, so that the branch doesn’t break off while you’re cutting it, causing the bark to rip off, thus damaging the trunk. Make an undercut about a third of the way through the branch a foot or more from the trunk. Then go farther out the branch and lop off the bulk of the branch, reducing its weight. The undercut will stop any tearing of the bark. Finally cut off the stub at the branch collar.
The nice thing about pruning is that there are few serious mistakes to make. Yes, you can “oops!” a branch, but the tree will fill in spaces in a year or two. Branches are not like our arms or legs. Pruning is more like giving a tree a haircut. And if you think of pruning as sculpting, you will want to do it every year.
Henry posts his weekly articles and others at https://dailyuv.com/