-

Now available for $24.95 including shipping. -

Now available for $21.00 including postage. Vendors I Like
 Click Here to buy from Cobrahead
Horseradish
The strong flavors of horseradish tend to create strong feelings: you either love it or you hate it. I love it on a roast beef sandwich or in a shrimp sauce. For most people, horseradish comes in a small bottle that languishes forever on the door of the refrigerator. But, just like tomatoes, fresh homegrown is better than the store-bought kind, so you may wish to grow your own. This is the time of year most people harvest and plant horseradish, though you can do either almost anytime.
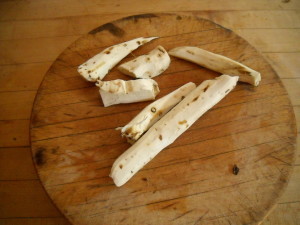
Peeled horseradish
Horseradish, along with rhubarb and asparagus, is one of the few perennial vegetables we can grow in New England. Once you have it, you will always have it – even if you decide you don’t want it anymore – so think where you want it before planting. Fortunately, a small patch doesn’t increase in size very quickly. About the only way to get rid of horseradish (or at least for an organic gardener who eschews herbicides) is to turn the patch into lawn. Even then, new shoots will come up through the lawn decades later.
Once established, the roots go down two feet or more into the soil. Because the roots branch and they are brittle, one can never get all the roots out. Even a scrap of the root will re-sprout, so the plants are there for life. Horseradish is as persistent as it is piquant.
Horseradish is in the cabbage family, but unlike its kissing cousins, it is the root, not the leaves, that you eat. And unlike other crucifers, horseradish is not started by seed, but by planting a cutting. The Johnny’s Selected Seeds catalog (www.johnnyseeds.com or 877-564-6697), one of very few that offer cuttings, explains that the seeds are not viable. They ship cuttings in April, “after danger of freezing in transit has passed.” But you can also get cuttings from a friend who is harvesting now and plant some this fall.
Prepare a horseradish bed by working in some well-rotted manure or compost. That will improve soil texture and keep the soil looser – for ease in future harvesting. Horseradish, which is essentially a weed, doesn’t need high levels of nitrogen, phosphorus or potassium.
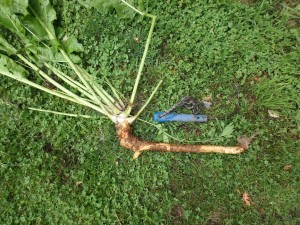
Horseradish root
To prepare a cutting for planting, dig a root from an existing plant and slice off the leaves. Plant the crown (where you cut off the leaves) and a section of root – 3 to 6 inches of root is fine. Plant the cuttings a foot or more apart. Water well, and surround with mulch to keep down the weeds. In a year or two you will be ready to harvest. Younger roots are easier to use for sauce than old, woody roots. Horseradish does best in well-drained soil, but really will grow anywhere. It will be most vigorous in full sun, but 4 hours is plenty.
To harvest, loosen the soil around a plant, either with a garden fork or a drain spade. Drain spades have blades that are about 16 inches long and 5 inches wide, and are great for digging out deep-rooted things like horseradish. A mature root will challenge even the strongest backs, so you may need to sever the root with your spade to remove it.
Prepare the horseradish for making sauce by hosing off the dirt, then peeling the dark brown skin to reveal its white interior. A potato peeler works just fine for that. The fumes of horseradish are very pungent, so think about working outdoors on a breezy day.
Horseradish root is tough stuff and can defeat your food processor unless you chop it up a bit by hand. Slice a chunk of horseradish lengthways into sections, then chop into pieces about ¾ inch in length before putting in the food processor. To prepare the sauce, grind the chopped roots in the food processor with a little cold water. Pulse the horseradish until it is coarsely chopped.
Grinding the roots releases the volatile oils (isothiocyanates), which give horseradish sauce its heat. Adding vinegar, besides adding flavor and helping to preserve the sauce, controls the level of heat. Add vinegar immediately, and the sauce is moderately hot. Wait 3 minutes before adding vinegar and the sauce will be spicier. In any case, blend the vinegar with the ground root until the consistency is moist and creamy. Add salt if you are so inclined. Put in a glass jar and store in the fridge.
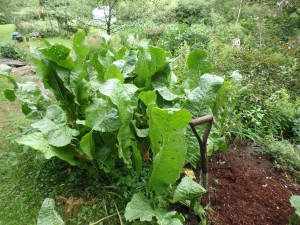
Horseradish Plants
The nice aspect of horseradish, for gardeners who want it for their kitchen, is that it is essentially labor free. Plant it, and walk away. The outer leaves, which are a bit coarse-looking, will sometimes get brown and scraggly-looking, and slugs will occasionally nibble them, but the plants are trouble-free. They’ll be there, just waiting for you to harvest the roots. Now, if someone would just create corn and tomatoes that were so undemanding, everybody would garden.
Sidebar: Shrimp Cocktail Sauce
4 ounces tomato ketchup
1-2 tablespoons fresh, home-made horseradish sauce
Juice of ½ lemon
Sprinkle of Worcestershire sauce
Black pepper and salt to taste
Blend ingredients in a small bowl, sampling and adjusting until perfect.
Read Henry’s blogs at https://dailyuv.com/
Fall Flowers
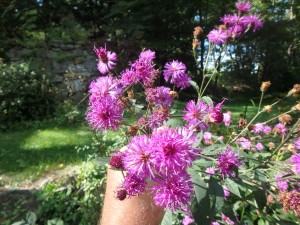
New York Ironweed
Almost every flower gardener has great June flowers: peonies are dramatic and go well with the Siberian iris that bloom at the same time. Bachelor buttons are blooming and poppies are popping out everywhere. But now, in September, some gardens have plenty of green but lack color. It need not be that way.
The first and easiest “quick fix” are the chrysanthemums that are for sale everywhere. Although many are sold as “perennial”, I treat them as annuals. That is because it order to get a clump of mums to have hundreds of blossoms, someone has to cut back the growing stems at least once, and probably twice.
After cutting them back in June, each stem sends out two or more new branches, each of which should flower. But on the occasions when I have let mums come back, I rarely did that. So to me, it is worth just buying new ones every year.
The same technique of cutting back early stems is used for those intensely purple fall asters that are for sale at farmers markets and grocery stores. I love them, and I am willing to pay someone to create that dense crown of blossoms. I often put them along my front walkway or keep them in pots on the front steps. Left on their own, they get much taller.
But what about perennials that come back every year? Sneezeweed (Helenium autumnale), tall New England asters, turtlehead, Sedum ‘Autumn Joy’ and Joe Pye weed are commonly planted. But let’s look at some others you may not know.
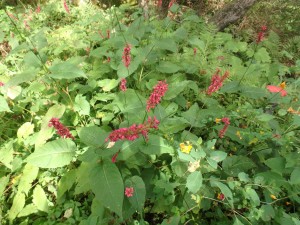
Persicaria
A lesser-known plant that has been flowering for me for many weeks and still looks good is pink bistort (Persicaria bistorata Superba, also called Polygonum bistorta). It has pink to red bottlebrush flowers that stand up 2 to 3 feet, rising above glossy green foliage. It is a skinny little flower – actually lots of little flowers on a forked thin stem. Each group of flowers is 2 to 3 inches. They grow, for me, near where my primroses bloom in spring – under an old apple tree with rich, moist soil. It does well in a vase.
Also in bloom for me is ‘Henry Eilers’, a named variety of Rudbeckia subtomentosa. It was found growing in the wild in Montgomery County, Illinois by Mr. Eilers, and introduced to the gardening world in 2003. It is unlike most black-eyed Susans (Rudbeckia) in that it has gaps between the petals, giving it a distinctive look. Each petal looks as if it were carefully cut out with scissors – with a straight edge and separated from the next, like teeth on a Jack-o-lantern.
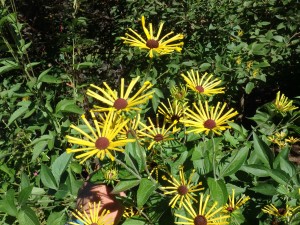
Henry Eilers Rudbeckia
Henry Eilers is usually a very nice plant and requires little or no staking. This year mine grew to be 6 feet tall and is flopping over. Each year any given plant tends to grow differently.
New York ironweed (Vernonia noveboracensis)is another tall plant in bloom for me now. According to my bible for flowers, a wonderful 800-page book called Manual of Herbaceous Ornamental Plants by Steven M. Still, ironweed likes full sun with moist acidic soil. I moved mine from such a location to a drier location with part shade. I did so because it was too vigorous and too tall and floppy, when given ideal conditions. Even so, it is about 6 feet tall and somewhat floppy. It has intense purple flowers similar to those short asters for sale right now.
Fall anemones (Anemone japonica and hybrids) are fabulous flowers, albeit a bit fussy. They come in shades of pink and white with lovely 5-petaled blossoms 2 to 3 inches across. I have lost them more than once as they really do not like moist roots in winter, but need plenty of moisture in summer. That’s a tough requirement. According to the book mentioned above, they want morning sun and filtered afternoon sun. But if they are happy for you they will spread and produce plenty of great fall blossoms. I’d say, plant them in rich dark soil in a well-drained location, and water regularly if it is a dry summer.
Another great fall flower is called “showy autumn crocus”, but they are not really crocus. They areColchicum, a different genus of bulb flowers. They look like crocus on steroids- they have 4 to 6-inch flowers on long tube-like stems. They pop up now without leaves; leaves appear in the spring, then disappear.
The stems have little strength, so they generally flop over. For me, they always flop over, except for a few of the doubles, which sometimes stand up. One way to avoid the flop factor is to plant a ground cover like myrtle or pachysandra in the same area. The vines support the flowers a little.
So go visit your favorite garden center. You might be surprised what you find – fall flowers are still blooming.
Read Henry’s blogs at https://dailyuv.com/
It’s Harvest Time!
My garden is finally paying me back for all the work I’ve done this year. I’m putting up the harvest and eating vegetables until they (almost) pop out of my ears. It’s been a great summer.
Let’s look at how to know if your vegetables are ready to harvest, as it’s not always obvious. Potatoes, for example, are not obvious – the tubers are underground. The earlier you harvest, of course, the smaller the potatoes. But you can snitch a few after they have bloomed. If you have loose fluffy soil you can poke your hand into the soil under a plant and grab a spud without disturbing the plant – or the other potatoes that are still growing. Or you can dig up one plant and leave the others to grow.
To avoid damaging potatoes at harvest time, plunge a garden fork into the soil a foot from the plant, tip it back, and the roots – spuds and all- will be visible. Grab ‘em, but place gently in a bucket so as not to damage the still tender skins. Harden off in a cool, dark place – and leave the soil on if you want to store them.
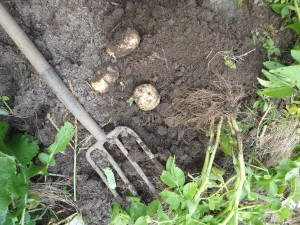
Kennebec potatoes picked now are a good size
Generally I let potatoes grow through September, harvesting only after the leaves have yellowed and died back. But I keep testing to see if they have reached the size I like. Some varieties develop hollow spots in the center if they get too big. That’s not a big issue for me. But I don’t want them too small and I generally start mine in June, long after most gardeners have started theirs. I do that to minimize potato beetle damage, and it seems to work. I didn’t see one beetle this year!
I grew artichokes again this year, though I don’t always. It is often hard to know when to pick them – an immature artichoke looks exactly like a mature one, but for the size. Same color, same feel if you squeeze them. But if you wait too long, the leaves get hard and unappealing. I picked my first ‘choke when it was about 3 inches across and didn’t seem to be getting bigger. That plant also produced a second flower (artichokes are actually flowers), and I picked it when it was about half the size. Again, it seemed to have stopped growing.
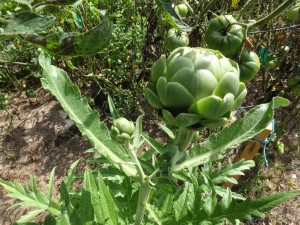
Artichoke
Summer squash can be picked at any size from tiny to mammoth. My favorite variety is ‘Romanesco’, which has stripes along its ribbed sides. I like it small, but it is still good to eat even if it “escapes” and gets huge. I just take a big spoon and scrape out the seeds. Generally I grate the big ones in my food processor and freeze the results in zipper bags for use in winter soups. I don’t blanch the squash, but do try to use it within a few months. Blanching kills enzymes that promote aging, while freezing does not. So squash is less appealing after months in the freezer.
It is tougher to know when winter squash is ready to pick. In general it is best to let winter squash like butternuts and hubbards stay on the vine until the leaves start to yellow and the stems turn brown and dry. But the best test is what I call the “fingernail” test: push your thumbnail against the skin. It should be tough enough that your nail leaves no mark. If you feel it digging in, stop pushing your nail against it.
When picking winter squashes or pumpkins, bring a sharp knife or a pair of pruners so that you can cut the stem, leaving a 3 inch “handle”. But don’t carry it by the handle, as you don’t want it to pull off. Most winter squashes also need some time in a warm sunny place to cure after being picked. Acorn squashes should go directly to a cool location, as they can get stringy if left in the sun. Always store winter squash in a low humidity area.
Never, I repeat never, let winter squash get frosted. If you don’t want to harvest them and frost is forecast, pull the comforter off you bed and cover them up. Or use an old sheet, I suppose, or even a plastic tarp.
Speaking of frost, which I hope is still weeks away, here are some veggies that will not survive even a light frost: basil, beans, cucumbers, eggplants, peppers, tomatoes and squash of all types.
On the other hand, plants that survive light frost include artichokes, beets, carrots, cauliflower, celeriac, lettuce, parsnips and Swiss chard. Plants that can still thrive after a hard frost include broccoli, Brussels sprouts, cabbage, kale, kohlrabi, parsley, radishes, spinach, turnips and leeks. I often pick kale and Brussels sprouts in December.
My onions were ready to harvest weeks ago. I know when they are ready to pull because the tops flop over. I cure them in a warm sunny place outdoors until the tops dry up. I store them, along with winter squash, in a low-humidity cool location indoors.
Growing vegetables really is for cooks. I probably would only grow flowers if I didn’t love fresh veggies so much. And of course being able to store and use my vegetables all year makes all that work even more worthwhile.
Want to have big Brussels sprouts? Read Henry’s blog for a 10-second trick: https://dailyuv.com/news/