-

Now available for $24.95 including shipping. -

Now available for $21.00 including postage. Vendors I Like
 Click Here to buy from Cobrahead
It’s Not Too Late to Start an Herb Garden
Garden centers are mostly sold out of flowers and vegetables by now, but there seem to be plenty of herbs still for sale. Now that you have (hopefully) gotten your veggies and annual flowers planted, this is a good time to plant some herbs.
My vegetable garden –where I have always grown herbs – is somewhat remote from my house and down a set of stone steps. But this summer I have an herb garden between my car park and wood pile – just 10 steps or so from the house.
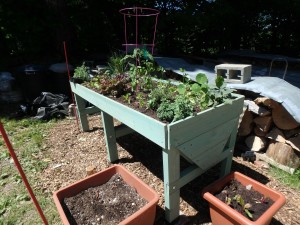
OLYMPUS DIGITAL CAMERA
So how do I grow parsley, sage, rosemary and thyme (and others not included in Simon and Garfunkel’s song) in a spot that sounds so inhospitable? I am growing them in a wooden container called a VegTrug that I got from Gardeners Supply (www.gardeners.com). It’s big and deep: six feet long, 2 feet wide and up to 18 inches deep in the middle of the V-shaped container. It is on legs and stands 30 inches high. Very nice, no bending over.
Filling up the VegTrug with appropriate planting mix is important: you can’t just dig garden dirt and shovel it in. The soil would compact and the plants wouldn’t thrive. But it takes over 400 quarts of soil mix to fill this behemoth. To buy that much potting mix would be pricey.
Getting the mix right is important: you want your mix to stay fluffy, hold water and offer nutrients. But if you just used a standard commercial potting mix, your growing medium would need weekly infusions of liquid chemical fertilizer. Adding compost introduces organic matter and beneficial microorganisms that work with the roots of your plants to share nutrients from the compost and organic potting soil.
I buy good quality compost each year that a local contractor makes from cow barn scrapings that he turns and aerates and makes into lovely light-weight compost that is relatively weed free. I mixed that compost with peat moss, “Moo-Grow” (an organic potting soil), organic fertilizer, limestone, perlite and vermiculite.
Vermiculite is a fluffy material made from heat-expanded mica that holds water. It is used in most potting mixes, though you might not notice it. I also added perlite, another heat-expanded mineral. It looks like Styrofoam, but is great for containers: it has a neutral pH, holds water and air, does not deteriorate or compress. I used a total of 6 quarts of each in my VegTrug. Perlite and vermiculite go a long way.
To make my soil mix I used a 5-gallon pail to measure, adding roughly 2 parts of compost and 2 parts of Moo-Gro potting mix to one part of peat moss. I stirred up that mix in a huge garden cart. I added half a cup of limestone per bucket of peat moss to counteract the acidity.
Once the ingredients were mixed, I add Pro-Gro, an organic bagged fertilizer. I used a total of 2 quart containers of Pro-Gro in the 100-plus gallons of soil mix I made. I added one quart of Azomite, a source of diverse mineral micronutrients, in the total mix. Azomite is optional. You could add rock dust instead, if you can get some very fine rock powder from a tombstone maker or a rock quarry. Or you can leave it out altogether.
It is important to get the ingredients well moistened before adding them to the VegTrug. I did this by adding water from my hose to the mix, and stirring with a shovel. Dry peat moss can be very hard to moisten; I wet it, stirred it, let it sit, and repeated until it seemed evenly moist.
So what am I growing? In the middle, where the soil is deepest, I have a tomato plant, one I started from seed called ‘Summer Sunrise’. The seeds came from the Hudson Valley Seed Library (www.seeedlibrary.org and is suited for container growing.
What else? I have about a dozen lettuce plants, 3 flat-leafed parsley plants, 2 kinds of sage, a rosemary and a thyme plant. I dug up a chunk of chives from my garden, cut it back and planted it in the VegTrug. Marjoram and a nasturtium are doing well – the latter has edible flowers, and will flow out and over from the VegTrug.
I planted dill and arugula by seed – both are up and doing fine, though I also bought a small pot of dill at my local Food Coop – another good source for pots of herbs. Lastly I planted a 4-pack of small basil plants. Everything is thriving!
Watering is important for containers. This VegTrug has shallow soil near the edges, deeper soil towards the middle, so the edges dry out quicker. I find I need to give it 4 to 6 gallons in hot, sunny weather. It only gets sunshine from 9am to 3pm, but that seems adequate.
So whether you invest in a VegTrug from Gardeners Supply or just grow some herbs in pots on the porch, go plant some. I am so delighted with my herb garden I know I will plant it again every year. And the collection of herbs in this nice cedar container is pleasing to the eye as well as the taste buds!
Read Henry’s blogs at https://dailyuv.com/
Dealing with Drought or Watering 101
When it comes to watering, Mother Nature generally does it best. But as I write this, we haven’t had any rain in over a week and the soil is dry. Bone dry, and I am watering my vegetable garden most evenings.
In general, I don’t like overhead watering systems. Yes, they do mimic a rain storm, but they waste a lot of water, and water the walkways and weeds as well as the plants. So long as the soil is not parched, I like to water plants using a watering wand.
My watering wand is a 30-inch long aluminum tube with a watering rose on the end and a shut-off valve that allows me to increase or decrease the flow of water. I like those made by Dramm, a company that specializes in watering devices and has figured out how to deliver lots of water while not disturbing young plants.
In the vegetable garden, I walk up the rows directing the water around my tomatoes or irrigating the lettuce. The wand allows me to spray water close to the ground level – it’s not falling from waist high, the way a nozzle on the end of a hose would.
But in times like this, an extended period of hot and dry weather, I know I need to water each bed entirely, from side to side. Why is that? Imagine taking a sopping wet kitchen sponge and dropping it in a bucket of clean kitty litter. Then pour more litter over it. What happens? In five minutes the sponge would be dry. All the moisture would wick away. Your soil is a bit like that litter. It will absorb the moisture that you gave to the roots of your plants. So you need to soak the soil around your plants, not just at the rootball.
If you’re going to plant anything now, water the soil deeply several hours before doing so. It is easier to drench an empty bed than one with tiny seeds that might wash away, or little seedlings that can be harmed by a deluge.
Another effective way to keep plants moist in times of drought is to mulch. Mulch will keep the sun and breezes off the soil so that moisture does not evaporate so quickly. In the vegetable garden I cover most everything with newspaper – four to six sheets thick. I generally put the papers in a wheelbarrow and soak them first so they are less likely to blow away as I spread them out. Then I cover the papers with a thick layer of mulch hay or straw.
Straw is supposed to be seed-free, while hay is not. Straw is the by-product of threshing a grain – oats or barley, perhaps. But it comes from far away on a truck and costs about $10 a bale. Mulch hay, on the other hand, I can buy from a local farmer for $3 a bale. The hay is grown as feed for dairy cattle, but if it gets ruined by rain and the cows won’t eat it, it’s sold as mulch hay. Since I use 5 to 8 bales of mulch every year I rarely use straw.
One of the great things about the newspapers is that they keep most of the hay seeds out of the soil – or at least until late in the season when most plants are big and less threatened by weeds and grasses. I know that my earthworms love to eat the newspapers and maybe they eat the hay seeds, too.
I get e-mails from readers every time I suggest using newspapers in the garden. “What about the inks?” they write. In the old days inks were dangerous – they contained heavy metals. But now the inks are made from soy products. And yes, the paper making process might leave some stray chemicals in the paper itself, but I haven’t seen anything scary about it. I have read that one should avoid glossy colored inserts to the paper, or magazines. Cardboard is fine.
How do you know when you’ve watered enough? Dig down in the soil. It should be dark and moist for 6 inches after watering. In general, plants do fine with an inch of water a week, either from the sky or from your hose. But if you are using an overhead watering device, you probably will not get an even distribution of water. Put out cat food cans all over the garden to catch the water to see if areas got less water.
If you see your plants starting to droop, you know they’re thirsty. Today my bee balm, a perennial flower, is wilting. I didn’t rush to water it as soon as I saw this, as I know the plant is resilient and the roots are well established. Tonight, if I have time, I might give that bed some water. But if I saw my tomatoes wilting, I’d water right away. They’ve only been in the ground for about 3 weeks, so the roots are not extensive yet.
Always try to keep water off the leaves of plants. On a hot sunny day, drops of water can act like a magnifying glass, burning spots on leaves. And some fungal diseases require moisture in order to penetrate leaves and infect plants.
Watering is not rocket science. Keep the soil from drying out, particularly if you have seeds in the ground waiting to germinate. But don’t turn your soil into mud, either. Plants did fine before we invented hoses – but hoses sure are handy in times like this!
Read Henry’s twice-a-week blog at https://dailyuv.com/
How to Create a Secret Space for Children
My sister Ruth Anne and I spent a lot of time on my grandfather’s farm in Spencer, Massachusetts when we were young. Grampy grew the most fabulous cukes, carrots and tomatoes – and flowers that would almost make the “faint of heart” swoon. I loved my time there.
One of the best features, on a hot afternoon, was a huge oval of forsythia bushes that enclosed a space where we could hide from adults and stay cool. I recently re-created such a space for my grandkids.
Kids like to have places that are secret and private. These days “helicopter parents” are said to be the norm. Even if you are not one, you might want to grow plants that will allow you to be nearby in case of emergency, but allow children the semblance of privacy.
So here is what I did: I planted 3 fast-growing willows about 10 feet apart. The one I planted is called ‘Hakuru-Nashiki’. At this time of year the leaves have pinkish tips, with white and green on them. Each of my shrubs had 3 stems when I bought it, and grew taller and wider each year. Now, 10 or more years later, they form a single mass of foliage about 15 feet tall. But the center of the planting is rather empty – a perfect place to make a “kid’s cave”.
To start, I entered the thicket, pruners and loppers in hand. I removed anything dead, or anything that was a potential “eye-gouger” – for me, or for a child. It didn’t take long to create a little cathedral with a domed ceiling full of brightly colored leaves.
Next I weeded out the floor of the space: there were ferns, brambles, some grasses and weeds. The soil was moist and most plants pulled easily. I didn’t bother pulling the grasses, but came in with my push mower and mowed them down.
I wanted to leave some vegetation around the edges of the space so that one could look out, but still feel secluded. There were some big iris plants growing along the stream edge that provided a screen. Years ago a friend offered to let me dig up some “nice yellow pond iris.” Little did I know, but that was an invasive iris, Iris pseudacorus. I tried digging it out, but like many invasives, that’s not possible. Even a scrap of root will grow back. It has spread, both by root and by seed. I have given up trying to get rid of it. It did make a nice screen for the edge of this new cave.
I like the willow as the structure for this hidey-hole. The branches arch up, touching at their apex. But other plants would work, too, but leave an open sky above. Lilacs, would work, for example, but take longer than the willows. And forsythia, I know works fine.
Common ninebark is a very fast growing shrub with a very dense habit that easily gets to be 8 to 10 feet tall. It blooms now, in June. I have a cultivar called ‘Diablo’ which has reddish foliage, but there are others including some with standard green leaves and a bright yellow-green leafed one called ‘Dart’s Gold’.
Ninebark will grow in sun or partial shade, wet or dry, good soil or bad. A cluster of these would create a nice enclosure. Each spreads 3 to 6 feet. My mature Diablo is only 18 inches wide at the base, but is over 6 feet wide at the top – which is 8 feet off the ground. I will prune it back, as I do each year, after it finishes blooming.
Don’t want to wait for shrubs to get big? Make a teepee of 8-foot poles tied at the top, and plant vines. Scarlet runner bean is a nice one and your kids can eat the beans! Morning glories are nice vines with colorful flowers. Purple hyacinth beans have lovely purplish leaves, and brilliant flowers, but take a long time to germinate. I would buy plants already started at my local garden center for those.
Many years ago my friend Emily Cromwell and her husband Mark Woodcock built a sunflower fort for her boys, Moe and Carlos when they were 4 and 6 years old (they’ve both graduated from college now, I believe). They marked out a rectangle in the lawn about 8 by 10 feet. Then they removed a 2-foot wide strip of sod all along the rectangle. They loosened the soil, and then planted 2 rows of sunflowers – with the help of the boys. They planted big sunflowers near the inside of the fort, shorter ones on the outside.
The nice thing about a sunflower fort is, for you helicopter parents, that you can see right in. But for young children, it will still seem like their own private space.
Kids spend too much time indoors. Create a special place to play, to read, to dream – and they will be outdoors of their own volition.
Read my blog posts at https://dailyuv.com/
Tips for Planting, Weeding and Edging Your Gardens
Are you still planting your vegetables? Here are a few tips. If your broccoli seedlings are a bit tall and floppy at planting time, you can bury part of the stem so they don’t flop over. I pinch of a lower leaf or two, and then plant the root ball 3 inches or so below the soil surface. Same for Brussels sprouts. Tall tomatoes I often plant sideways after I remove 2 or more of the lower branches. The buried portion will send out roots, which is helpful to the plant later on.
Most gardeners who start seedlings indoors plant 2 or more seeds in each cell, thinking that at least one will germinate. But what to do if they both did? I advise snipping off one of the two early on. But I had a six-pack of kale seedlings with 2 nice plants per cell that had somehow escaped my scissors. For some I snipped off one seedling at planting time, thus avoiding any disruption of the roots.
For others, particularly if the seedlings were growing in opposite corners of the growing cell, I separated them and planted both. To do this I hold the rootball in two hands, thumbs on the soil surface and nearly touching. Then I push my thumbs down, and gently pull them away from each other – and tearing the rootball in half. Sometimes the roots are so entwined that the break, other times they just pull away. Either is fine. Roots recover easily.
But what can you do if you have too many melons or an overabundance of okra? It’s very hard to throw them in the compost pile. Call your friends and neighbors, ask if they need some more plants. If you still have too many plants, deliver them to the community garden nearest you. Most have websites and contact info. I found one that will drive to my door to pick up vegetable and flower starts.
The bottom line is this: you don’t have to plant every seedling you grew or bought. You might have to buy a 6-pack of kale when you only want 2 or 3 plants. It’s okay to put the others in the compost pile if you can’t find a taker. That’s better than cramming them all into a small space.
After a recent day of heavy rain I spent much time weeding. Right after a rain when the soil is soaked is a good time to do so. Deep-rooted plants like thistles or dandelions are easier to pull when the soil is moist – or even soggy. If it’s soggy, of course, your feet can compact the soil, so stay on the lawn and work from the edges.
I have learned all the weeds that grow in my garden: some by Latin name, some by common name, a few I just call “Bob” or “Larry”. No matter. What is important is to know their roots. Annual weeds like jewel weed pull easily, all the roots coming with a scratch of my CobraHead weeder and a tug from above.
Other weeds, like perennial dandelions and burdocks, have tap roots that can go down 6 to 12 inches. For those I use a shovel to loosen the earth. I push it into the soil 4 inches from the weed, pull back on the handle, and the soil – along with the roots – loosen. Then with a tug the whole system comes out. If you break off a tap root, the weed will grow back, so it’s worthwhile taking the time to do it right.
Crabgrass, by the way, grows well in compacted soil – but lawn grass will not. That’s why it grows where you walk the most. Avoid it, if it bugs you, by putting down pavers to walk on. And if you set your mower at 3 or 4 inches the good grass may shade out the crab grass that is trying to establish itself now, in the early summer.
Ground ivy (Glechoma hederacea) – also known as Creeping Charlie or Jenny – is a pest to many of us because it grows in lawns and flower beds and will even grow in pure mulch! But it pulls easily and smells vaguely minty. Its leaves have scalloped edges and the flowers are generally a purplish blue. It sends down roots easily as it creeps into flower beds. I follow the roots with the tip of my CobraHead weeder, and they come out easily.
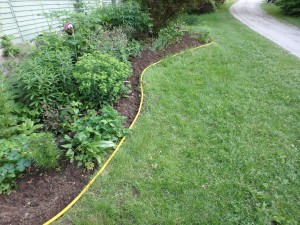
Formal garden edging
Edging the border of a flower bed makes it look tidy and professionally maintained. Basically edging means cutting a sharp edge to the bed with a shovel or an edging tool. By removing some soil after you have cut the edge, you create a little “moat”. Lawn grass sends roots exploring for new territory – but if it finds air, it stops growing. It can save a lot of time weeding out grasses later on.
If you have a straight flower bed, pull a string taught to establish the line you will edge. If you want to create curves, use your hose. Just lay it out in the lawn to establish the exact curves you want. I like to make flower beds bulge out into the lawn rather than follow straight lines. Just be sure that when you expand your beds and establish new boundaries, your lawnmower can follow the lines you establish
.
I try not to get too compulsive with my weeding. I get to the weeds when I feel like it. I try to pull them before they flower and set seed, but – obviously – that doesn’t always happen. That assures, however, there is always something to do in the garden.
Read Henry’s twice-a-week blog at https://dailyuv.com/