-

Now available for $24.95 including shipping. -

Now available for $21.00 including postage. Vendors I Like
 Click Here to buy from Cobrahead
Spring Activities
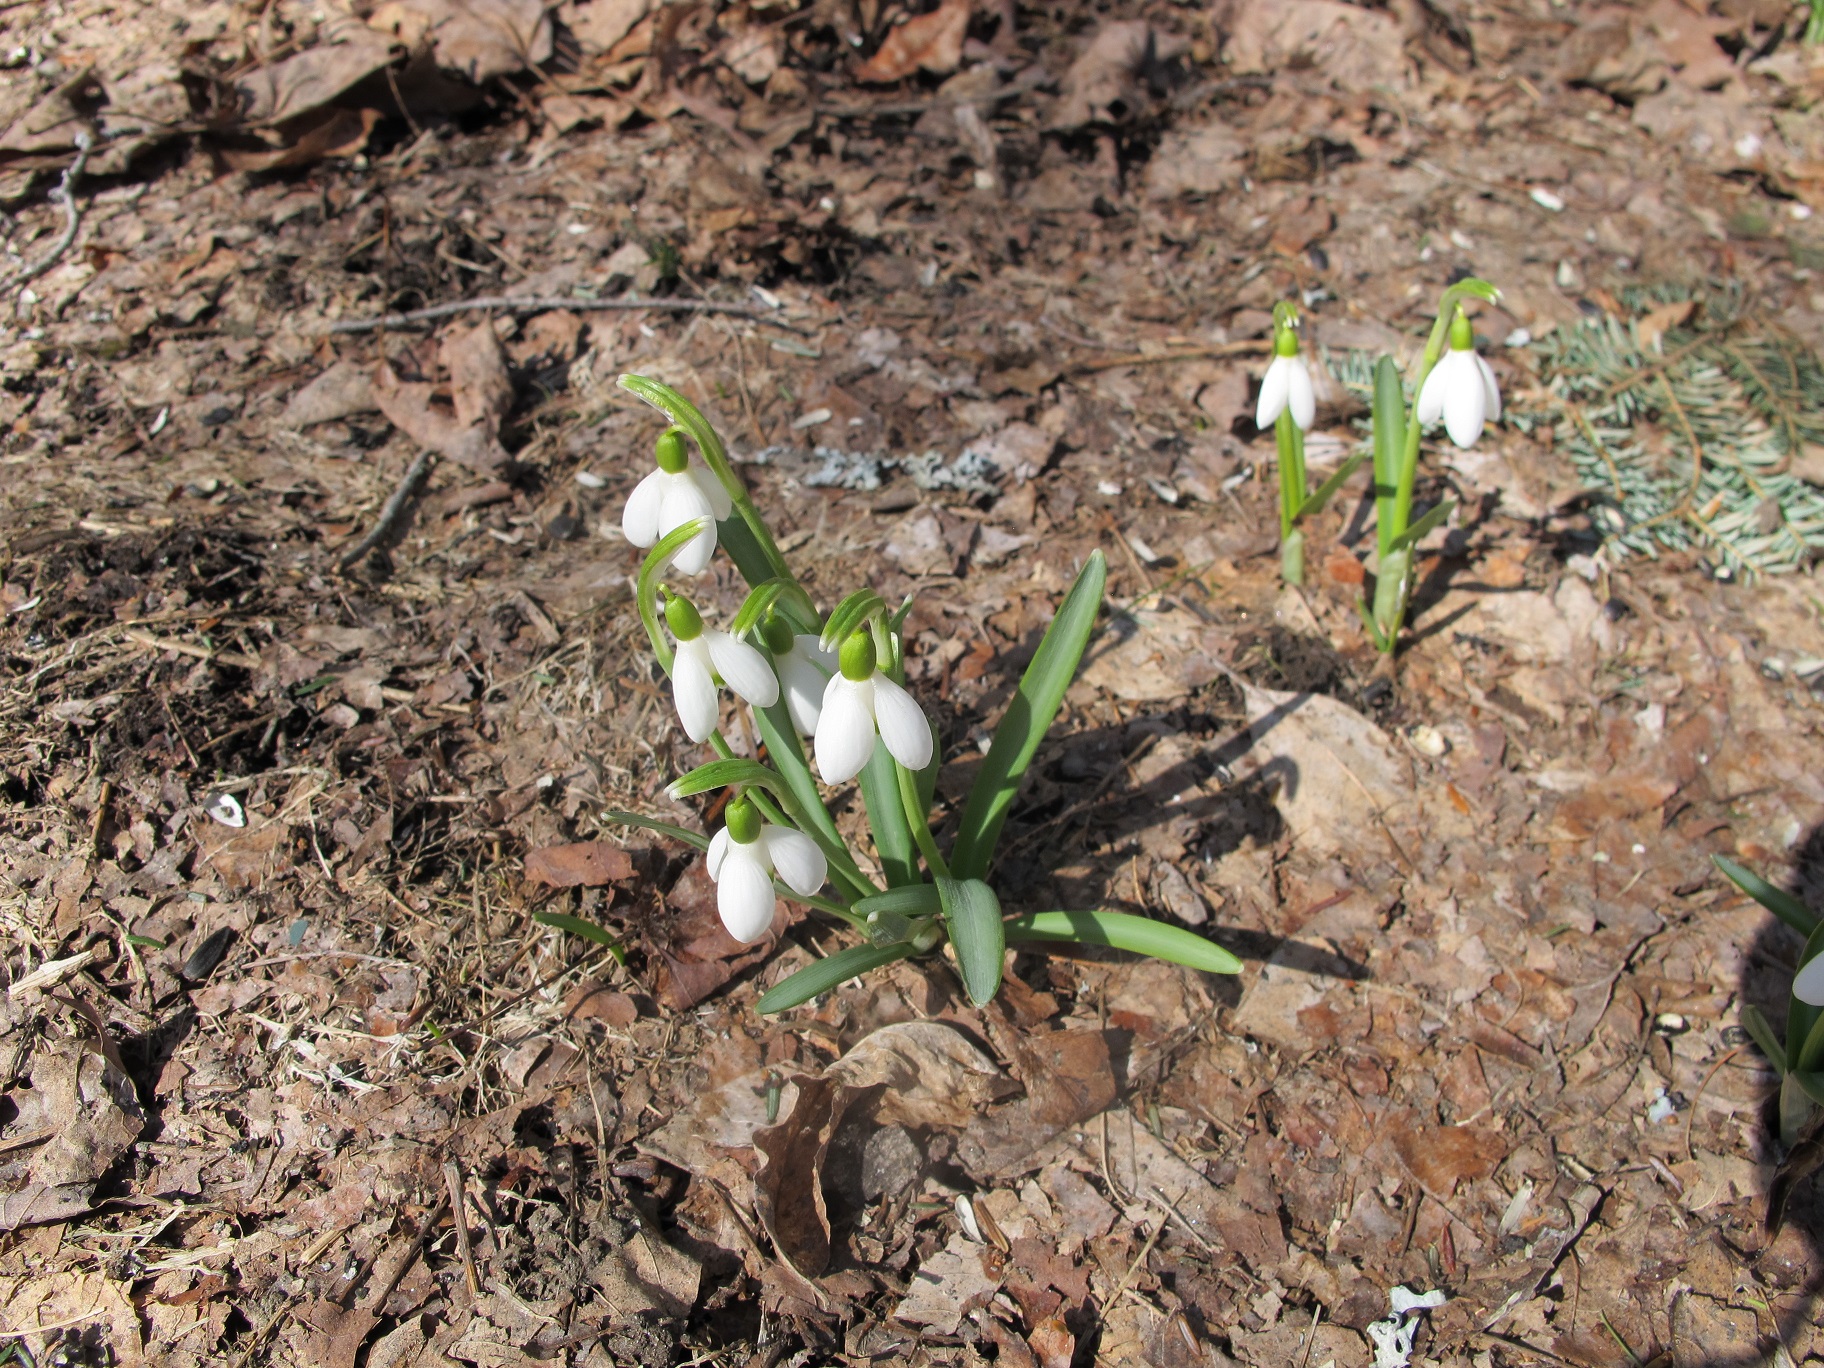
Snowdrops
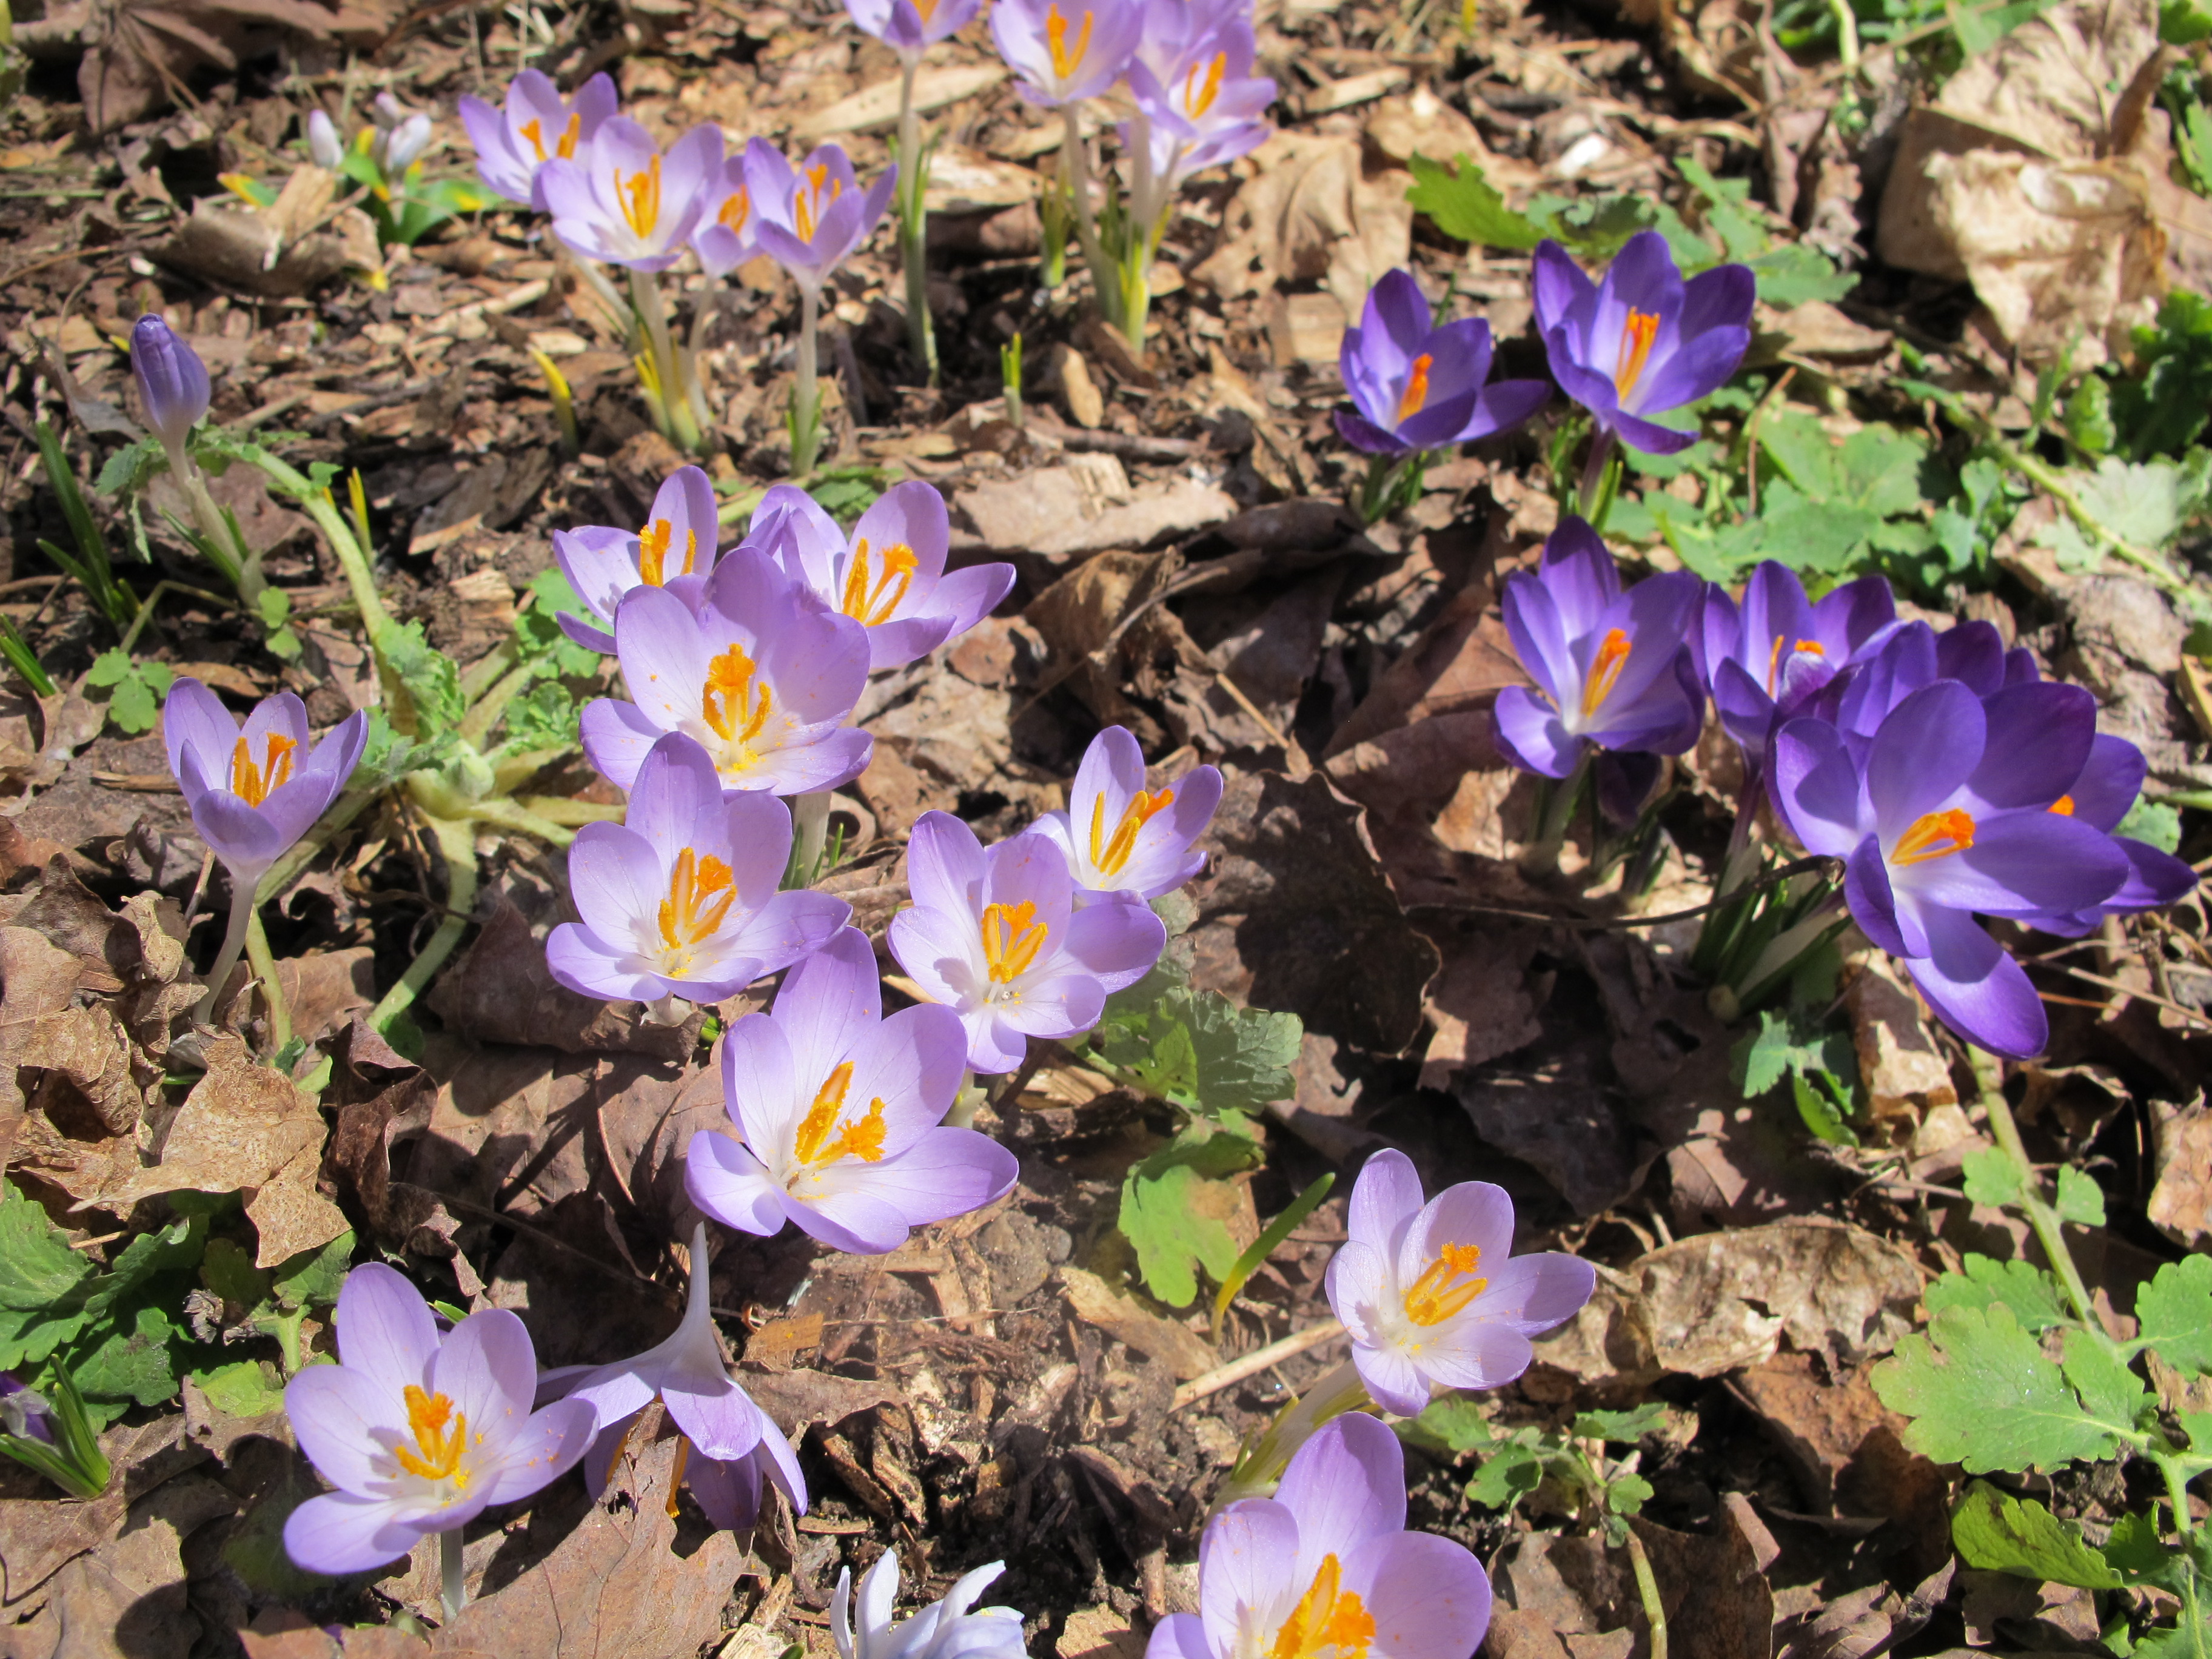
Spring has been slow in showing its colors. Snowdrops, usually up in early March at my house, were a month late. Crocus, the early ones, and winter aconite (a flower that is a nice school bus yellow color) are finally blooming. But everything is slow, and the ground is still frozen a few inches down. I won’t be planting anything outside for weeks.
So what can we do on a warm, sunny day? Maybe we better start by thinking about what NOT to do. Don’t rake the lawn while the soil is still soggy. I recently saw a fellow raking his lawn – even though there was still snow on it in places. Soil structure can be damaged if you compress it and squeeze out all the air spaces in it. This is easily done by walking on it when the soil is still frozen and wet – it’s very fragile. And it’s easy to rip out your grass with a rake if it hasn’t woken up and turned green.
Don’t rototill your vegetable garden early, either. If you are going to rototill, wait until the soil is good and dry. Take a handful of soil and squeeze it into a ball or cylinder. Then, with your other hand, tap it with a finger. It should fall apart. You want the soil crumbly before rototilling, though some clay soils never get to that point. Rototilling sticky wet soil can create heavy clods that roots will not easily penetrate.
So what can you do now? As soon as the snow disappears you can collect a soil sample and send it off to your state university extension service. Just Google “soil test” and your state, and you will find where to send a sample and how to collect it. I usually sun dry a sample on a cookie sheet, and remove any bits of grass, roots and rocks. As a rule of thumb, it is good to collect your sample from the depth where roots will be. For most things, that is 4 to 6 inches deep.
If you live in a house that was built before 1978, its exterior paint probably has some lead in it. Lead paint has been shown to contaminate soil and to be picked up by plants; this is most severe within 20 feet of the house, or even further if you are on a hill. Testing for heavy metals can be expensive: in New Hampshire the test for it is $65. But if you have small children and will be gardening near the house, it is a worthwhile one-time investment. Children are most severely affected by lead poisoning.
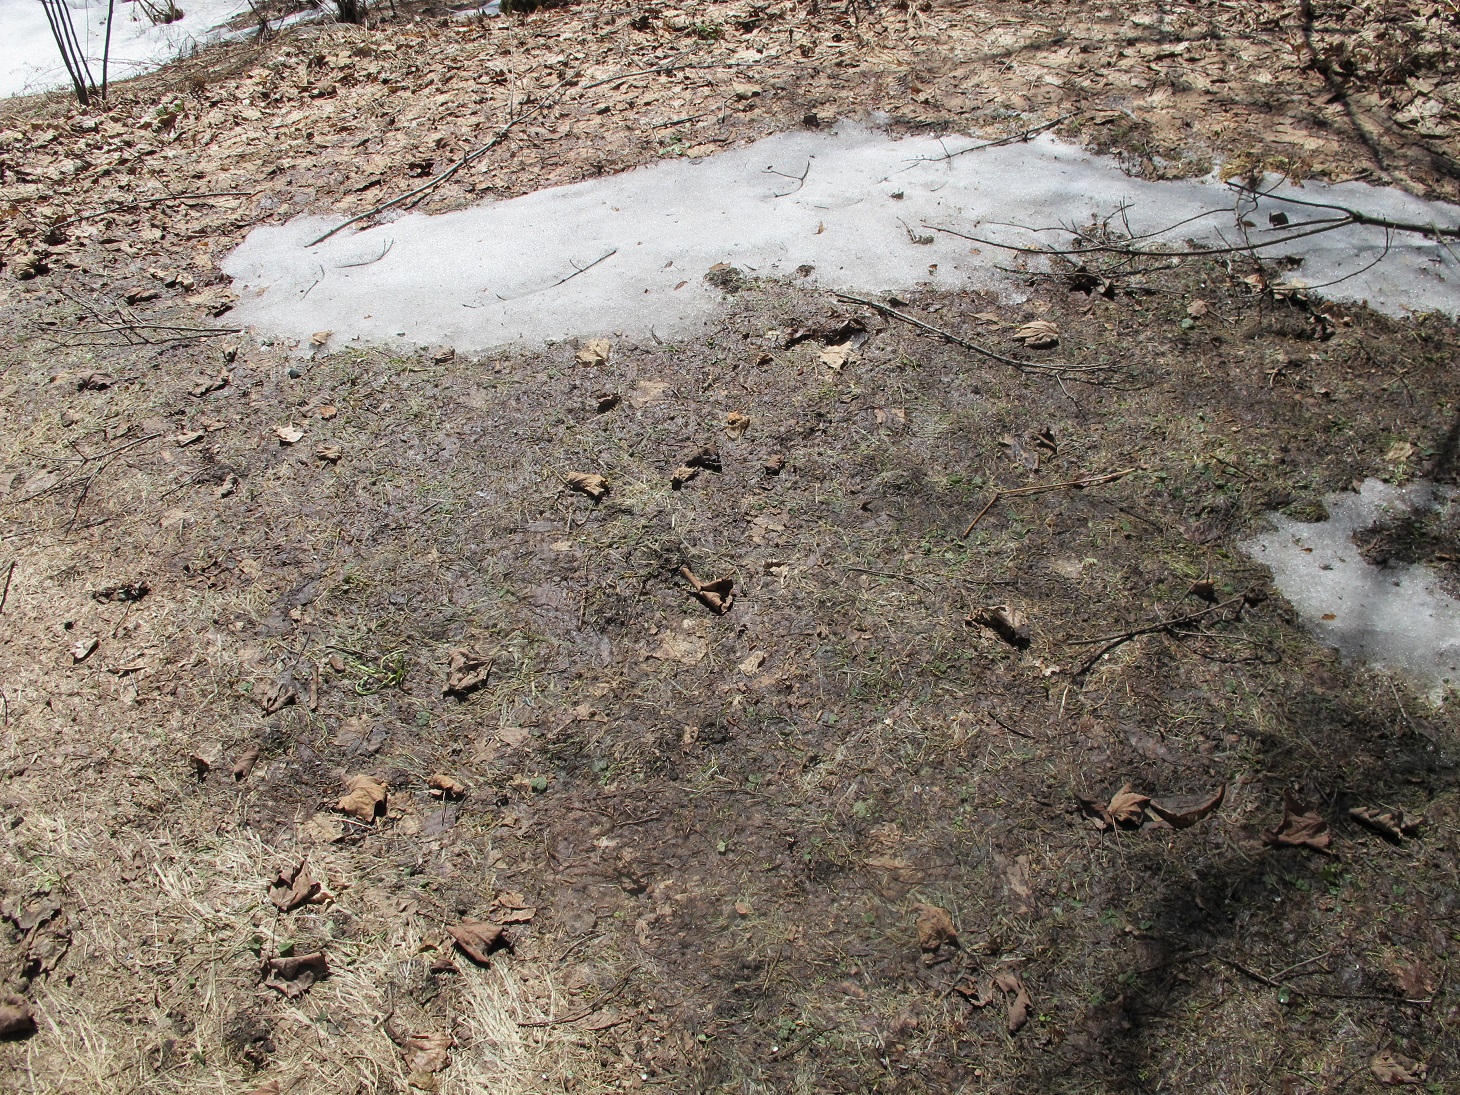
This lawn should not be raked yet
Root crops are the worst offenders when it comes to picking up lead and arsenic, another heavy metal. Lead was an additive to gasoline up until 1996 in most states, and lead from exhaust can still be a problem within 100 feet of a major highway. Arsenic was used as an insecticide, particularly in apple orchards up until the 1980’s, either as lead arsenate or calcium arsenate. Heavy metal compounds like that do not dissipate or disappear easily or quickly.
So how can you improve your soil? In a word, compost. Good compost is biologically active, meaning that it is full of beneficial microorganisms – bacteria and fungi. Later, when my lawn has turned green, I may spread some compost on it to improve the soil. All I do is fling compost over the lawn with a shovel, and then use a lawn rake to even it out.
Half an inch of compost spread out over the lawn will help a lot, particularly if you have used chemicals on the lawn. Fertilizers and particularly “Weed-n-Feed” products inhibit the growth and survival of microbes that will give your lawn that springy feel when you walk on it barefoot this summer. Compost adds organic matter and carbon to feed microbes that can’t use photosynthesis to get their own food. Earthworms love compost, too. Add compost, and they will come and help to get it down into the soil.
I have, carefully, raked leaves off one of my bulb beds. I did so recently. I was delighted to see, beneath a layer of leaves, the tips of daffodils and other bulbs were showing. I didn’t walk into the bed, as that would compact the soil, so I just reached what I could from the edge. That meant the back of the bed stayed unraked for now.
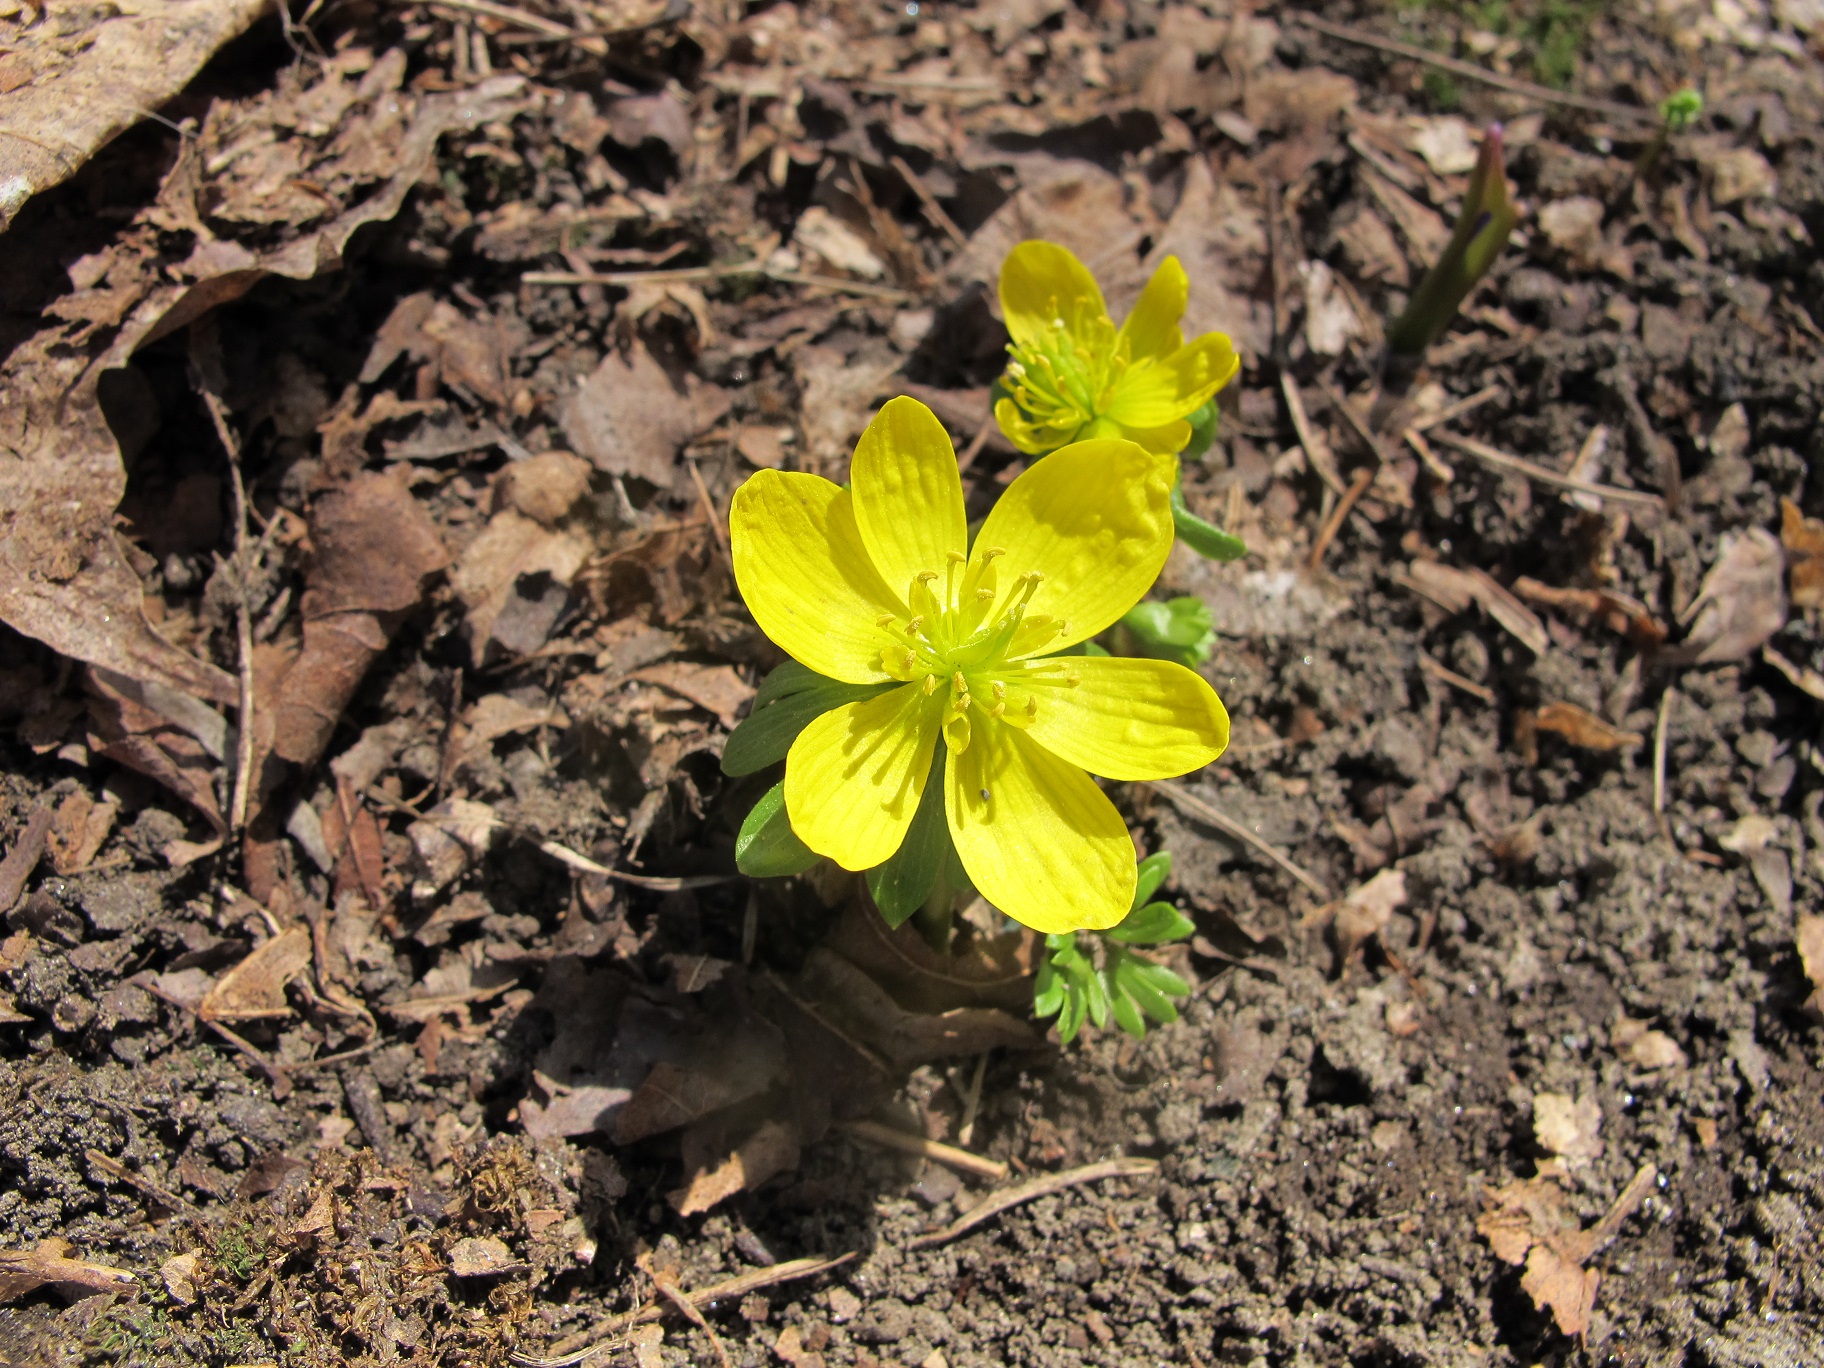
winter aconite
I have been known to lay down boards to walk on to avoid soil compaction at this time of year. Six-inch wide boards cut in five-foot lengths are good: they are light enough to move around, but do a good job of distributing my weight. Two or three is all you need. And once, to avoid compacting the soil, I wore my snowshoes. The neighbors probably thought I was crazy!
This is a good time of year to do a little maintenance on your tools. Take a big, rough file and sharpen the edges of your shovels and hoes. Just try to mimic the angle that exists already. A sharp tool works so much better than a dull one.
I apply boiled linseed oil once a year to keep wooden handles from drying out. I paint it on, let it soak in, and then rub the handles with a rag to polish them up. The handle on my potato hoe, which I got from my family’s garage 30 years ago, is probably 50 years old – but still smooth, strong and splinter-free because I take good care of it.
So don’t rush into spring. Enjoy a warm lazy day from the deck and know that soon the soil will be dry enough to start raking.
Henry Homeyer has a new book: The New Hampshire Gardener’s Companion, Second Edition. This edition has 2 new chapters and updated information in all chapters. His e-mail is henry.homeyer@comcast.net.
Ikebana: Arranging Flowers in a Japanese Artform
Some people collect salt and pepper shakers, others license plates or stuffed teddy bears. I collect different species of flowers that I grow in my garden. Although I lost track long ago, I grow well over 100 species and varieties of flowers, probably over 200. If I see something new at a green house, I have to try it. I love them outdoors, but most I grow so that I can have flowers in the house. I love to make flower arrangements, and have been doing it for decades.
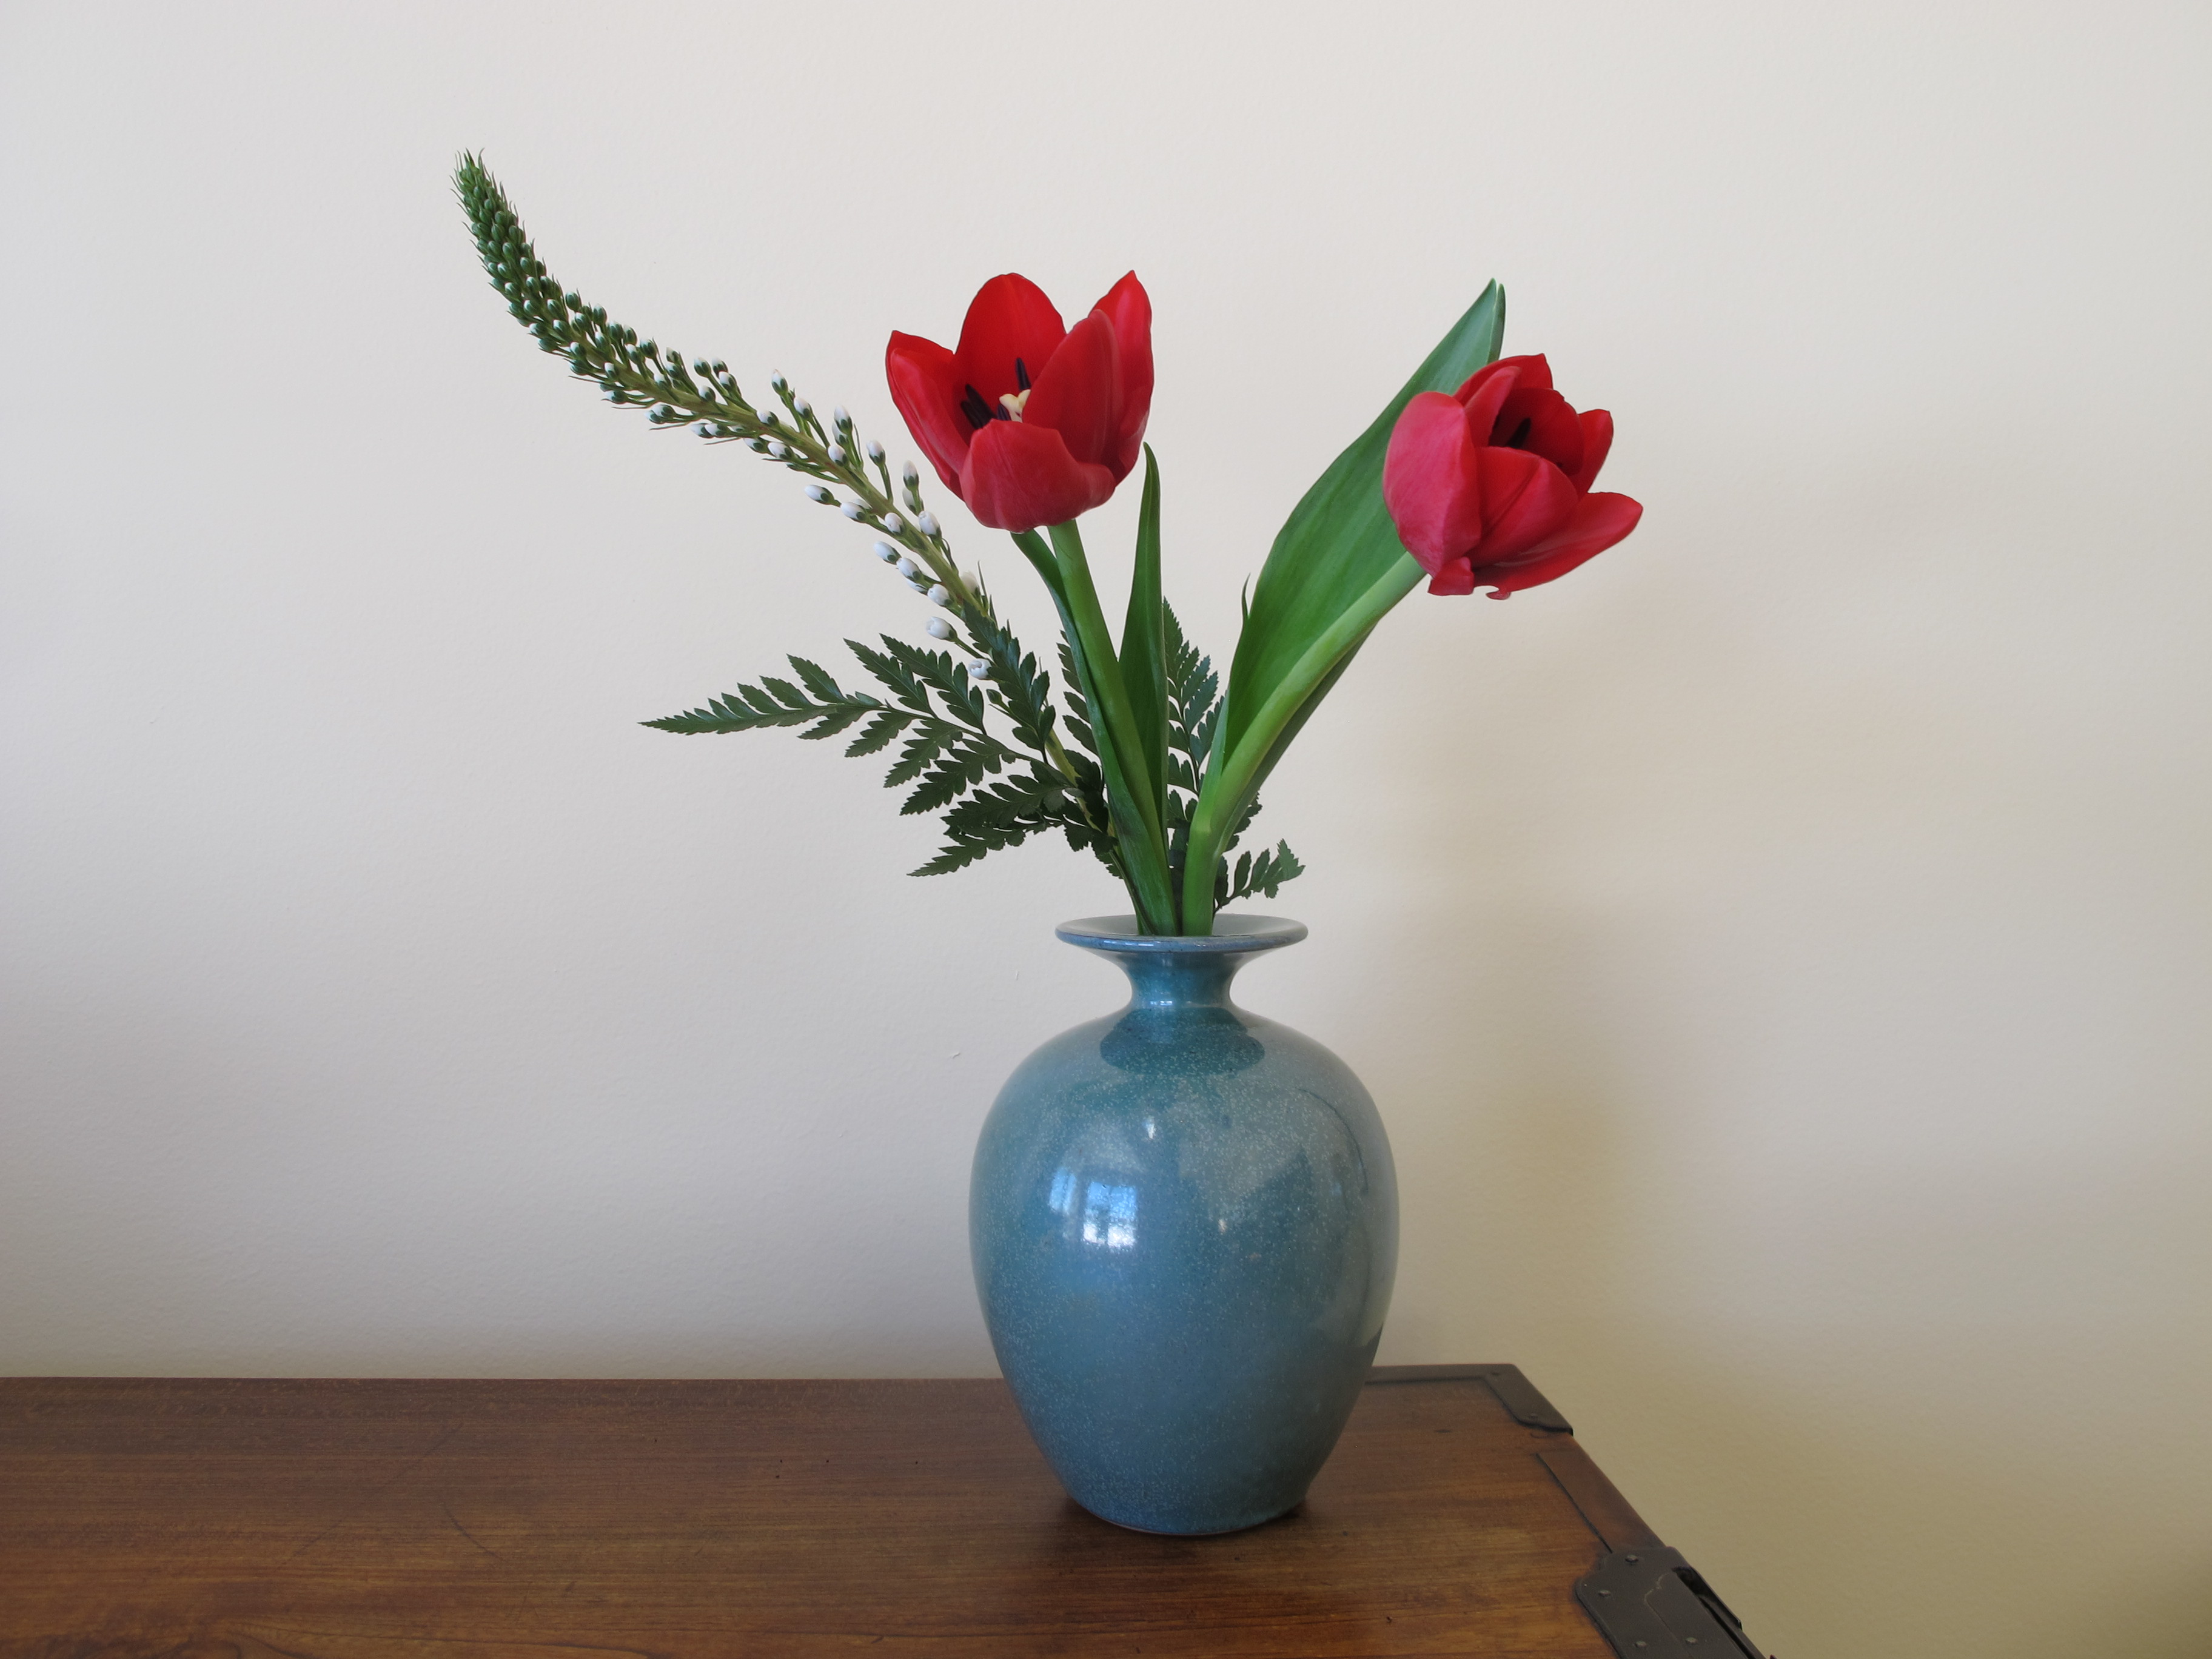
Ikebana or conventional
Recently I met with Joanne Wise of Grantham, NH to learn about a Japanese way of arranging flowers, an art form called Ikebana. Joanne lived in Tokyo for four years and apprenticed under an Ikebana master. I brought a generous bouquet of cut flowers with me, and Joanne provided the expertise, containers and frogs (which are heavy objects with sharp needles poking up to hold flowers in place in a vase).
Joanne explained that there are at least nine schools of Ikebana in Japan, and that she was trained in one called Sogetsu. Ikebana developed in the fourteenth to sixteenth centuries when shoguns (feudal leaders) ordered certain artists to create flower arrangements to bring natural beauty indoors, infusing nature to their palaces. Over time, different styles have developed.
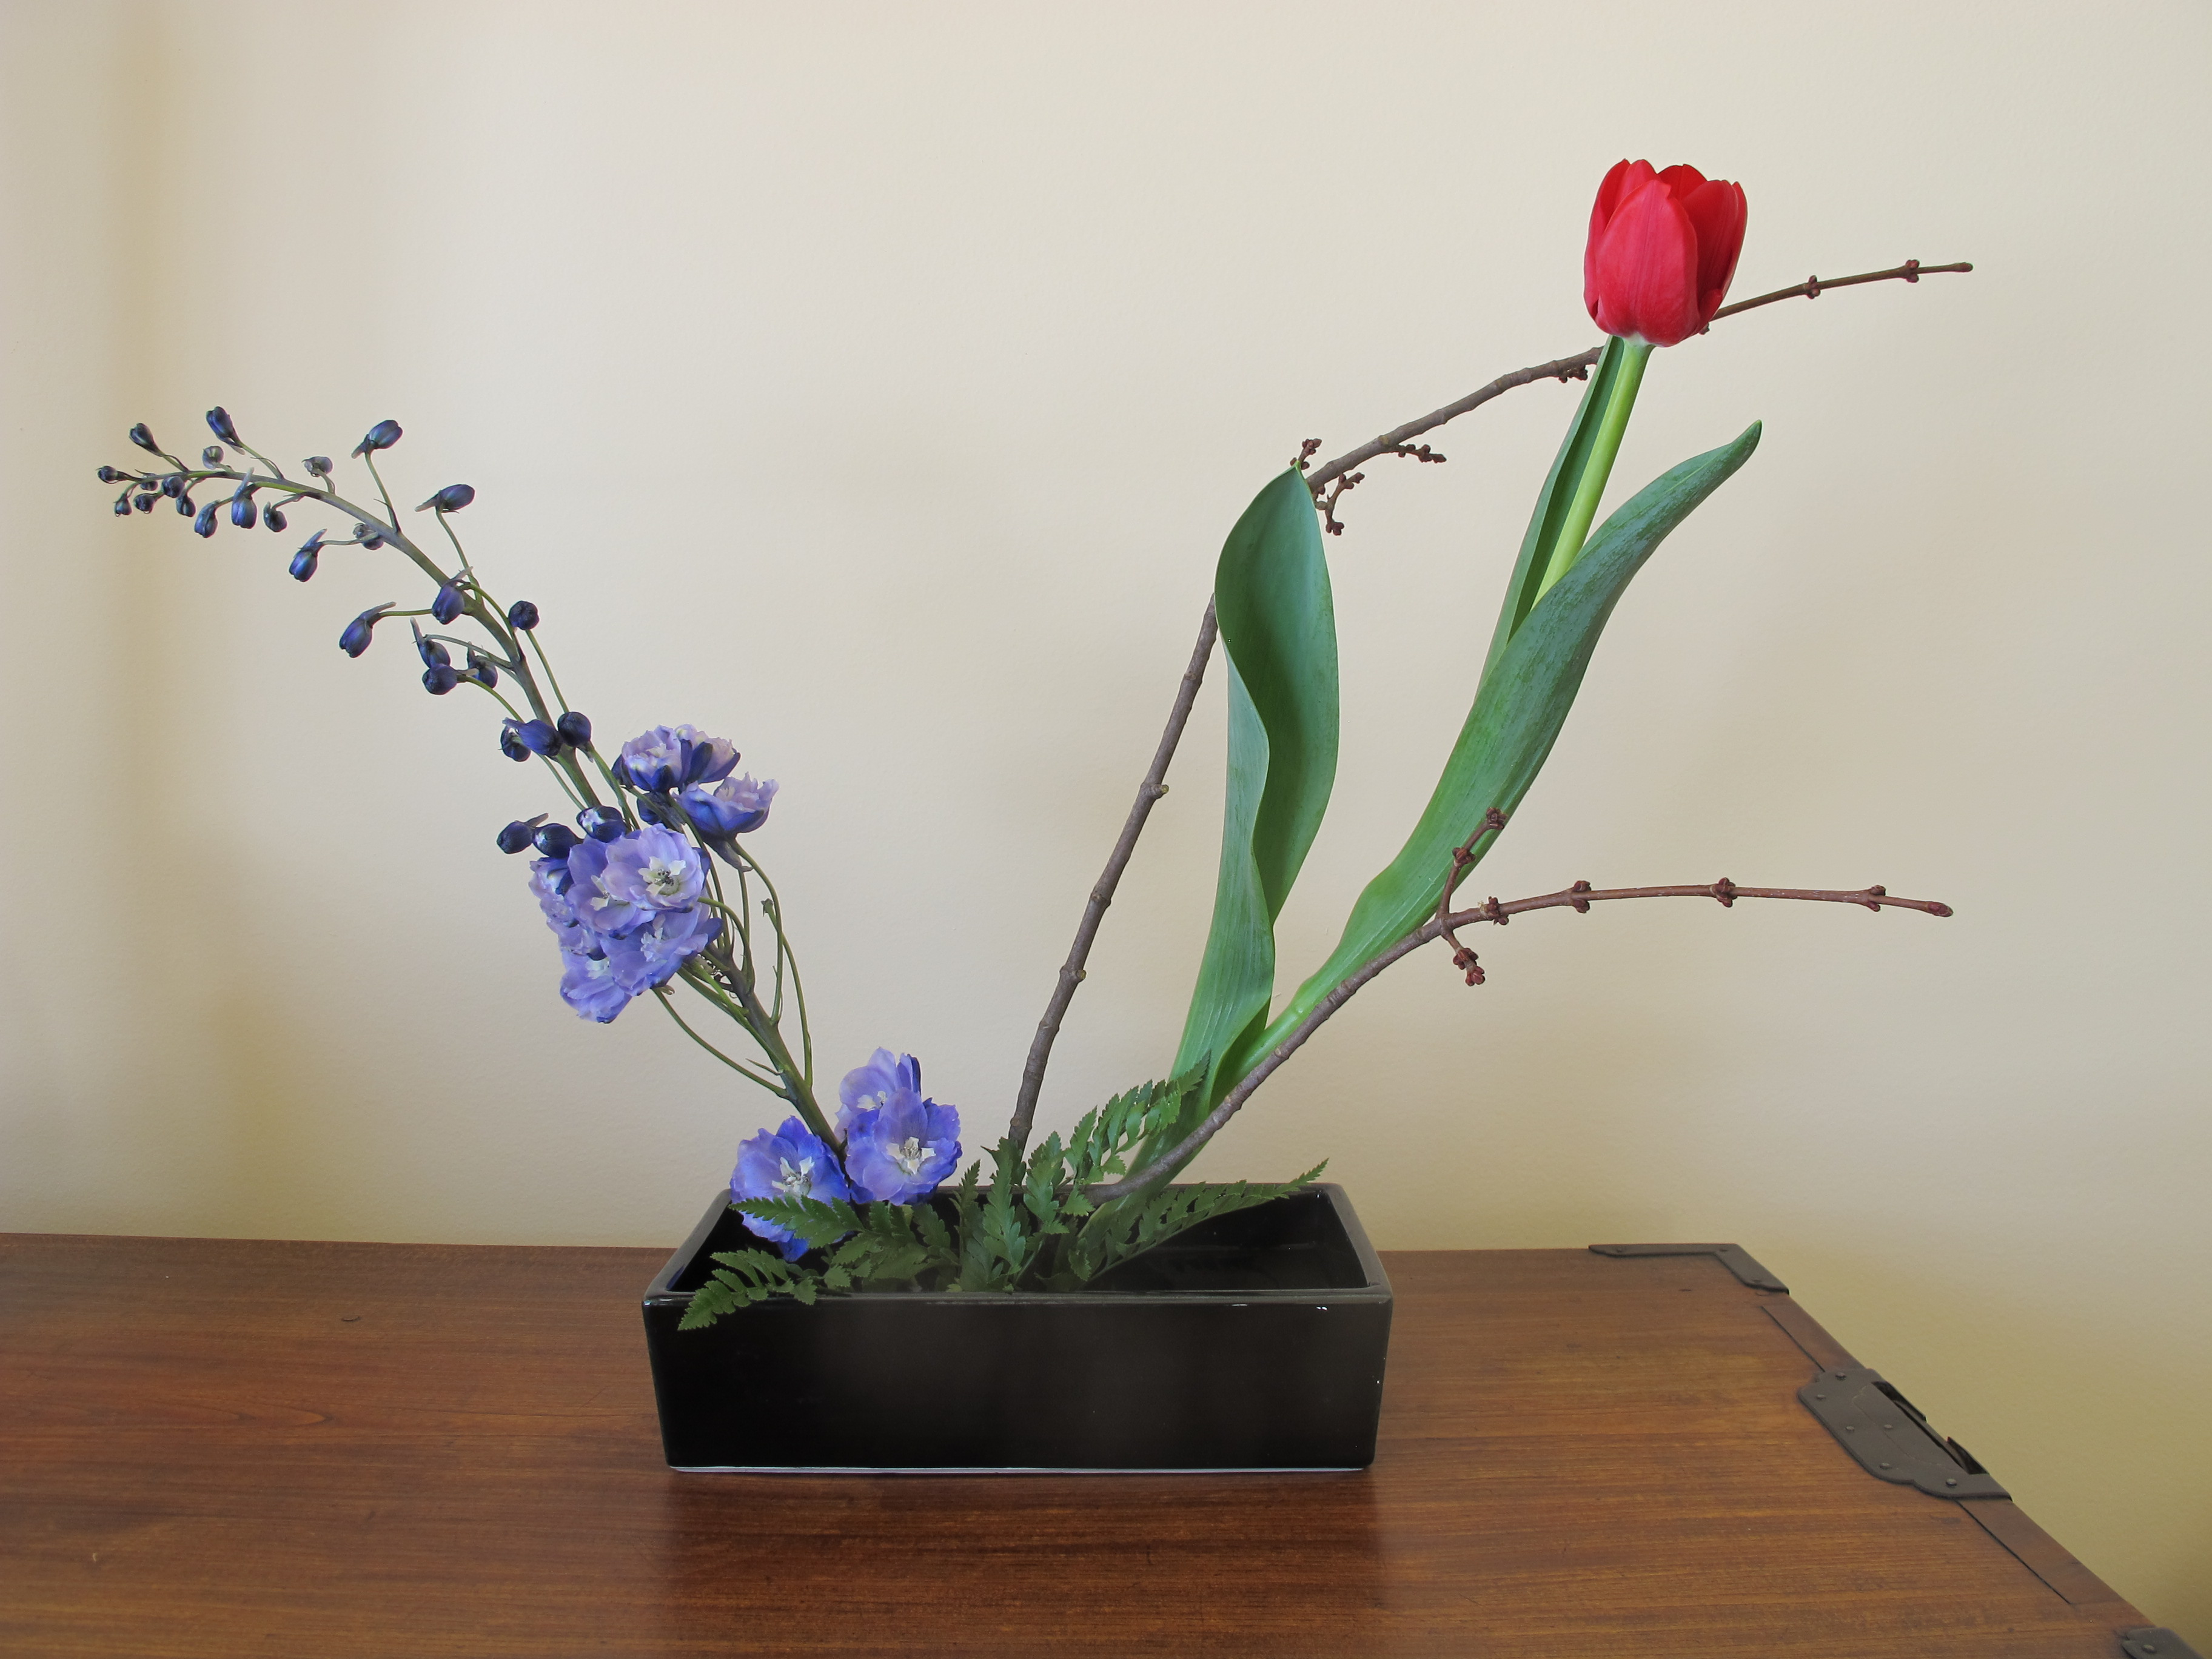
According to Joanne, Ikebana arrangements should have strong lines, usually created by branches, often bare branches. Arrangements also include flowers, of course, but are generally very simple. Some styles use stone and water or even sand as part of the arrangement, often in a simple low bowl.
My ikebana
My first arrangement under Joanne’s supervision was in a low Ikebana bowl, a ceramic rectangle about two and a half inches deep. I placed a frog in the middle and then selected two bare branches, which I pinned in place on the frog. I cut the ends of the branches at an angle so that I could more easily push them onto the needles of the frog. A straight cut produces a round cross-sectional cut, but one on a 45 degree angle yields a nice oval with more space to grab the upward facing pins of the frog.
Each branch was placed at an angle of about 30 to 45 degrees off vertical – and the second branch was roughly parallel to the first. Next I placed a stem of delphinium going off in the opposite direction. I stripped off the lower blossoms from the stem, which served to establish a strong visual line. Later I used the blossoms I had taken off to help hide the frog in the bowl.
Simplicity is an important component of Ikebana, so I added just one bright red tulip. The tulip wove its way through the two bare sticks, adding a punch of color. I left the leaves on because they added a simple splash of green. Joanne removed a bit of fern frond that came free with the flowers and used it in the base of the arrangement to help cover the frog.
Getting flowers and sticks to stay in place in an arrangement can be difficult. Joanne taught me some nifty tricks that I will use in arrangements – whether Ikebana or conventional.
The first trick is how to attach a narrow stem to a frog. It’s impossible to do if the stem is smaller than the needle, or nearly so, which is often the case. Joanne showed me how to use a one-inch piece of stem from a tulip or daffodil (or other fat, juicy stem) to create a sleeve that can hold a thin stem inside it. She just poked a tooth pick into the tulip stem, making a small hole that allowed her to insert the thin stem of a single delphinium blossom inside the tulip stem. The tulip stem, along with the blossom, was easily attached to the frog.
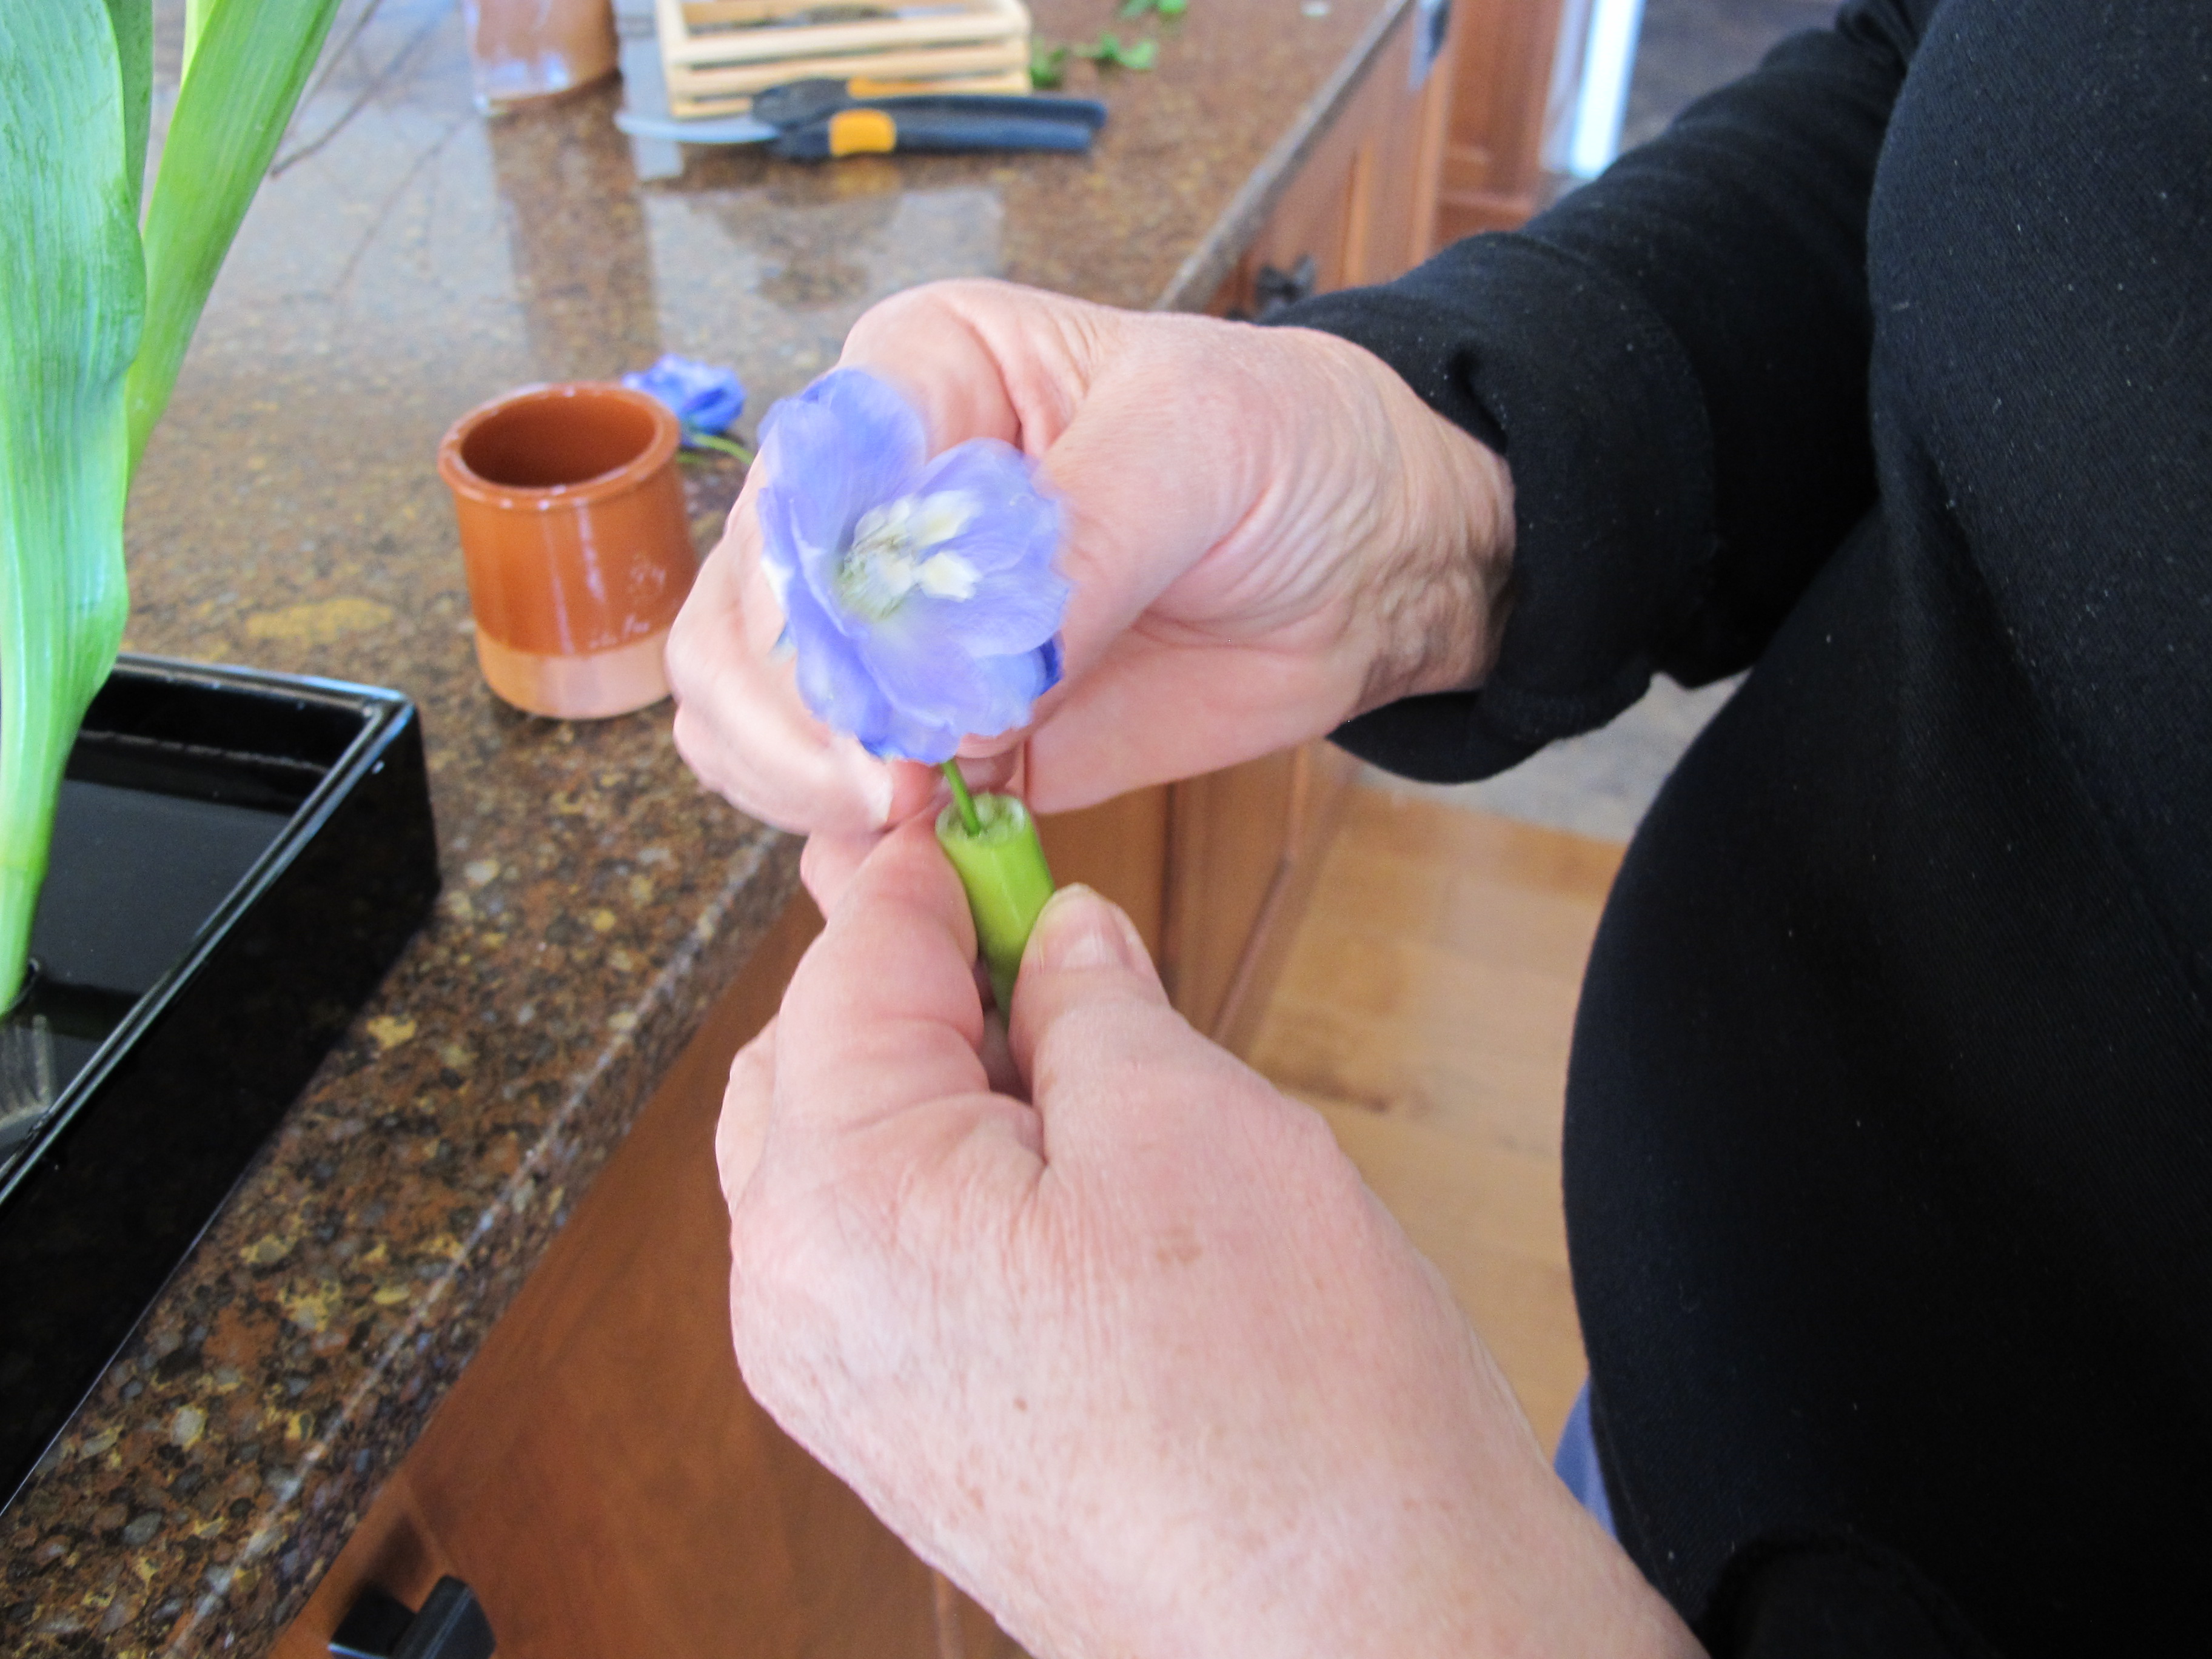
Using a small section of a tulip stem as a sleeve for a flower stem too small to pn to a frog
One arrangement we created was in a tall narrow ceramic vase which precluded using a frog in the bottom to hold stems in place. When Joanne wanted to keep 2 sticks together in that arrangement, she used a narrow Velcro strip as a fastener. She tied the sticks together down low, so that the ceramic vase hid the Velcro but the sticks stayed close together.
Joanne uses many different kinds of flowers in her arrangements, but only a few at a time. Some flowers that work well in Ikebana include Siberian iris, alstroemeria, tulips, Irish bells, forsythia, goose-necked loosestrife and chrysanthemums. I prefer to work with flowers like lisianthus or chrysanthemums that will last a week or more in an arrangement, but also appreciate iris and tulips that might only last a few days. Tulips, by the way, will move in an arrangement, bending or twisting their stems – sometimes in opposition to the laws of gravity.
Trying to define Ikebana is, for me, a bit like trying to define love, a fabulous meal or a great bottle of wine. You can describe the ingredients, but there has to be a chemistry that makes it work. As I see it, simplicity and elegance are keys to Ikebana. A lack of clutter is important. Joanne made one arrangement using 2 tulips and a stem of loosestrife in an urn-shaped blue vase with a narrow neck. It could be considered Ikebana, or just a simple conventional flower arrangement.
On another note, go outside today and notice where the snow has melted off the ground first near your house. That is where you should plan on planting early-blooming spring bulbs next fall. Take a photo or place a plastic marker to remind yourself next fall. We all need flowers as soon as we can get them.
Henry’s book, The New Hampshire Gardener’s Companion is just out in a second edition with 2 new chapters and updated material, including pests and diseases common in New England.
Starting Seeds Indoors
After arguably the coldest, snowiest winter on record, I am ready for spring. Okay, maybe the winter of 1934 was colder. So what? I still have snow, and my woodpile is pathetic. I am picking up sticks and burning soggy remnants of previous woodpiles. To keep my spirits up on raw, gray days, I plant seeds indoors.
I started back in March, planting artichokes, onions, leeks and peppers. Now I am planting the brassicas: Brussels sprouts, broccoli and kale. Those hardy souls can go out around the time of the last frost, even if the ground is still cool. My tomatoes, the queens of the garden, I will start closer to mid-April and go in the garden in June – well after the last frost – when the soil warms up to 60 or more.
One key to success with plants indoors is having enough light. A bright, sunny windowsill might be enough for the first couple of weeks in a plant’s life, but to grow good healthy tomato plants for 8 weeks requires artificial lighting.
Shop lights are relatively inexpensive: a two-tube, four-foot fluorescent fixture should cost under $20, plus the bulbs to go in them – which vary widely in price. You don’t need fancy “Gro-Lights”. Those mimic the spectrum of daylight, but for starting lettuce and tomatoes for the garden, ordinary cheap tubes work just fine. And if you can mix cool white and warm white tubes, you can have something close to daylight wave lengths.
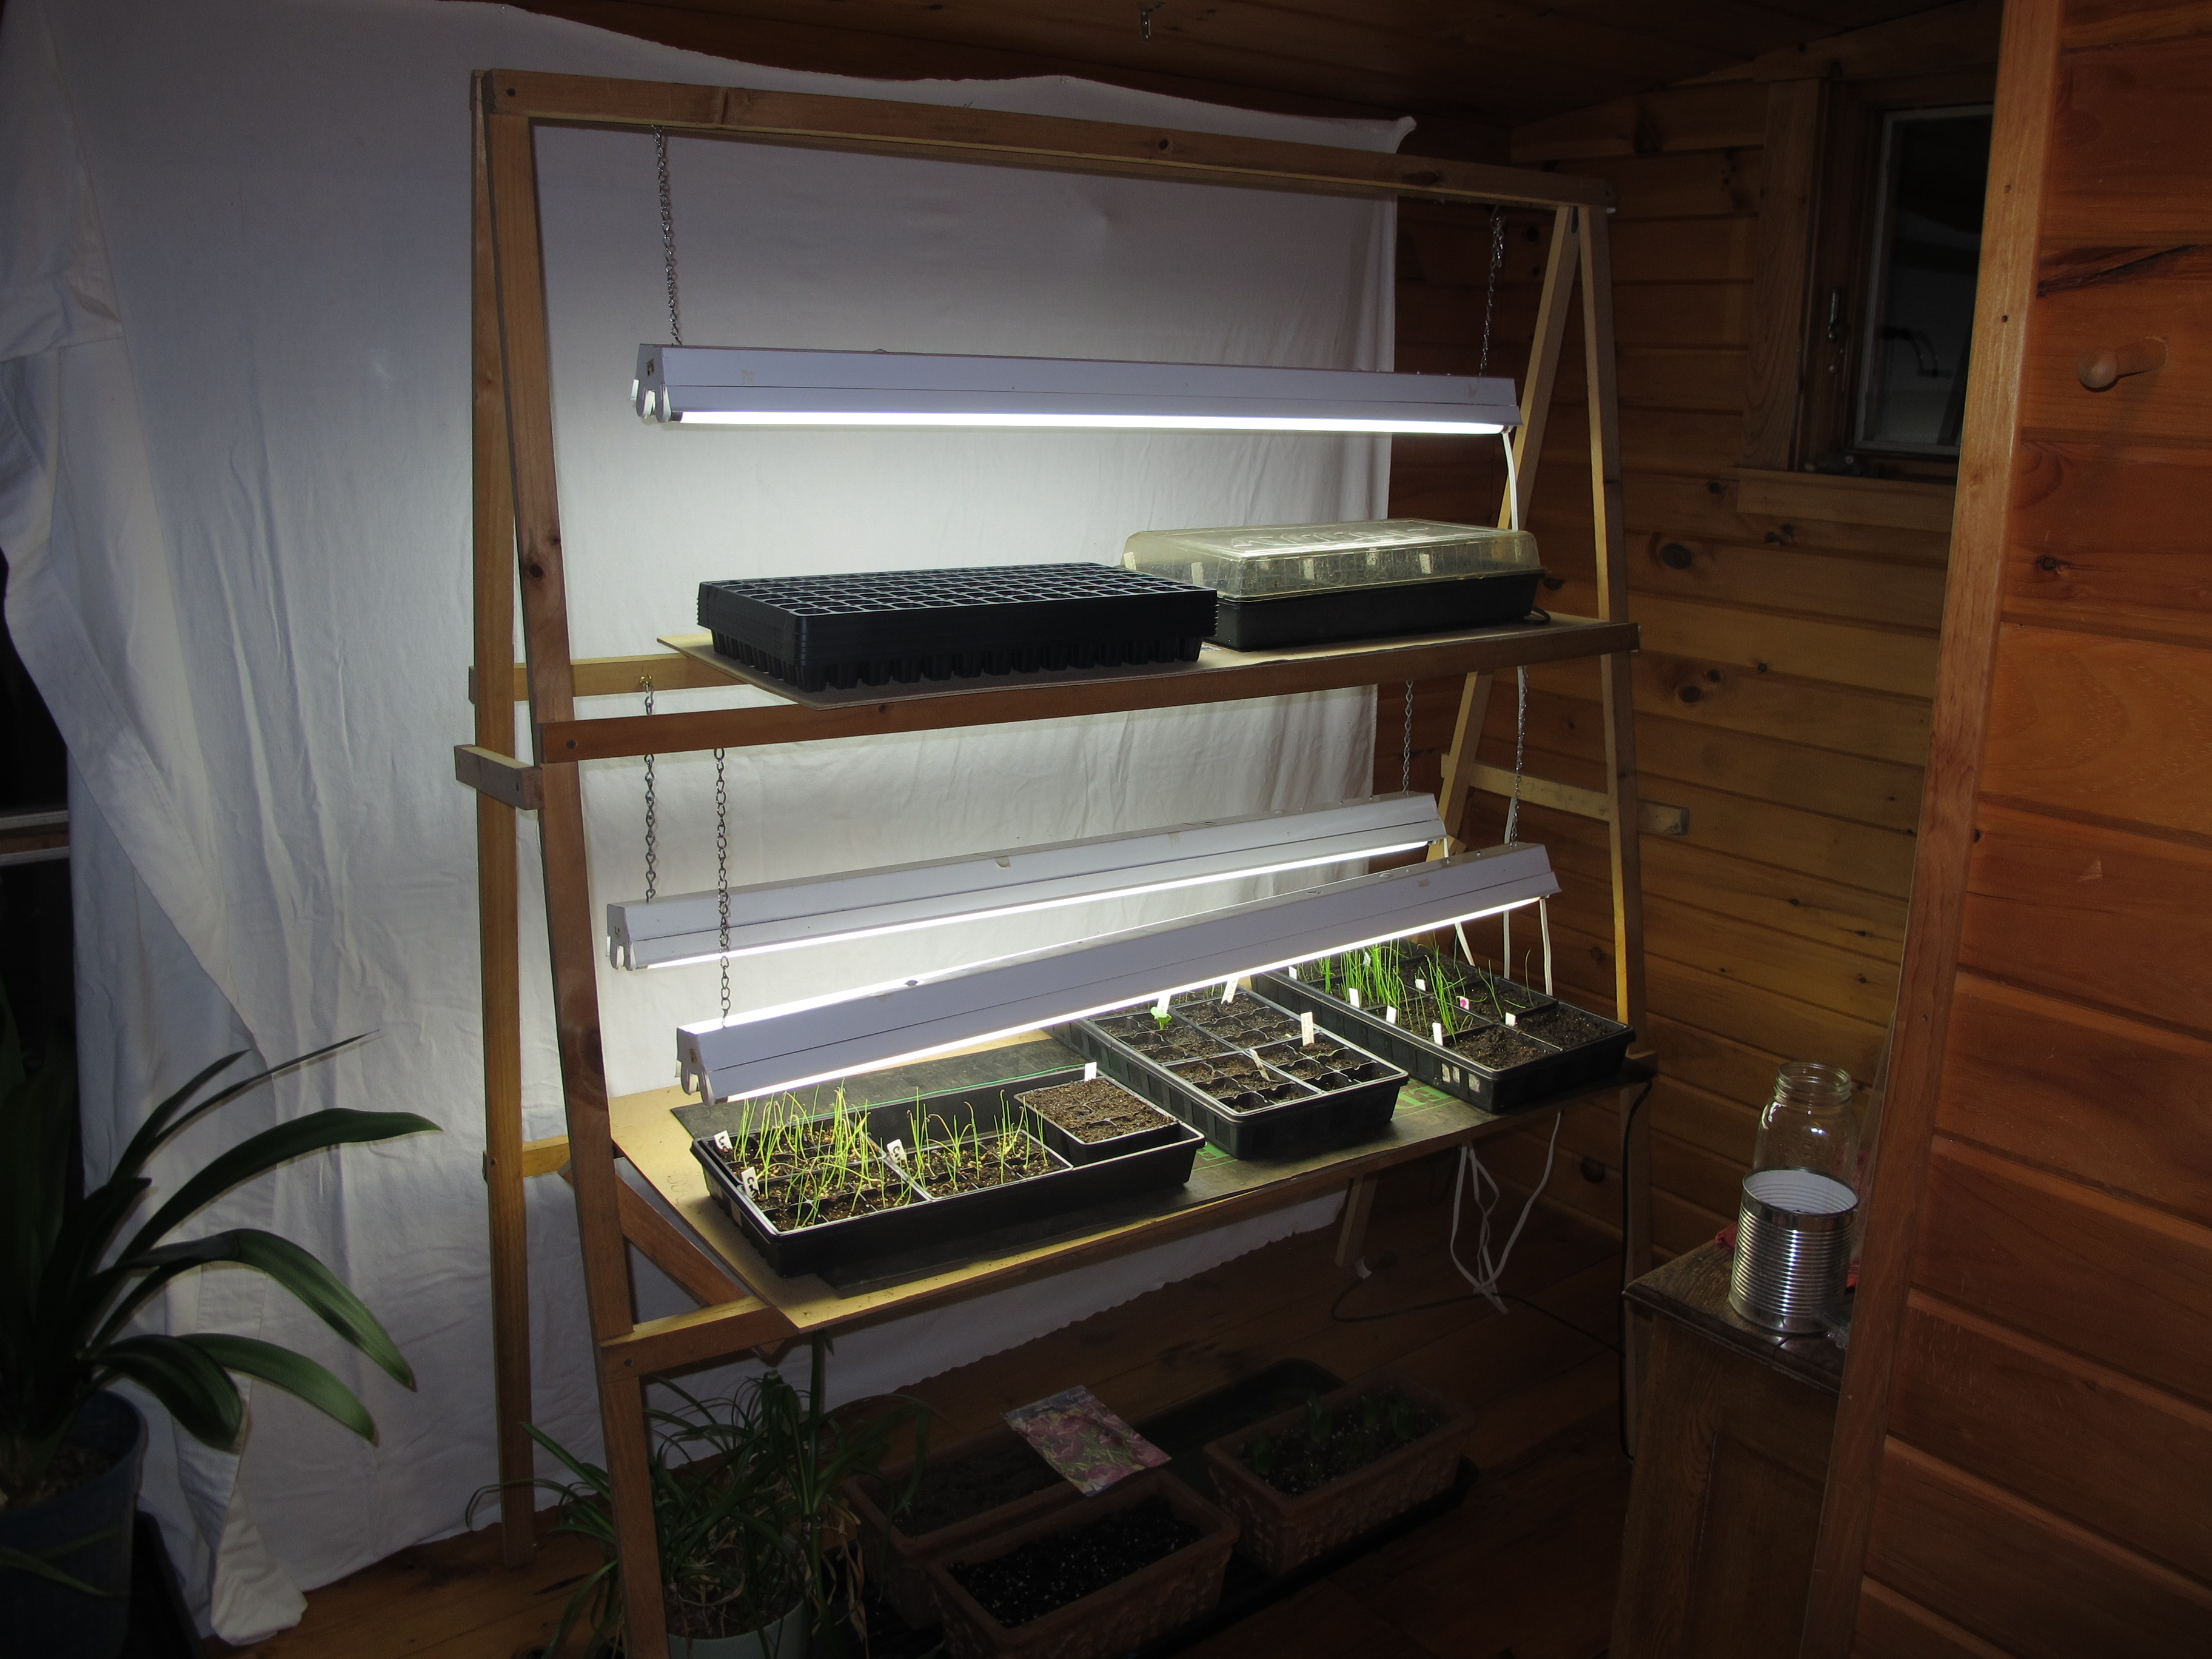
Homemade plant stand
A few years ago I built a simple wood A-frame plant stand that has worked out well for me. It uses 3 fixtures and will illuminate 6 flats of seedlings. I suggested at the time that your local lumber yard will be glad to take your parts list and cut lumber to the appropriate sizes. To get the directions, go to my website (www.Gardening-Guy.com) and type in “Plant Stand” in the search engine, and the article will come up. Or send me a self-addressed, stamped envelope and I will mail you the directions.
Another item that will help you is an electric heat mat to put under the flats while your seeds are getting ready to germinate. Most seeds have a protective mechanism to keep them from germinating too early. They need the soil to reach a certain temperature in order to know that winter has gone by. Garden centers sell 2 sizes: enough for one flat, or enough for four flats.
Last spring I started all my corn indoors in plug trays (containers with over 100 planting places per flat) and put them on a heat mat. They germinated in just 3 days – but would have taken 10 or more outdoors. Corn sometimes rots if the soil is cold and wet. Crows love to steal corn when it is first up, but I planted the seedlings when 3 inches tall and they rooted right in, so the crows didn’t steal a single one.
Moisture is another important factor when starting seeds indoors. Get your planting mix thoroughly moist before you plant. That can be done by placing a tray of planting soil in six-packs in a flat with water in it, and letting the water soak up from the bottom. Or pour water into the bag of soil mix the day before using it.
If the soil mix dries out when seeds are just starting to crack open and send out a rootlet, your seedlings will die. You can prevent that by covering the planted six packs with a plastic dome. These are clear plastic so you can see what is happening, and so that the seedlings that have germinated can get light while others are still waking up. By the time your seedlings are two inches tall, they will be crowding the dome and you should remove it.
Have you ever had bad germination rates? I have. It could be due to bad seed or old seed. In general it is best to buy new seeds every other year, even if you have plenty. Most seeds are good for 3 years or even longer – but at a lower germination rate.
But bad germination may also be due to the position of the moon and stars. I have been following a celestial calendar called “Stella Natura” (www.stellanatura.com) for a few years now, and although I can’t prove that its advice is right, I’ve had some interesting results.
I planted lettuce seeds on a “leaf” day, and then some more the following day, which was a “blackout” day (not recommended for planting anything). Even though I used the same seed package and planting mixture, I got a very low germination rate for seeds planted on a blackout day, but the others did well. The calendar has good days for planting fruits, flowers, roots and leaves. But this year I followed the calendar and still got very low germination for my artichokes, so who knows?
Remember when you calculate the cost of your tomatoes that building a plant stand for $50 and then buying lights for $100 is a multi-year investment. If you like messing around with plants in spring, starting seedlings indoors is a good idea. You can get rare and unusual seeds from catalogs that you would never find at your local farm stand. And, as one of my fridge magnets says, Gardening is Cheaper Than Therapy!
Henry Homeyer is a fruit tree pruner and gardening consultant. Contact him at henry.homeyer@comcast.net or P.O. Box 364, Cornish Flat, NH 03746.