-

Now available for $24.95 including shipping. -

Now available for $21.00 including postage. Vendors I Like
 Click Here to buy from Cobrahead
Fall Color
Some years ago, in a moment of enlightenment, the New Hampshire legislature outlawed the propagation, transport and sale of three popular landscape plants: burning bush, barberry, and Norway maple. All three had been proven to be invasive, seeding into the woods and crowding out our native plants. Both Massachusetts and Connecticut have banned them, too, but so far Vermont, Maine and Rhode Island have not.
I agree with the ban. All three are thugs. Even where banned, the plant police will not come and take away your invasive plants, although I do recommend that you pull yours and replace them. I also understand why so many people love burning bush (Euonymus alatus), especially now when it displays brilliant red foliage. It will grow anywhere and stays a nice size.
Fothergilla
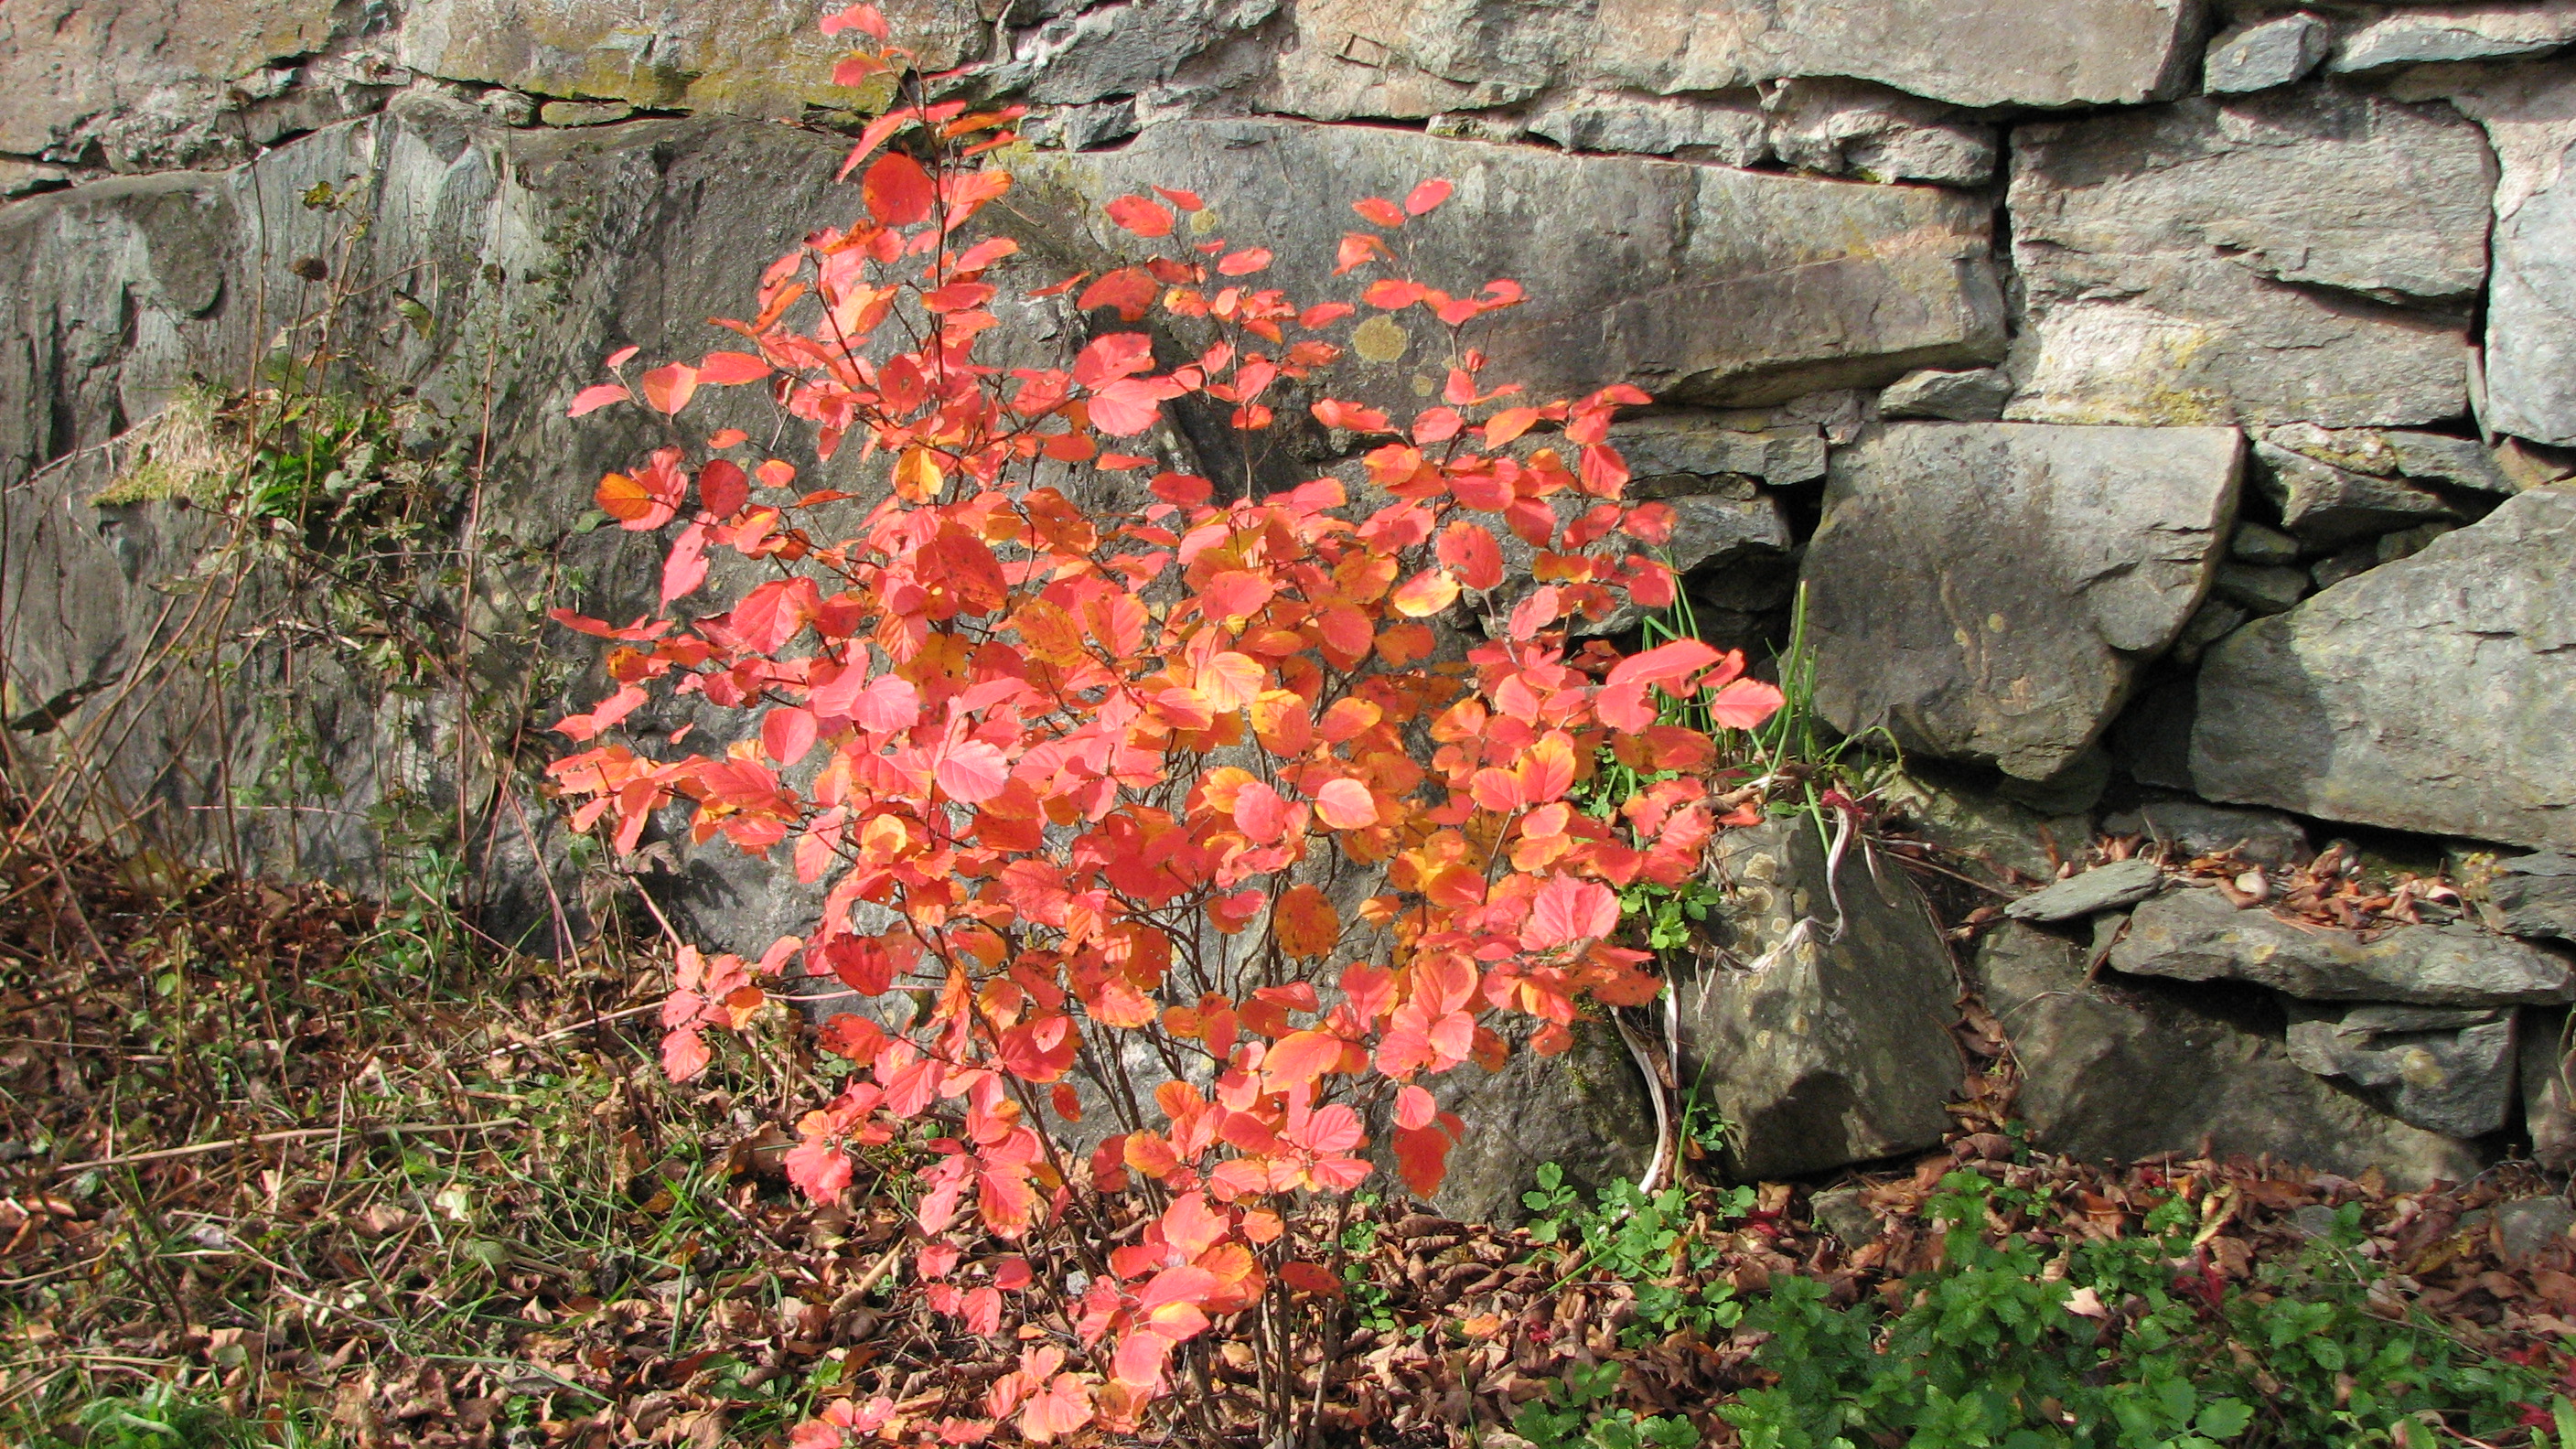
There are good alternatives to burning bush that will provide good – even spectacular – fall color. The best I can recommend is fothergilla (Fothergilla spp.). This is a small to medium sized shrub with gorgeous white bottlebrush flowers in April and brilliant leaves starting now. It is slow growing, so it need not be pruned often, which I consider an advantage. The fall foliage can range from red and purple to yellow and orange – and I’ve had all 4 colors on one plant. A named variety, ‘Mt Airy’, is one of the best.
The common blueberry is another nice shrub that has red and yellow leaves in fall. The white blossoms in June are nice – and who knows, you might even beat the birds to a few berries. The trick to success with the berries is to get the soil very acidic by adding garden sulfur to the soil, or, right after flowering, add an acid fertilizer like Holly-Tone or Pro-Holly. But don’t add fertilizers now – you don’t want any soft new growth just before the winter.
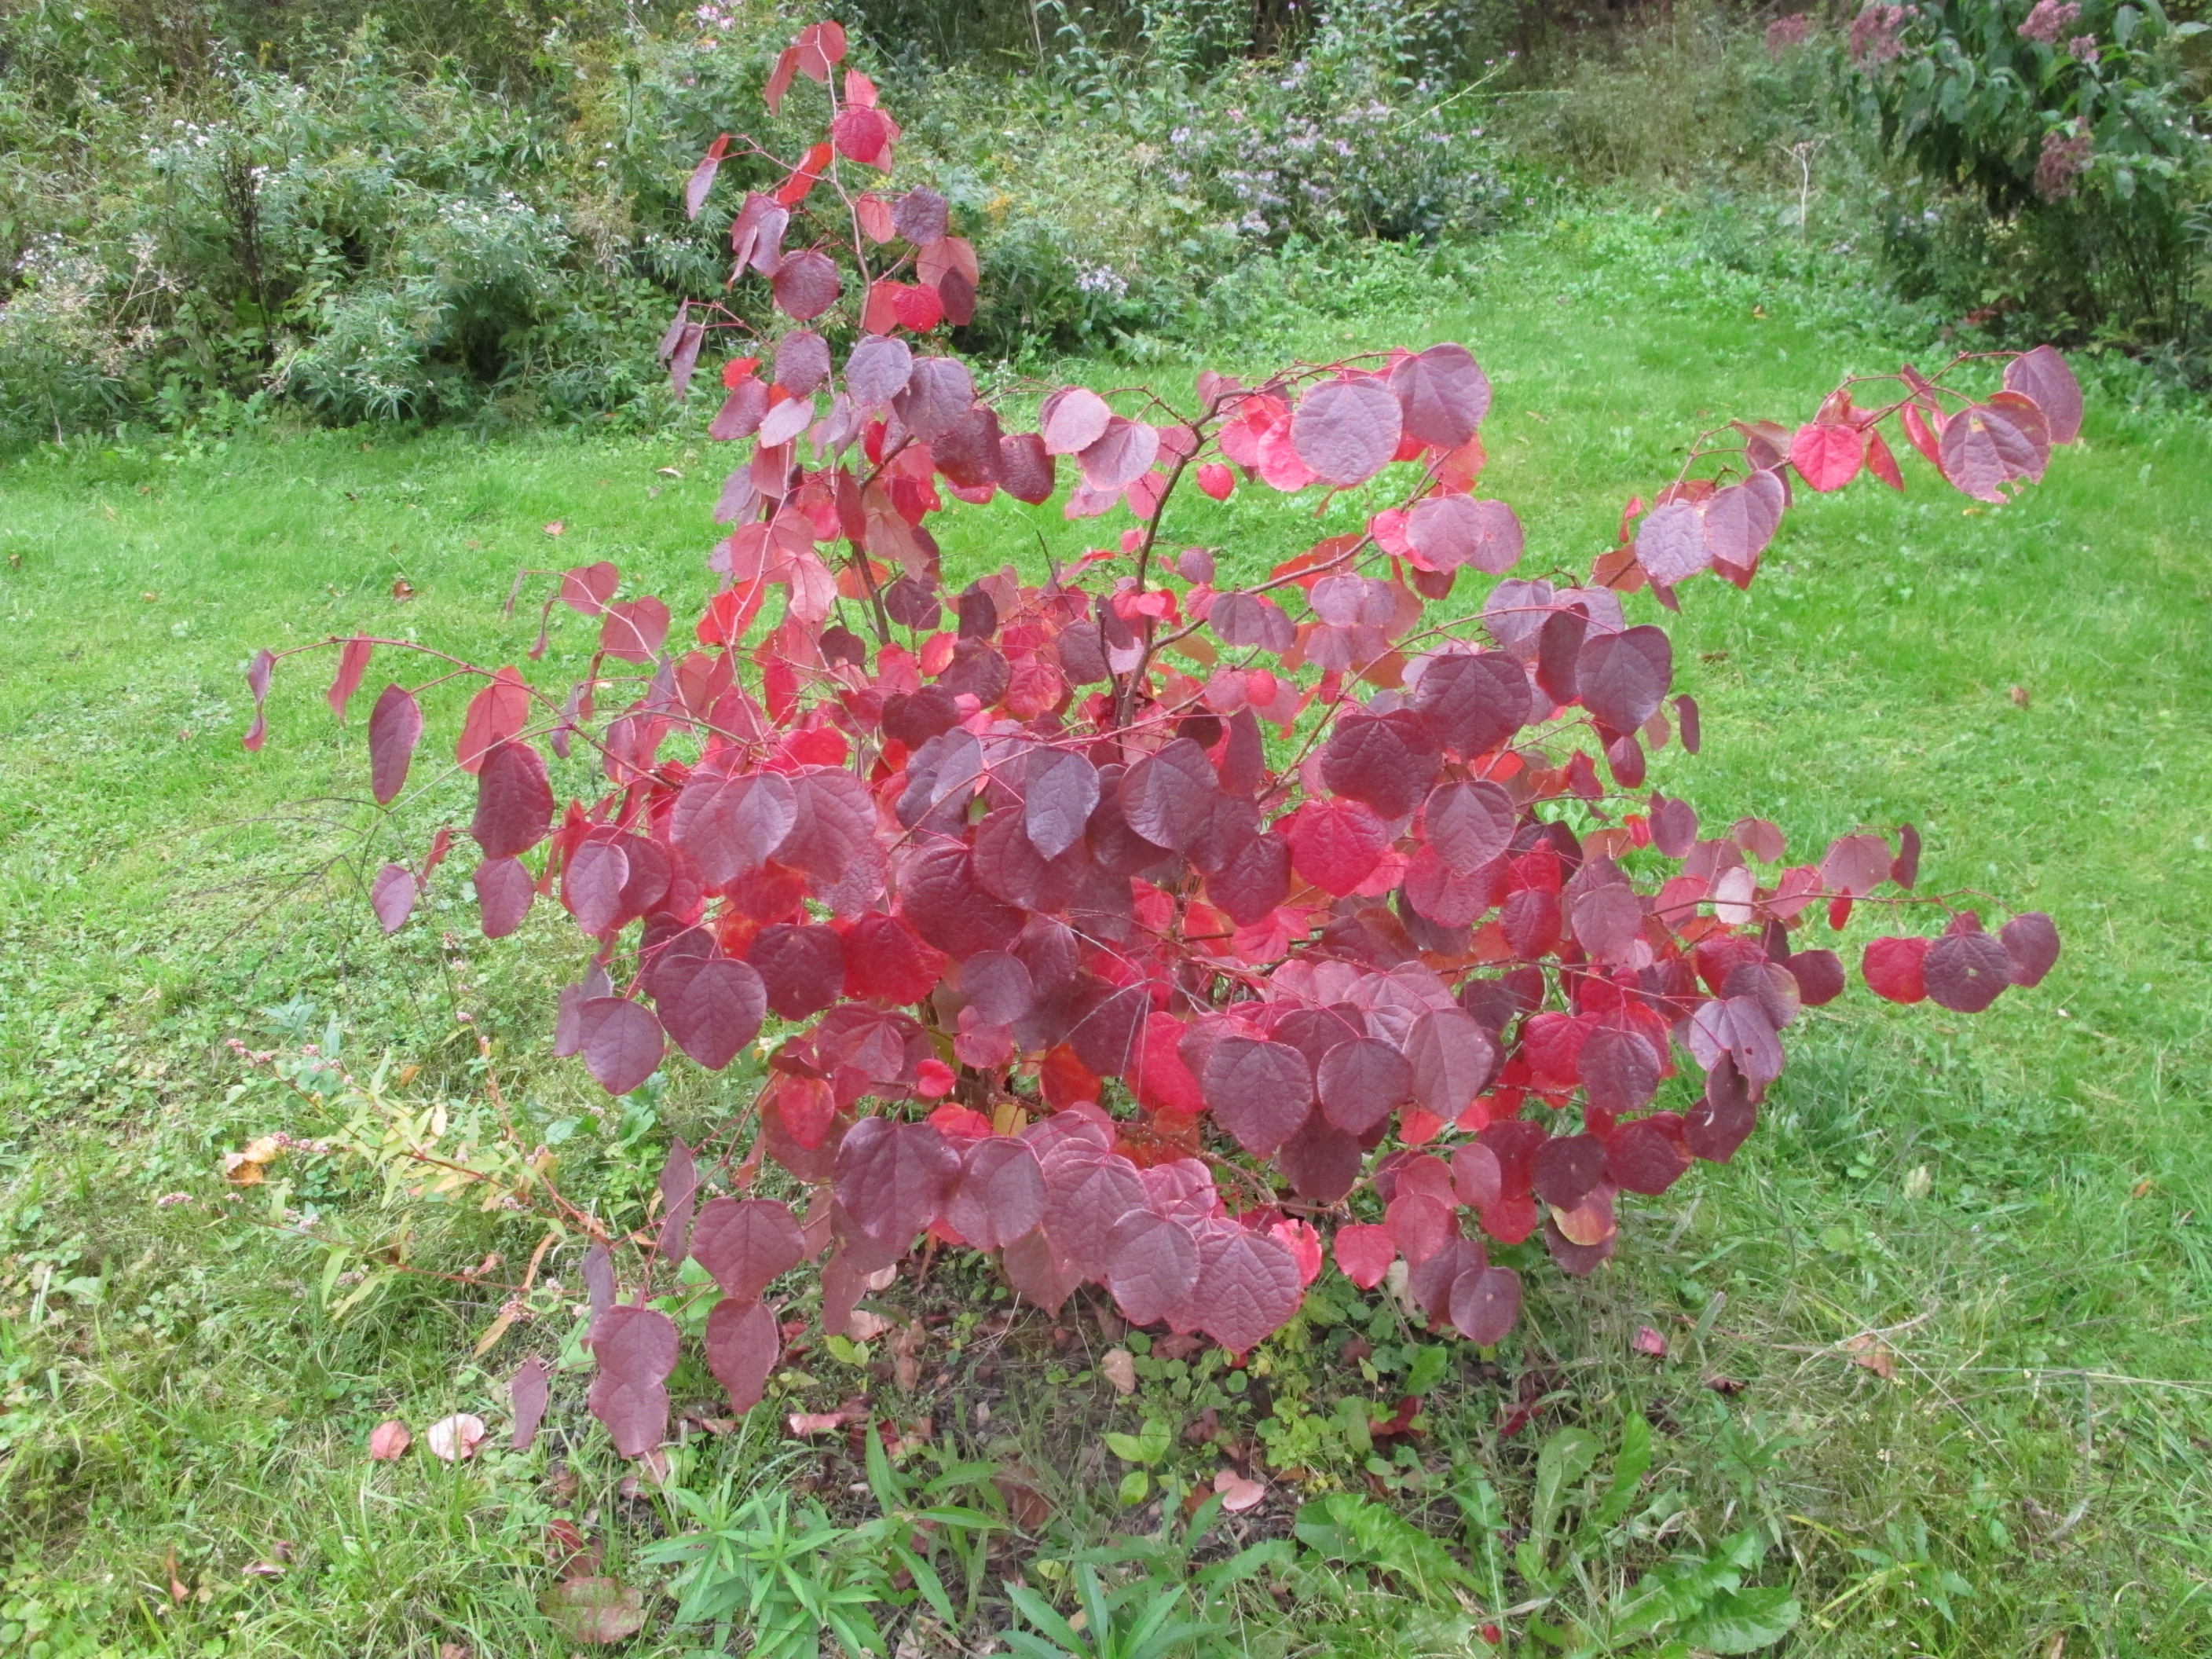
Disanthus cercidifolius
Another great plant for fall color is redbud hazel (Disanthus cercidifolius). It is not commonly found in garden centers, but I predict it will be: the leaves turn a brilliant claret red to purple early in the autumn. I got one last year and it suffered from the cold winter with some branches dying back. It also was munched by deer. But it rebounded nicely this summer, and is putting on a great show. According to Professor Michael Dirr’s books, it might reach 6 to 10 feet tall, and does well in partial shade and moist, rich soil. Dirr says it is hardy to minus 20, and we saw temperatures colder than that last winter, so I should be glad mine survived.
Spirea is the common (and scientific) name for a group of shrubs commonly planted around post offices and municipal buildings. It is what I think of as an “urban survivor”. Like that banned burning bush, it requires little and will survive almost any conditions. There are some varieties that have excellent fall color. ‘Glow Flame’ and ‘Glow Girl’ are varieties with good red color that I have seen, though, not grown.
Some azaleas also develop good red colors. ‘Cornell Pink’ is a very early- blooming azalea that also has excellent red leaves right now – in some places, but not others. I saw two examples growing side-by-side. One had a nice burnt red color, the other had leaves that were still an ordinary green. Beats me why one should turn color, the other not.
Both the double file viburnum (Viburnum plicatum) and arrowwood viburnum (Viburnum dentatum) often have excellent red fall color. But like the azaleas mentioned above, there is limited consistency. If you want to get a specimen that shows good color, buy one with good color at the nursery and plant it now. Both produce nice white flowers in the spring and produce berries in late summer that are relished by birds. They are medium-sized shrubs that are pleasant additions to the landscape.
One word of warning: there is a viburnum leaf beetle, a foreign pest, that has recently appeared in the landscape and it can devour the leaves of viburnums and ruin their appearance – or even kill them. I’ve been told that this new pest came down from Montreal, so some northern gardens have been affected before those in southern locations.
One last suggestions to consider is the red chokeberry (Aronia arbutifolia. I bought one 10 years ago after reading about this species and seeing a specimen with brilliant foliage. What struck me was that the tops of the leaves in fall were red and the undersides were silver. But my specimen has not thrived, and I have moved it once on my property trying to find just the right place for it. It is generally said to be adaptable to soils and sun conditions, and the berries are so bitter that even the birds will not eat them. Still, it’s worth a look. My specimen has stayed about 6 feet tall.
As with anything we do in the garden, there are few guarantees when it comes to fall color. Burning bush? Yes. Red, year after year. And I’ve always been pleased with fothergilla. But even our favorite maples cannot be depended on to put on a spectacular show every year. So please don’t sue me if you pull out your burning bush and plant a spirea or a viburnum and it doesn’t perform as well! Each shrub we plant has its virtues.
Henry Homeyer is the author of 4 gardening books and is a UNH master Gardener. His web site is www.Gardening-Guy.com/.
Planting Trees
Fall is hard upon us, or at least here, in Cornish Flat. I know I should “toughen up” and ignore the cold, but I admit it here: I had my first fire in the wood stove recently. It felt great on a raw, rainy night. “Real” New Englanders never admit to turning on the heat or starting a fire until Halloween or later. Not me. And I’m looking at fall chores outside, too. Chief among them is planting trees and shrubs.
There is disagreement among experts as to the best time to plant trees. Some like spring, saying roots have a longer time to get established before winter. Other say no, if you skip a week or two of watering in the heat of August, you can damage roots or even kill a tree. Fall is safer, they say, because the weather is cooler and often rainy. Experts explain that roots grow and extend in fall, even after leaf drop – right up to the time the ground freezes. That last argument makes sense to me, so I’m in the “plant trees in fall” camp.
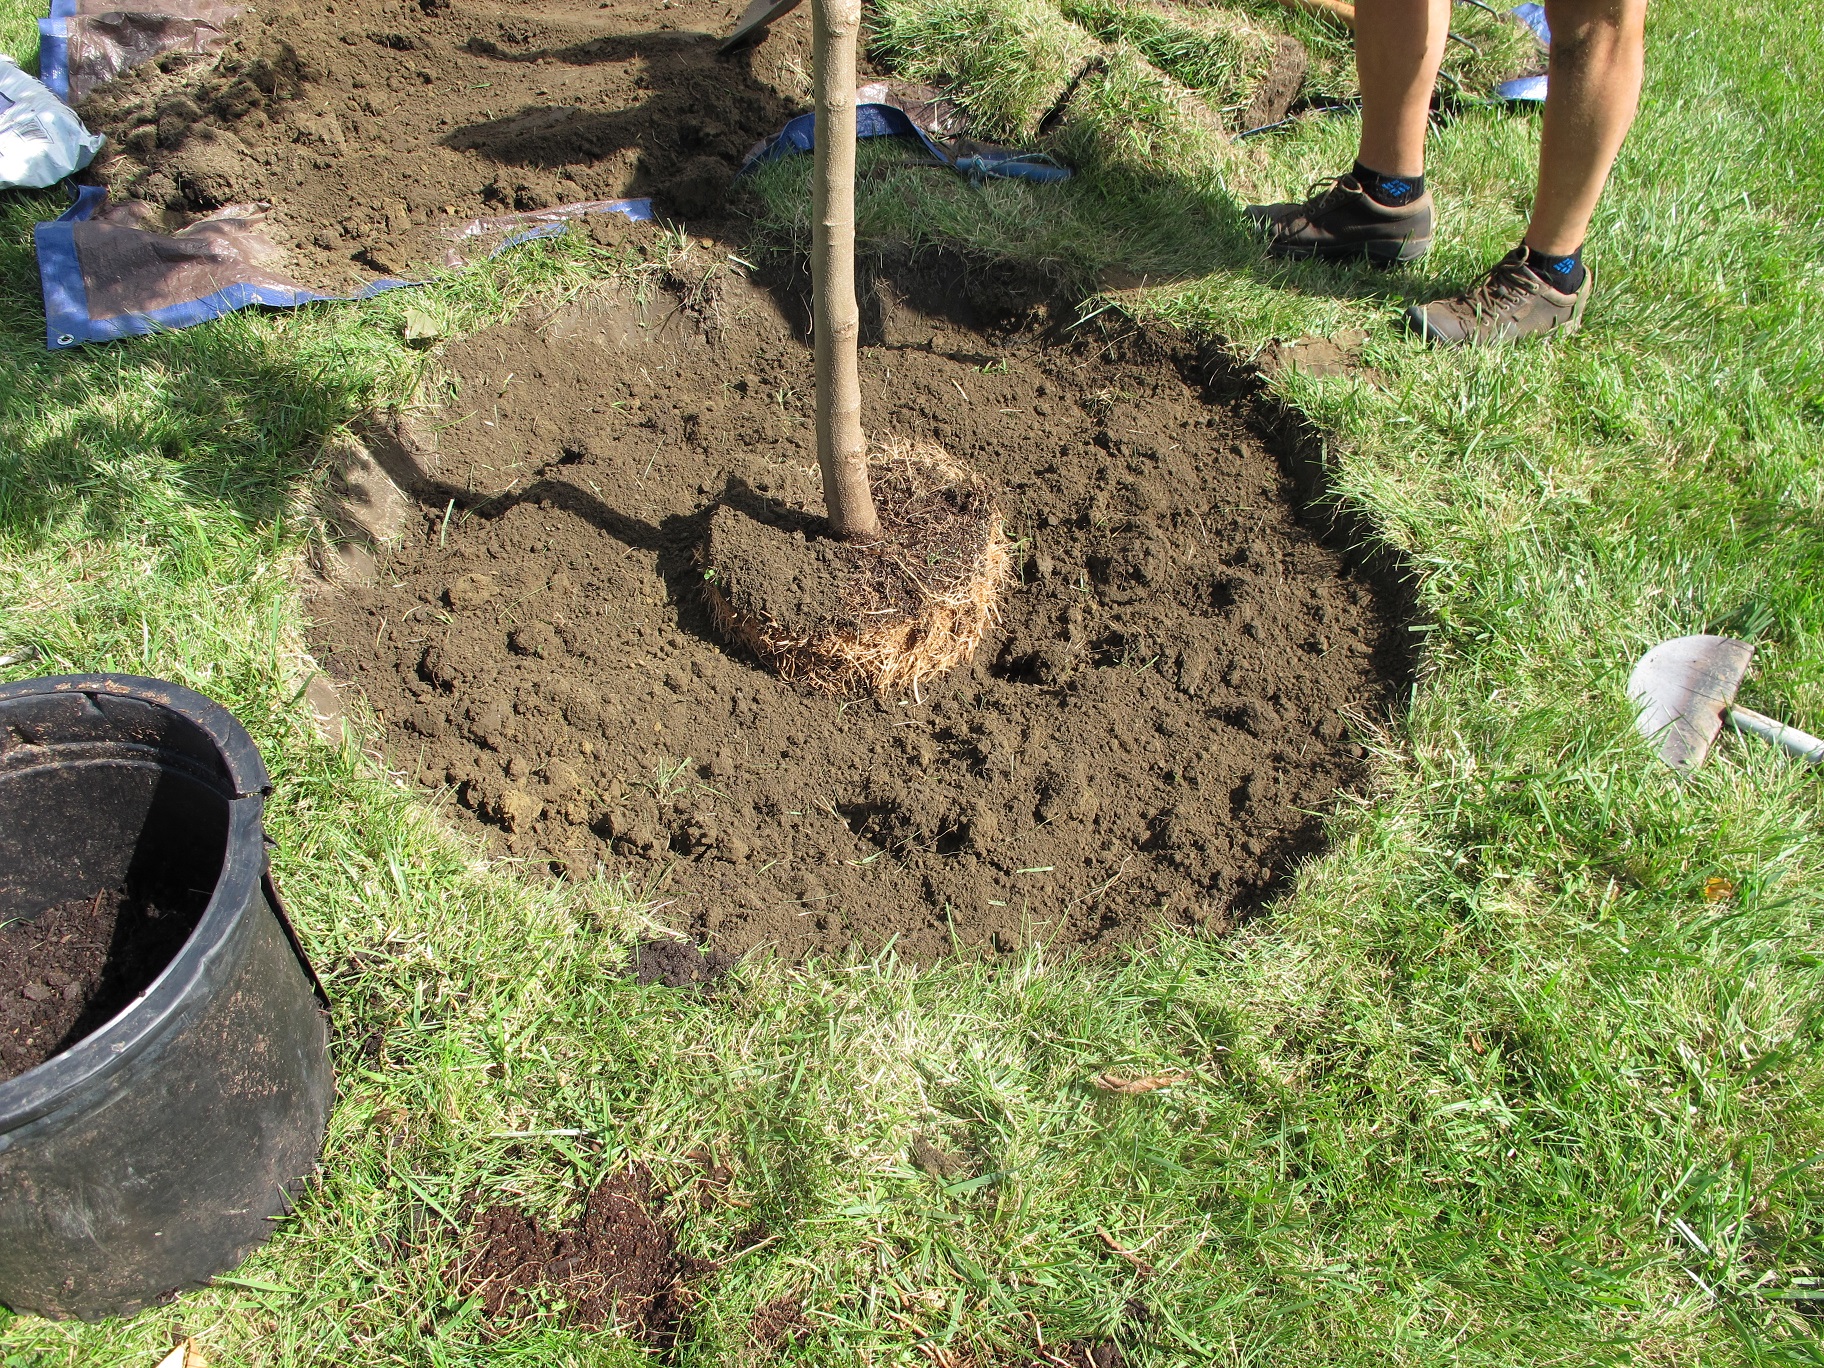
Trees sold in nurseries are often grown in fields like corn – row after row of maples, birches and oaks. Then they are lifted out of the soil and plunked into plastic pots. Those pots are then filled up with a potting mix but little or no regard is paid to the placement of the seedling in the pot. Workers don’t seem to know or care that it’s important that the “trunk flare” is on the surface of the potting mix – not buried 3 to 6 inches below the surface. This often causes trouble later on.
I recently planted a 10-foot tall Merrill magnolia for a client. It came in a plastic pot that was about a foot deep and wide. One of the first tasks I did was to dig around in the planting mix to find the trunk flare. Trees in nature – or well planted in the landscape – don’t look like telephone poles at the ground’s surface. Instead, the trunk flares out, displaying above ground “roots” that stabilize the tree in high winds. But even a large tree in a pot may not show much flare.
Here’s the problem: If the flare is covered up, the bark will be covered by soil and will eventually rot. The growing layer beneath it (the cambium) will be ruined – and the tree will decline and die. But it’s a slow process, taking 6 to 10 years. Sometimes more. Look for tip die back – trees that lose their leaves at their tops long before the rest of the leaves. Those are trees that are not doing well, and may have trunk flares covered by soil or mulch. Remove the soil until you can see the trunk flare, and you can save the tree.
At planting time you need to figure out what was above ground while the tree was growing in the ground, and clear soil off it before planting. You might be misled by little roots growing out of the trunk flare if the tree has been in the pot for a year or more. Trees in nurseries are watered from above, so trees in pots grow roots at the surface of the pot. But you can disregard those roots, or cut them off. Use your fingers to loosen soil around the base of the trunk and expose the trunk where it flares out. Then you are ready to plant.
Filling the hole that is wide, not deep
Many experts advise digging a hole that is three times as wide as the pot it came in. I like 4 or 5 times the width of the root ball. The idea is create a zone around the planted tree that has nice loose, fluffy soil that will allow fine roots to penetrate it. But the depth should just be the depth of the root ball, not more. You want the root ball to sit on unexcavated soil so that it doesn’t sink down deeper after a few rains or waterings.
What do you do if planting on a hillside? You must create a level terrace for the tree by cutting into the bank and/or filling up the lower side with fill. Generally it is better to cut into a hillside and re-grade the soil.
Once the hole is dug, remove the tree from the pot and place it in the hole. If you place a tool handle over the hole you can easily see if the hole is the right depth. Be sure the bottom is flat and the tree is vertical, not leaning. Look at it from 2 sides to see if it is straight, and if the best side is showing forward.
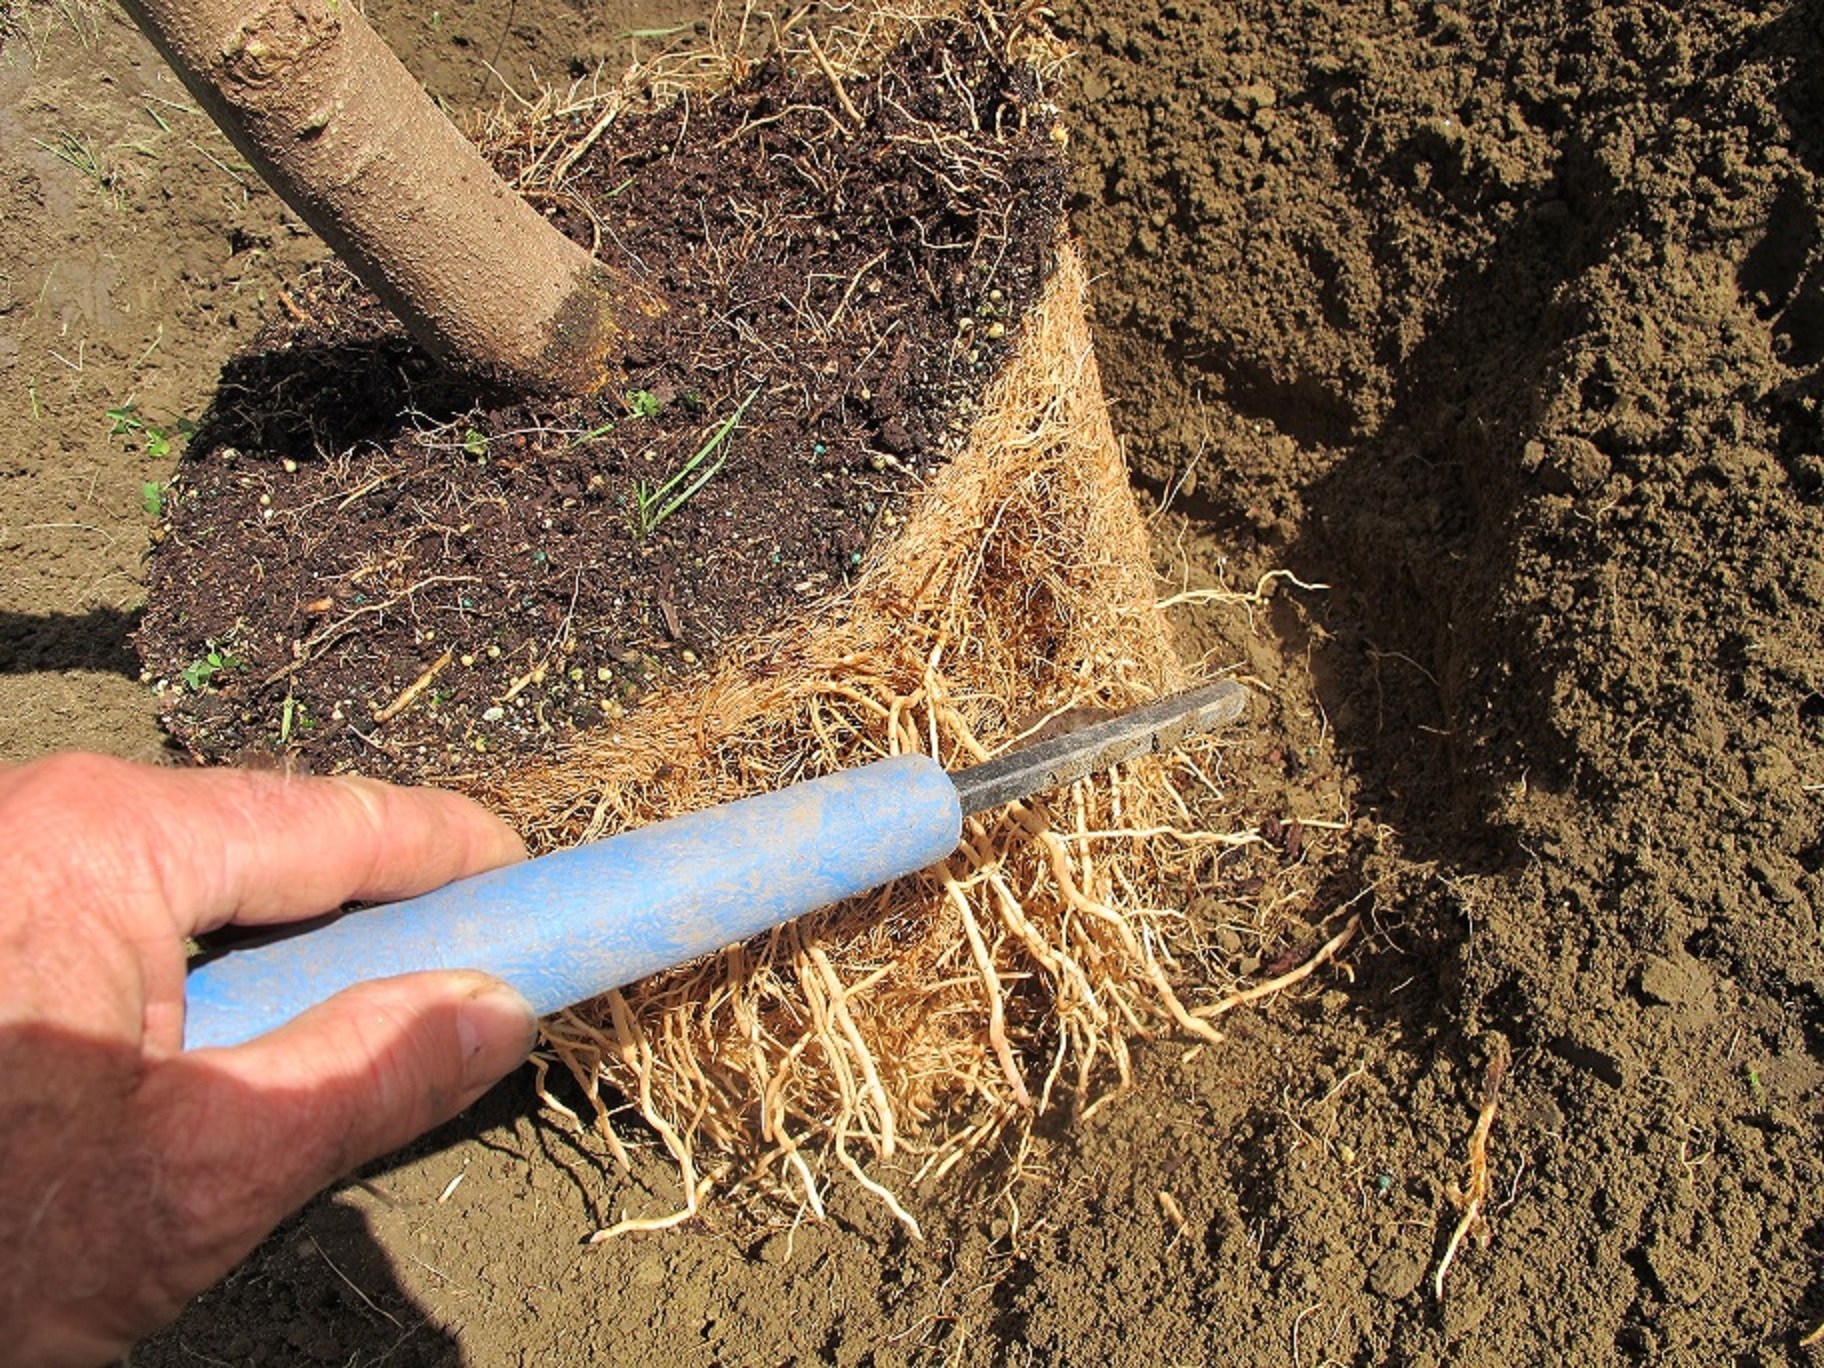
Teasing out the roots
I tease out the roots on the sides and bottom of the root ball to loosen them up before filling the hole. Then I refill the hole, using the same soil I dug out – minus the rocks. It’s okay, according to me, to add a little compost or rich topsoil to the fill if planting in poor soil. But don’t fill the hole just with topsoil and compost. If you do, the roots may never extend past the hole you have dug – like a tree growing in a bathtub.
Mother Nature doesn’t use fertilizer, and I don’t either. I don’t want to push a tree to grow fast in its first year, which fertilizer would promote. I want it to get established, and to send out roots looking for water and minerals.
Planting a tree is not rocket science. Just expose the trunk flare before you put it in the ground, dig a nice wide hole, and keep it watered for the first year of its life. Planted right, your tree should out last you!
Henry Homeyer is a UNH Master Gardener, and the author of 4 gardening books. His e-mail address is henry.homeyer@comcast.net. His Web site is www.Gardening-Guy.com.
Fall Chores
The fall equinox arrives on September 23 this year. On that date, days and nights are of equal length, but with each subsequent day the nights get a little bit longer and we begin our descent into winter. For many gardeners, the shortening days are not welcomed. I try to look at the positive side: we all need a break from weeding and working on our gardens. It’s not time to hang up our tools and put them away, but we can start to slow down.
My vegetable garden did well this year. We had plenty of rain – but lots of sun, too. Often the rain was torrential – which is not ideal – but it most often fell at night, followed by sunny days which were great for growing. I worked a piece of borrowed land this summer, one that had been fallow for a couple of years, and I was not bothered by tomato blights there, so the leaves are still green and the plants producing well.
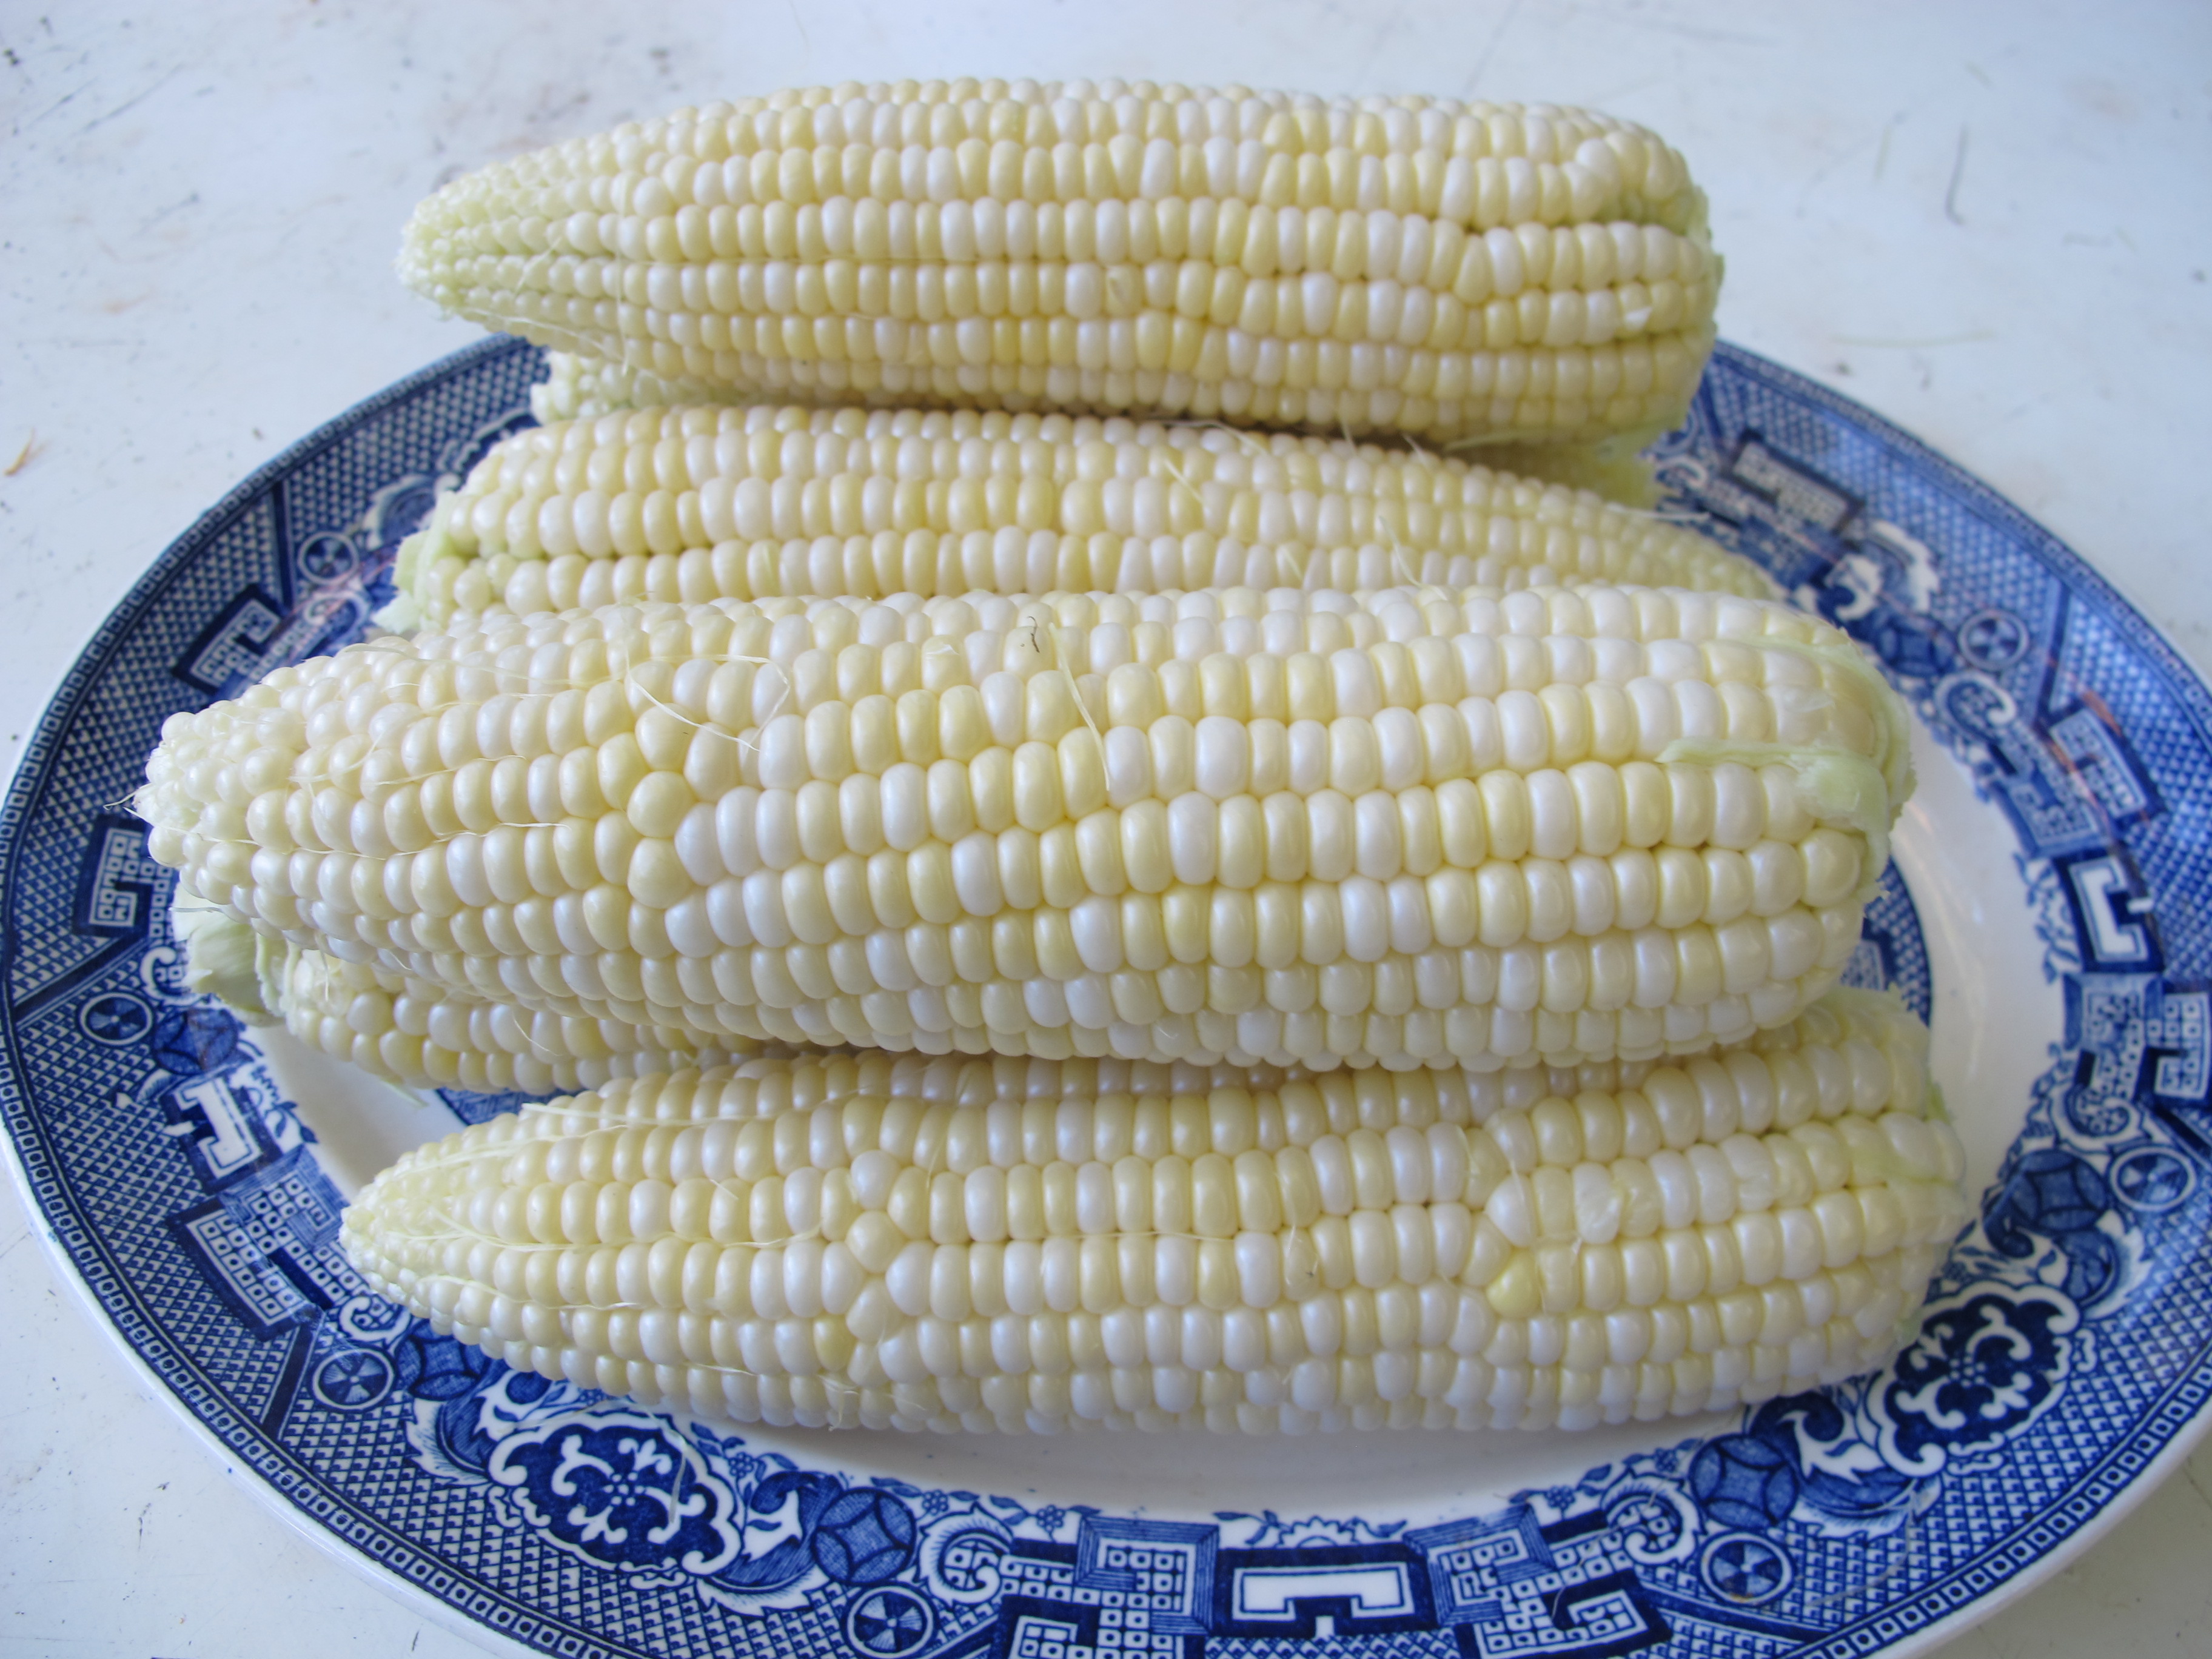
Organic Corn from my Garden
I grew corn for the first time in more than 20 years and was delighted that the corn did not all get ripe at once; it ripened over a 3 week period. I had plenty to share, which is nice, too. People often say that you can’t grow corn organically – that you need insecticides to kill the corn ear worms and chemical fertilizers to feed the nitrogen-hungry plants. I used neither, and got fat, juicy ears that produced not a single worm. I fertilized with Pro-Gro organic fertilizer at planting time. Period. Too much nitrogen from chemical fertilizers has been shown to attract insects.
I used a lot of hay as mulch this year, and that really helped to keep weeding to a manageable level. Three or four inches of mulch hay around the tomatoes applied early on kept down weeds and provided a nice clean place for fruit, some of which inevitably lands on the ground (despite the cages).
It’s important to clean up and remove diseased plants once they have stopped producing. I like to mix plant carcasses with brush in a pile in the garden where I can burn it all after the snow flies. Insects (and their larvae and eggs) and fungal spores can be effectively destroyed that way. Weeds harboring seeds can go on the pile, too. Weeds with big clusters of seeds should not go in a compost pile that you intend to use anytime soon. Weed seeds can last for years, and composting often does not kill them.
Some of my flower beds are less weedy this year than in the recent past. I’ve realized that I have more flower beds than I can keep up with by myself, so I hired a fellow to help me weed this summer – and he actually knows the difference between a flower and a weed! It was quite liberating. But I need to go over some of the beds he worked on and get out little weeds that have appeared since he cleaned them up. Weed seeds – or scraps of root – are a fact of life, and re-weeding is always necessary. If I get these little weeds now, it will help me have cleaner beds in the spring. It will help, too, if I put down a layer of bark mulch after this weeding.
Each summer I grow colorful plants on my deck, and I dread the onset of cold weather as many of these plants will never be happy inside the house. They just can’t survive the lower light levels indoors. Each fall night that portends frost I scurry back and forth from the deck to the indoors, lugging my favorite plants. I keep them living as long as I can but realize that some will have to be left to succumb to the arriving cold.
A fall chore I do each year without fail is to wash the leaves, top and bottom, of any plant that I bring in from the outside. I do this to wash off aphids and their eggs and larvae. Aphids are well controlled outdoors – there are lots of predator insects that consider them the Ben and Jerry’s of the insect world, consuming them with glee. But indoors? Even a few eggs will soon produce adults that will reproduce and make a mess of my houseplants. So I wash them with a sharp stream of water from the hose, let them dry in the sun, and then bring them indoors for the winter.
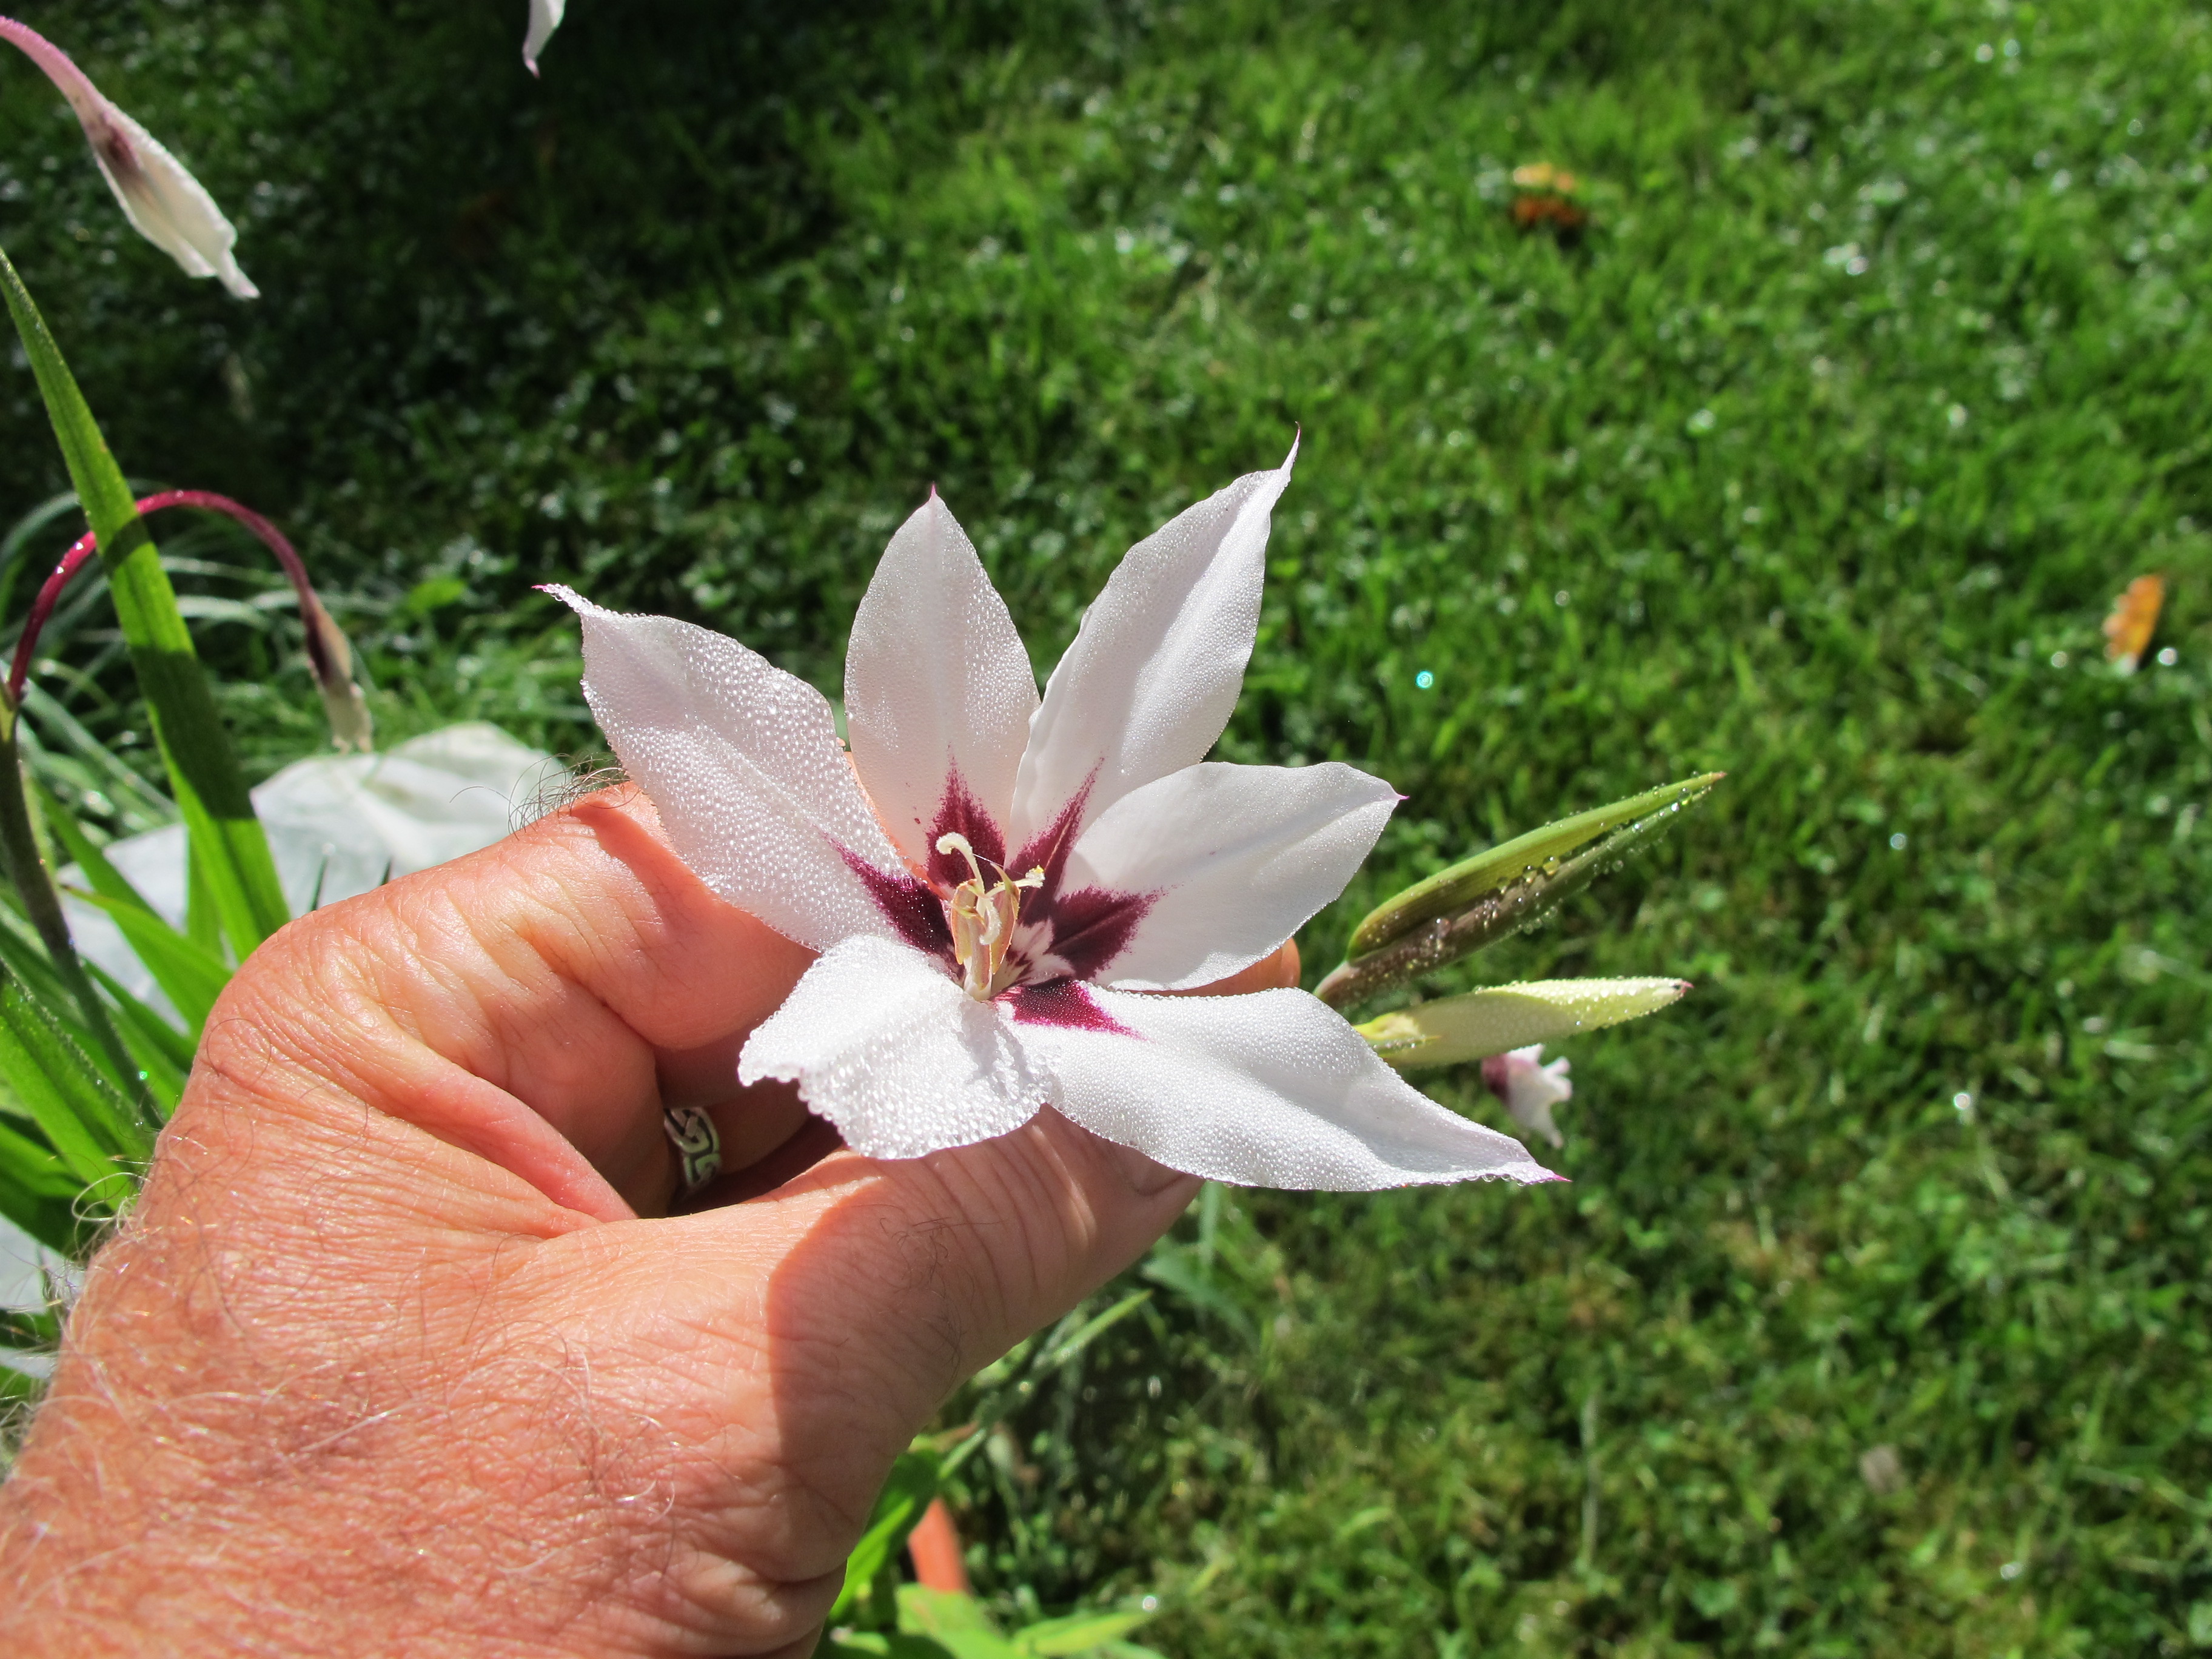
Sword lily
A fall chore I often forget to do in time is to dig up and store tender bulbs like gladiolas, dahlias and peacock orchids or sword lilies (Acidanthera spp.). These will not survive our winters and deserve to come indoors to live in a paper bag in a cool spot. This year I resolve to do better. I planted sword lilies in pots and they are blooming beautifully right now, and are delightfully fragrant.
This week I will plant some grass seed. Fall is a good time to fill in dead spots on the lawn. The soil is warmer now than in the spring, and fall rains will make watering less needed. There is still plenty of time for the new grass plants to get established before cold weather. I’ll just scuff up the soil with a short-tined garden rake, spread some seed, and then cover it with a thin layer of mulch. Finally I’ll smooth over the mulch with the back side of a lawn rake to mix in the seed and compress the soil a bit by putting down a board or small square of plywood and stepping on it lightly.
There will still be plenty of summer-like days ahead, but it’s good, I think, to start planning for fall and winter. Before we know it, we’ll be raking up the leaves – and shoveling snow.
Henry Homeyer is a garden designer and consultant, and the author of 5 books. His web site is www.Gardening-Guy.com.
Plants for the Front Porch
We New Englanders have a long tradition of doing something to brighten the approach to our front door. In winter it’s a nice green wreath; my grandmother liked red geraniums in a pot by the door all summer; in fall, pumpkins and chrysanthemums are traditional decorations. Three common decorative plants are available for purchase at farm stands now – and worth a look.
Chrysanthemums are very popular, and are readily available in a wide range of colors. I treat them as annuals even though some are touted as perennials. I once estimated the number of buds and blossoms on a potted “mum”. By counting and multiplying I arrived at an estimate of 300 blossoms on a plant that was perhaps 18-inches across. Phenomenal. But if I had planted it in the ground and it came back the next spring, I would have gotten just a small fraction of the number of blossoms the following year. Why? The growers pinch back the stems at least twice to make the plant branch again and again. I don’t have the patience to do so.
A few tips about keeping mums happy. First, they have a large number of blossoms and leaves for the size of their pots. On a crisp fall day a mum loses a lot of water, especially on a sunny doorstep. You probably should water daily, or every other day. If yours comes in a peat pot, which many do, the soil or potting mix will dry out even faster than if it’s growing in a plastic pot. I find that submerging the pots in a big container of water and holding them down until they stop bubbling is the best way to get the roots full hydrated. Or transplant them to self-water containers that have water reservoirs to prevent roots from drying out.
Secondly, if you want to plant your mums in the ground, be careful at planting time: the branches are often very brittle. It’s always disappointing to me when I break off a big section of a mum before it can even strut its stuff for a moment. Usually I just leave my mums in their pots and arrange them by the front door.
If I do plant my mums, I endeavor to plant them deep enough so that I can cover the root ball with an inch of real soil (they are planted in a peat-based growing mix that dries out very quickly). And although you can plant the peat pots directly in the ground, tear off the top 2 inches of pot so that it won’t be sticking up and wicking water away. Remember, a dry mum is an unhappy mum. Frost seems a long way away now, but remember to cover mums when hard frost comes, or bring the pots indoors. They survive light frost nicely.
Another great fall doorstep plant is decorative cabbage or kale. I just bought a big fat one at a farmers market recently, and it will look great all fall, assuming I don’t let it dry out. Last year I started a couple of dozen decorative kales from seed, but was disappointed that they stayed smaller than those generally sold, and bolted in the heat of summer. Huh. The professionals seem to have tricks I do not. I had mine in the ground, not pots, and had planned on transplanting them into nice containers after Labor Day, but ultimately I didn’t think them worthy of moving to the front of the house.
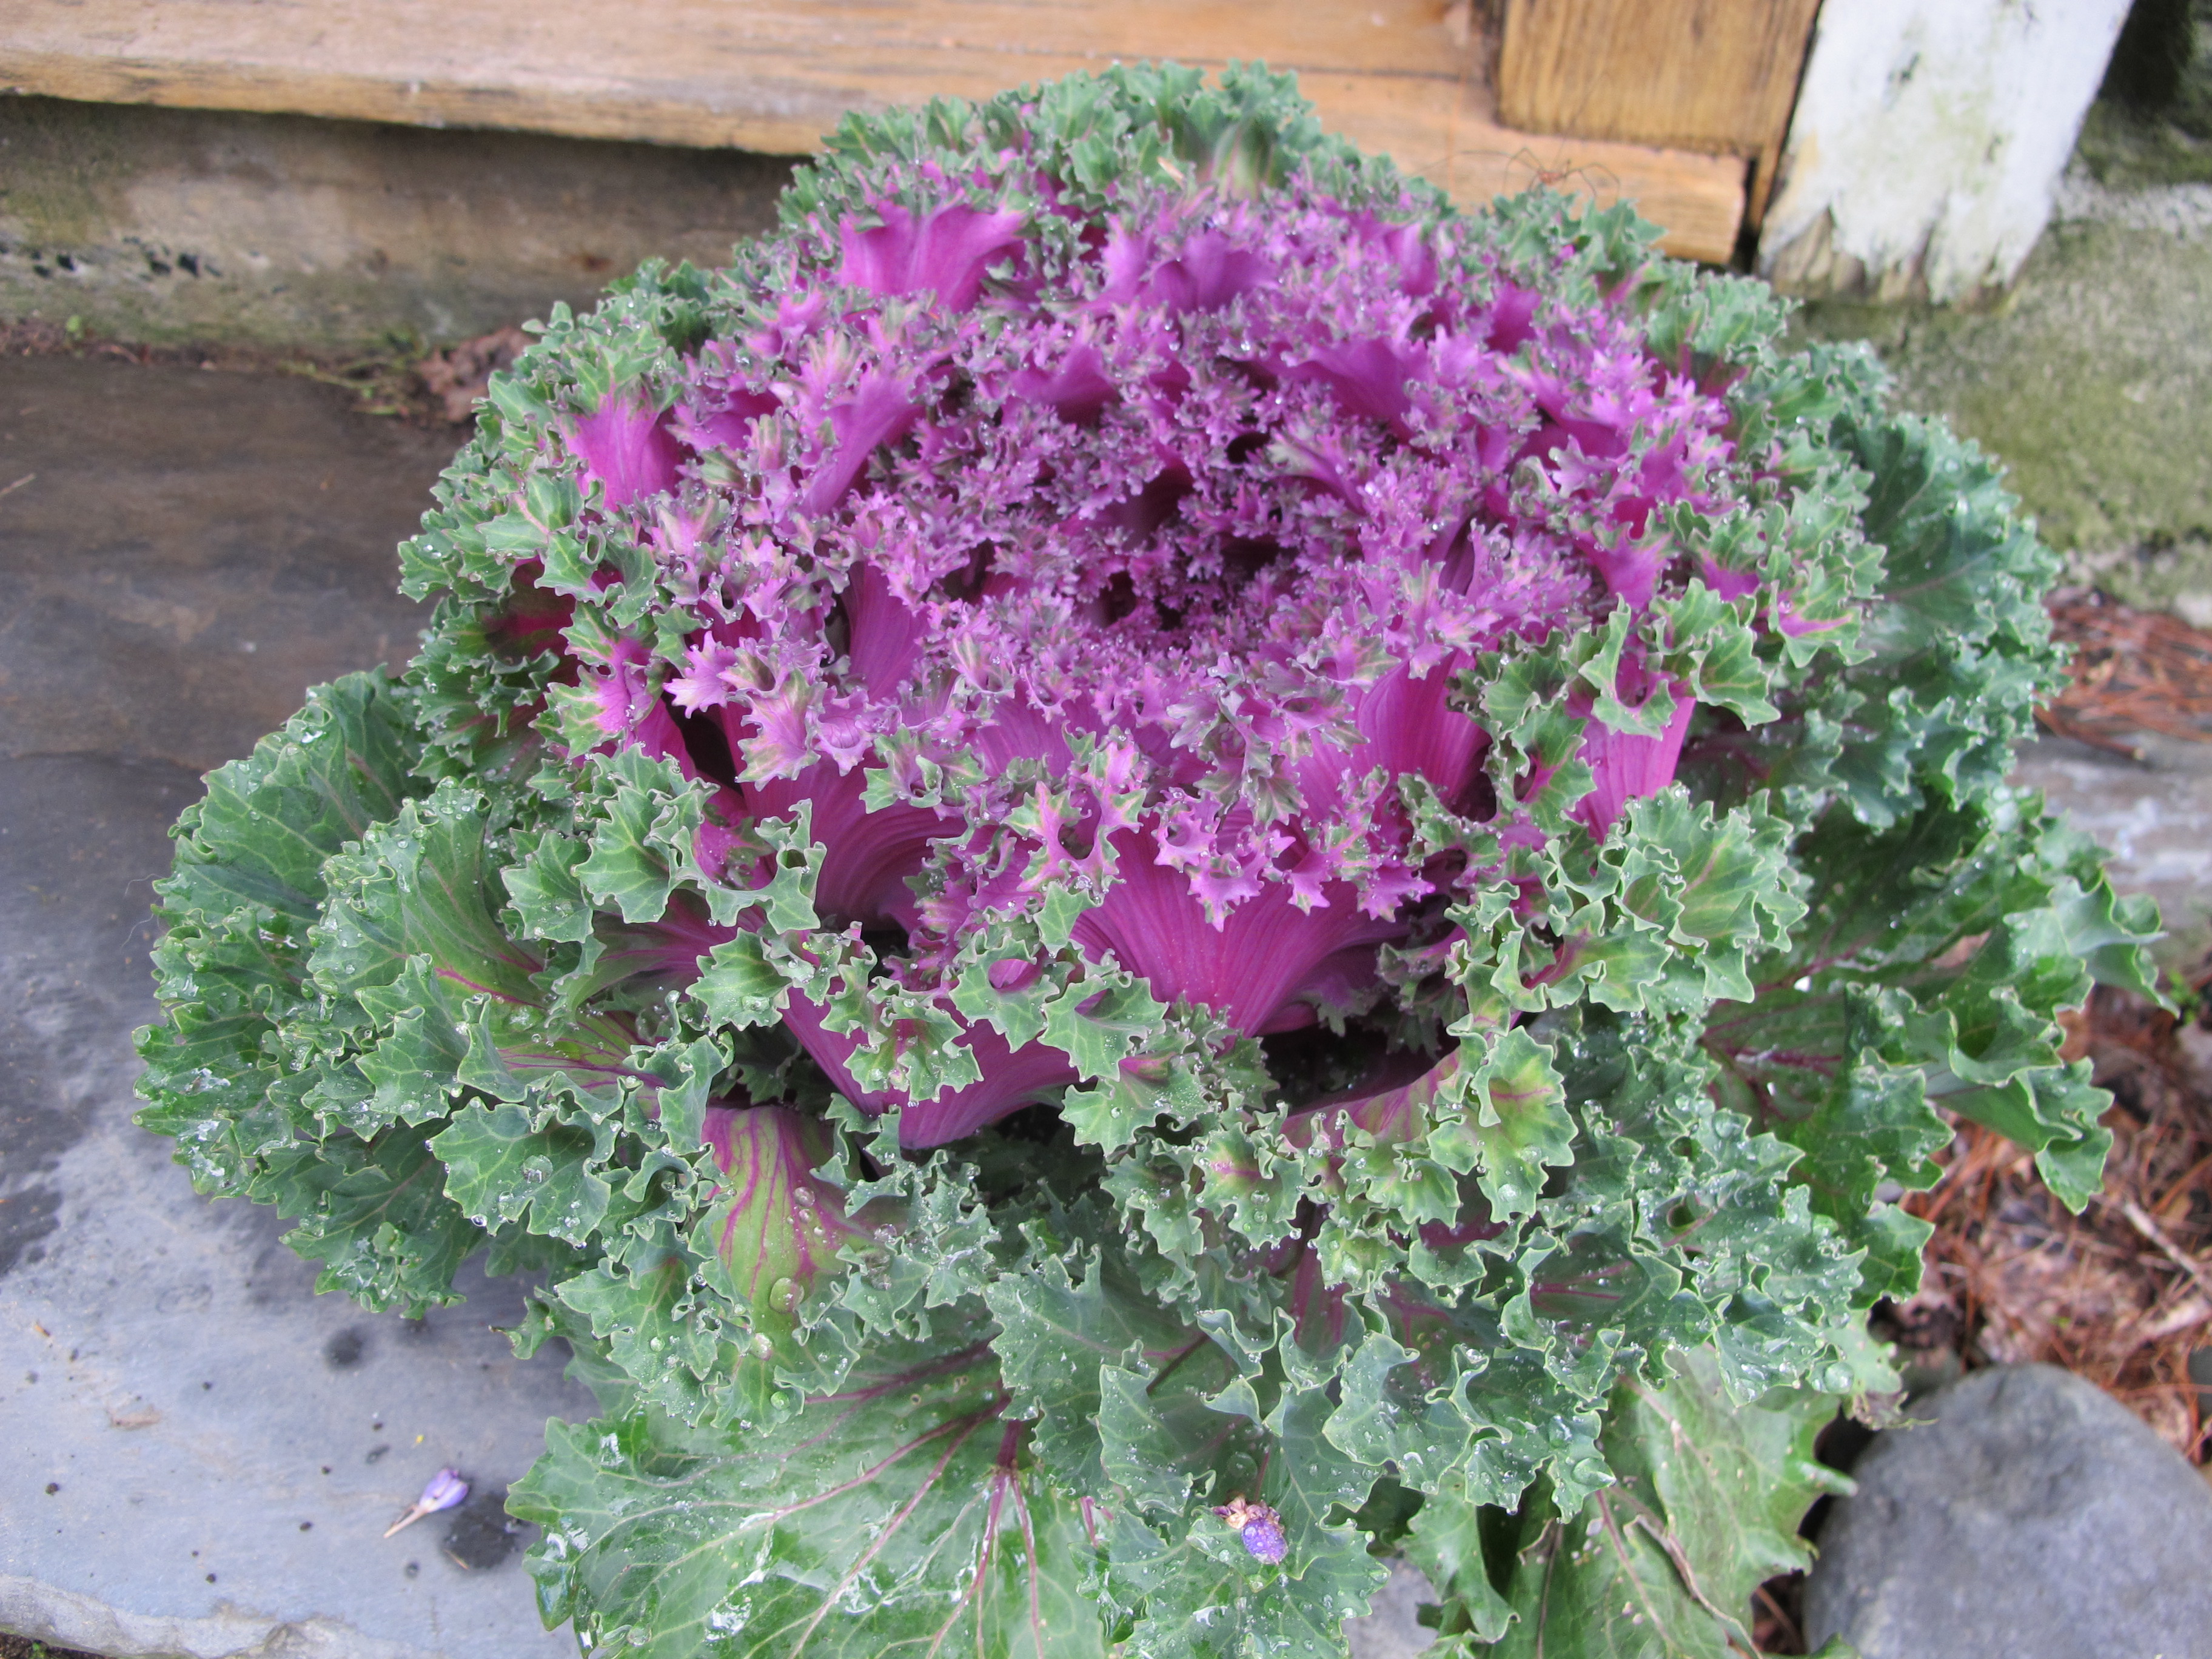
Decorative Kale
Decorative kale generally has dark green or purplish leaves on the outside, and pink, white or light purple inside. I’ve read that they are, indeed, edible, but are tough and leathery; why bother when edible kale is so easy to grow and tasty? Another great feature of decorative kale is its ability to survive frost. It will not even blink when temperatures drop down into the teens, assuming that your plant has seen temperatures in the twenties and has had time to get used to cold weather. I’ve read that they will survive temperatures as low as 5 degrees without harm.
The last of the fall porch plants are the short asters commonly available in blues and purples, and occasionally in white. Like the mums, these have been pinched back to stimulate the production of more blossoms – and to keep them short. Most are winter hardy, and I have planted them in the ground and let them come back for a second show the next year. But instead of being under a foot tall, they were at least 18 inches tall and only had a few blossoms. I never got around to pinching them back. Nice in the second year, but not dramatic. I usually prefer to buy new plants and let someone else do all the hard work.
Even if you have some new mums on the porch, don’t forget about your window boxes and planters full of annuals. Yes, they may look bedraggled now, but with a little care you can give them new life. Deadhead blossoms, cutting back stems several inches below those tired seed heads. This is tedious, but worthwhile. And give those annuals a burst of energy with some liquid fertilizer. I use a liquid fish mix, but there are plenty of choices, and almost anything will help.
When I see a nice pot of flowers on a neighbor’s porch I always think, “How nice. She is blessing us all with a glimpse of beauty as we go by.” I try to do my part in doing the same, and hope you will, too.
Henry Homeyer is a gardening coach, garden designer and the author of 4 gardening books. His Web site is www.Gardening-guy.com.