-

Now available for $24.95 including shipping. -

Now available for $21.00 including postage. Vendors I Like
 Click Here to buy from Cobrahead
Holiday Gifts for the Gardener
When I was a boy I believed in Santa Claus long after most other kids had given up on him. I must have been in fifth grade before I started to doubt the story of the jolly old elf. I’m not sure if that was due to my own personality, or because my parents and older sister deluded me. Or maybe I was just plain dumb, back then. But now, as the holidays approach, I try to choose gifts that only the real Santa would know are perfect. For gardeners, it’s easy.
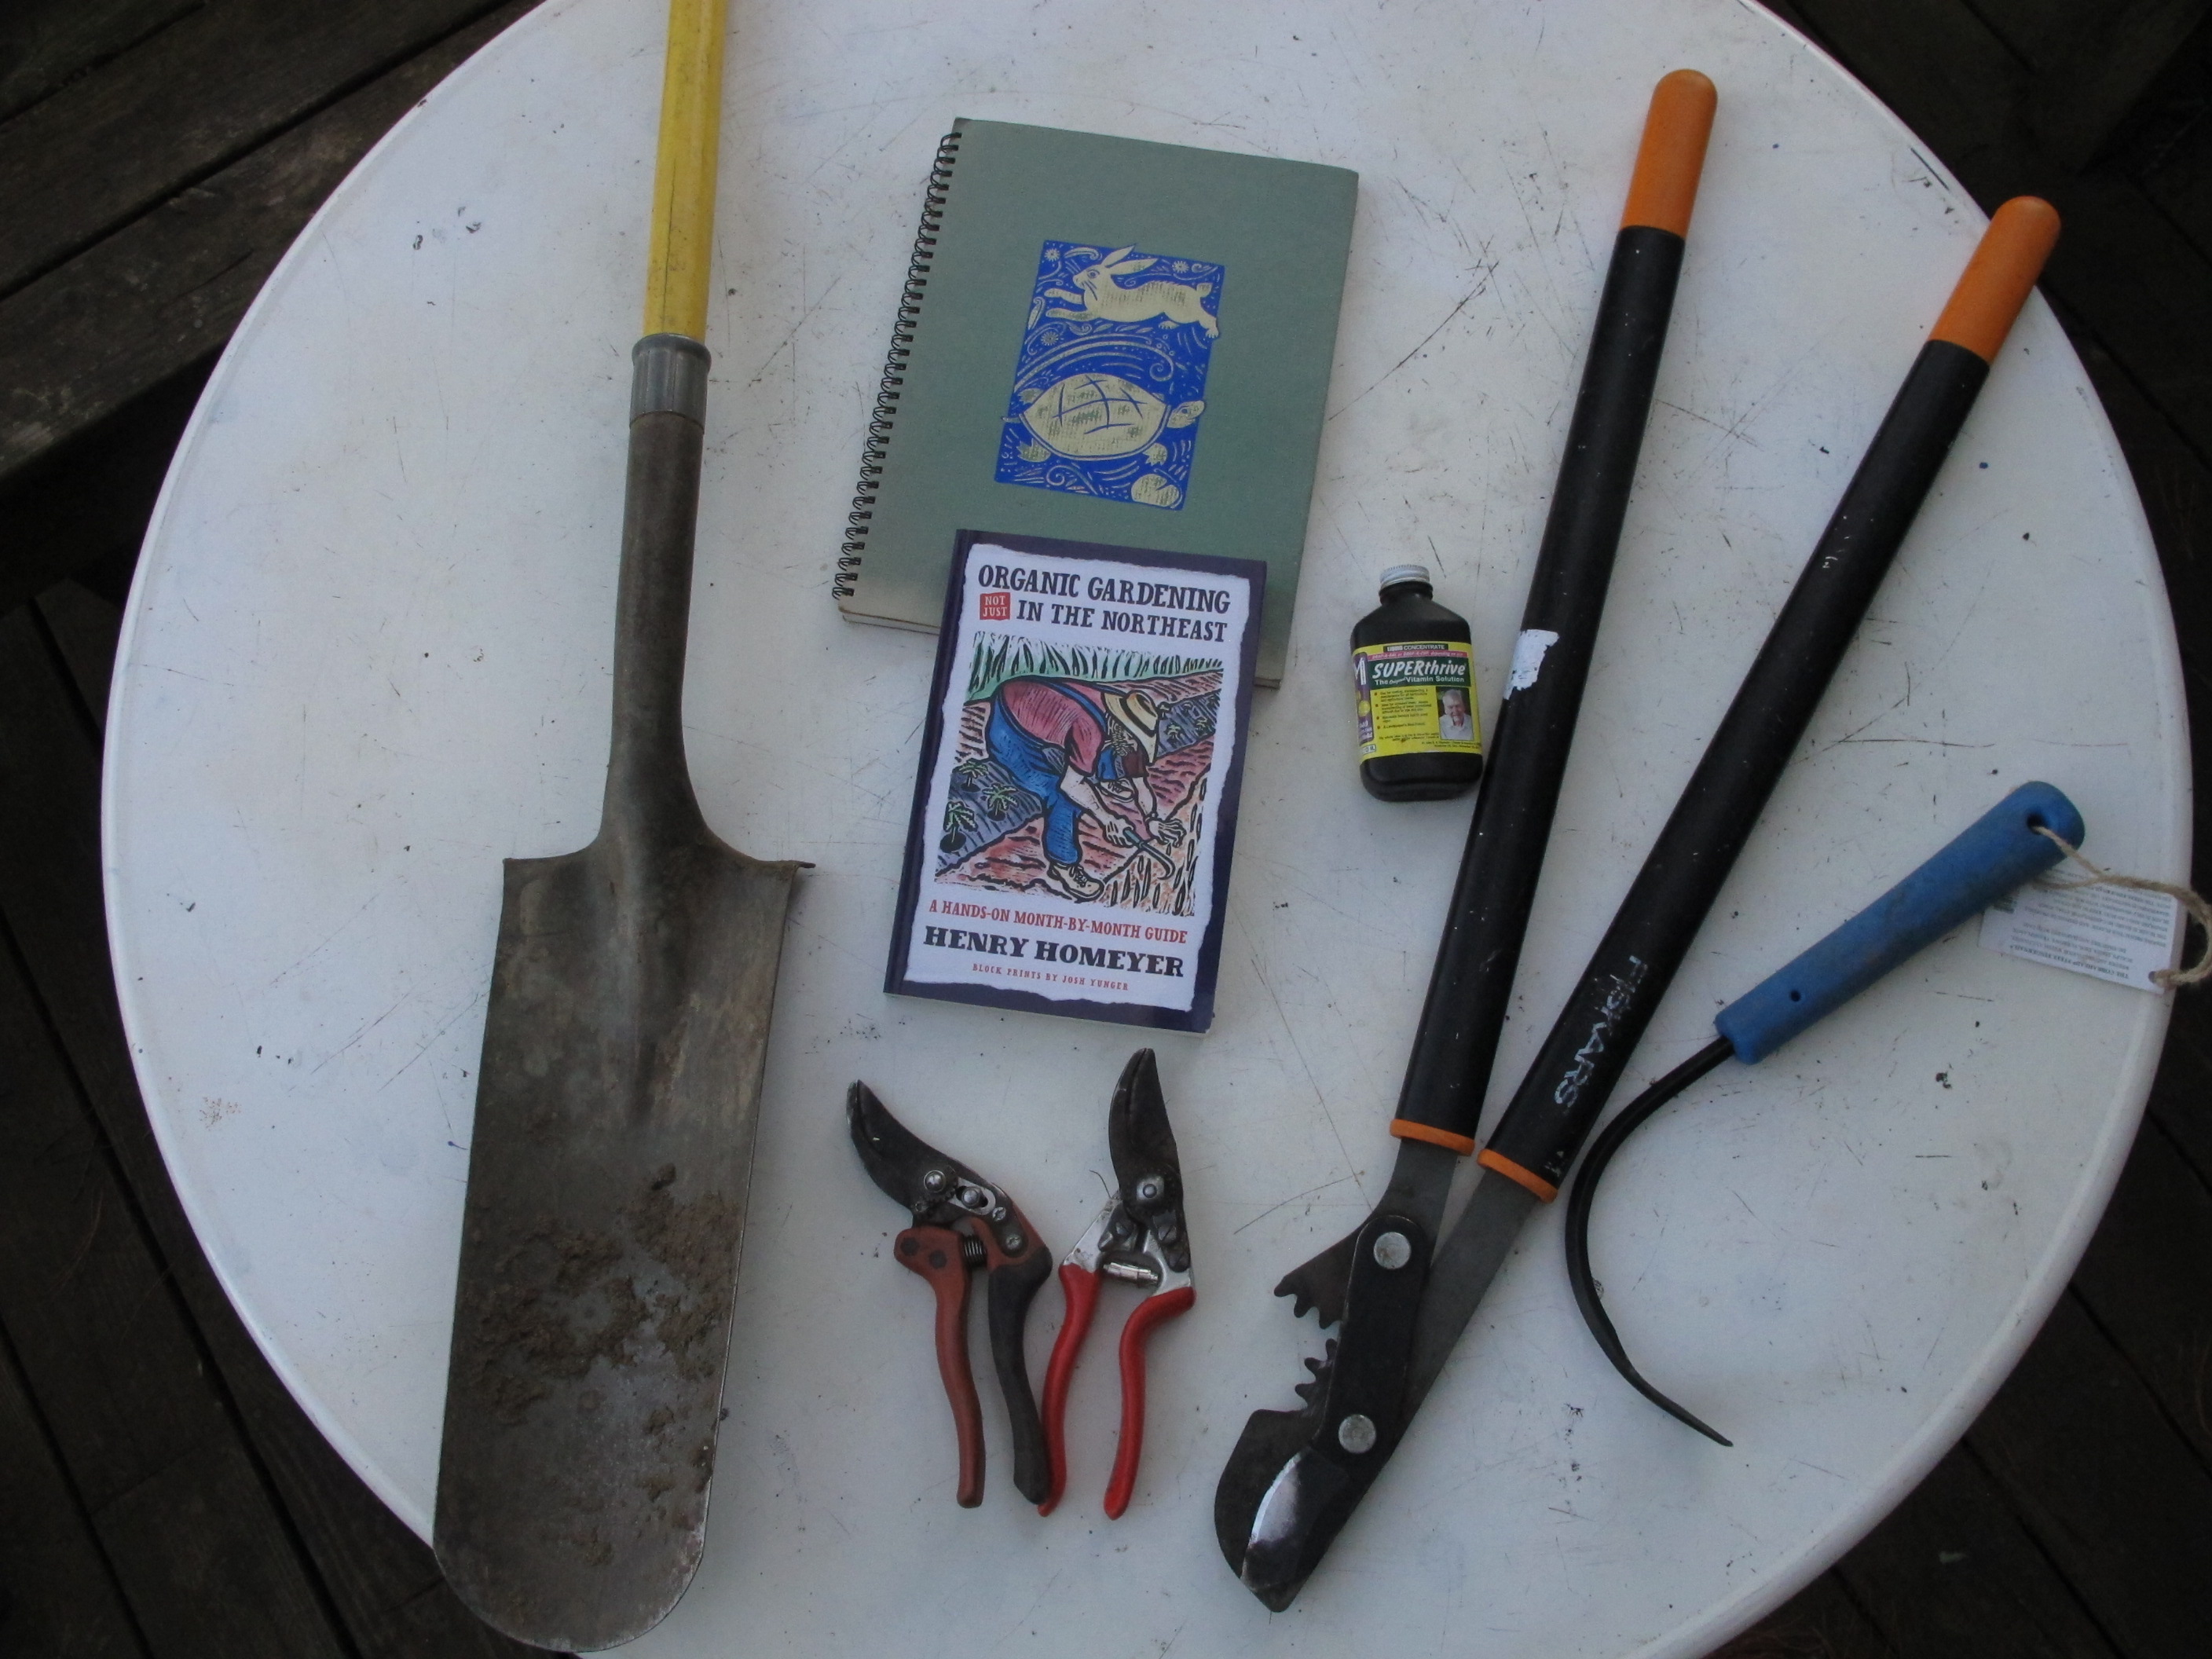
Every Gardener needs some basics: a good weeding tool, a pair of hand pruners and a transplant shovel. For me, the weeding tool is a no-brainer: virtually anyone who has tried a CobraHead weeder (www.CobraHead.com) agrees that it is perfect. It’s precise, light-weight and is fabulous at teasing out long roots. Curved like the tine of an old-fashioned horse-drawn cultivator, I think of it as a steel finger. Available at good gardener centers everywhere, or from the company on-line for less than $25. And it will last forever.
Pruners and loppers are great gifts, too. Most of us –by my age at least – tend to misplace pruners, so even if your loved one has a pair, a second is always a great gift. And they get dull, so a new pair of sharp ones is a treat. Don’t go to a big box store and buy the cheapest you can. Buy quality pruners even though they can cost in excess of $50. The two brands I like are Bahco and Felco. Both are excellent. They come in different sizes for different size hands, so talk to a knowledgeable sales person. I personally do not like those with rotating grips that allegedly prevent carpal tunal.
I’ve had a pair of loppers made by Fiskars for at least 10 years that still work great – I use them a lot, even on large diameter branches. They are geared, so they don’t take great strength to use – and they never get “sprung” the way so many loppers do. Mine is the PowerGear 32” lopper, rated to cut branches up to 2 inches in diameter. Available locally for a little under $50. They also come in smaller sizes. All are lightweight and of good quality steel.
Transplant shovels are often overlooked by gardeners, but they do a much better job at moving plants than an ordinary shovel, so everyone should have one. I got mine at my local hardware store –LaValleys – where it is called a drain spade. Not sure why. The blade is long and narrow – 15 inches long and just 6 inches wide. I like the long blade for getting under the middle of a perennial and prying the plant loose after a few judicious probes. At less than $20, even Santas on a budget would approve.
Holiday gifts
At the lower end of the cost spectrum are plants. I don’t advocate giving anyone a house plant -that’s too much like giving a puppy. Most gardeners have enough –nay, too many – house plants. But an amaryllis bulb is a good gift. They bloom, and then you can either throw it away or hold on to it and coax it to bloom another year (though that’s often more trouble than it’s worth). Prices range from grocery store amaryllis under $8 to fancy ones already potted up and ready to bloom at a florist shop for $15 or more. The bigger the bulb, the more expensive – and the bigger and more dramatic the blossoms.
Also around $10 would be a small bottle of Super Thrive. This is a seaweed and plant hormone extract that is great for helping stressed plants. And right now, many house plants are stressed due to the short days and lack of light. I find it helps them, and I also use it on transplants in the spring. Available locally.
A good blank book with quality paper is a nice gift if your loved one likes record keeping. It’s great to be able to look back, 5years later, and know the name of the variety of bulbs or daylilies you planted. Such a book is also good for sketches of the garden.
On the other end of the cost scale would be a nice dehydrator. I wrote recently about the Excalibur 9-tray dryer for fruits and veggies (www.excaliburdehydrator.com). It’s about a $300 present, so think of it as an investment: it’s an energy–efficient dryer for your tomatoes and apples and more.
Books are excellent presents, too. Santa, are you listening? I want Michael Dirr’s Encyclopedia of Trees and Shrubs. I know it’s expensive ($79.95), Santa, but it has 952 pages and 3530 color photos. It’s the new bible for woody plants by my favorite, highly opinionated tree expert. He even wrote a nice blurb for the back jacket of my last gardening book (Organic Gardening (not just) in the Northeast, A Hands-on, Month-by-Month Guide –just $17.50 in paper). And if you want us to keep on believing, we have to get the goodies. And I’ve been good this year!
Henry, a.k.a. Santa’s Helper, can be reached at the North Pole, P.O. Box 364, Cornish Flat, NH 03746 or henry.homeyer@comcast.net. Like Santa, he makes no promises except for his gardening book, which he can send you signed and personalized.
Successes in the Garden
We had a cool, wet summer this year, and tomatoes were a disappointment. If you read this column regularly, you may know that my zucchinis were a bust. I did get some cukes, but like most gardeners, I didn’t have big yields – not enough to bother making pickles. Pumpkins ? Zippo. It would be easy to focus on those failures, but instead I want to share my successes – and hope you had some, too.
My Sweet potatoes
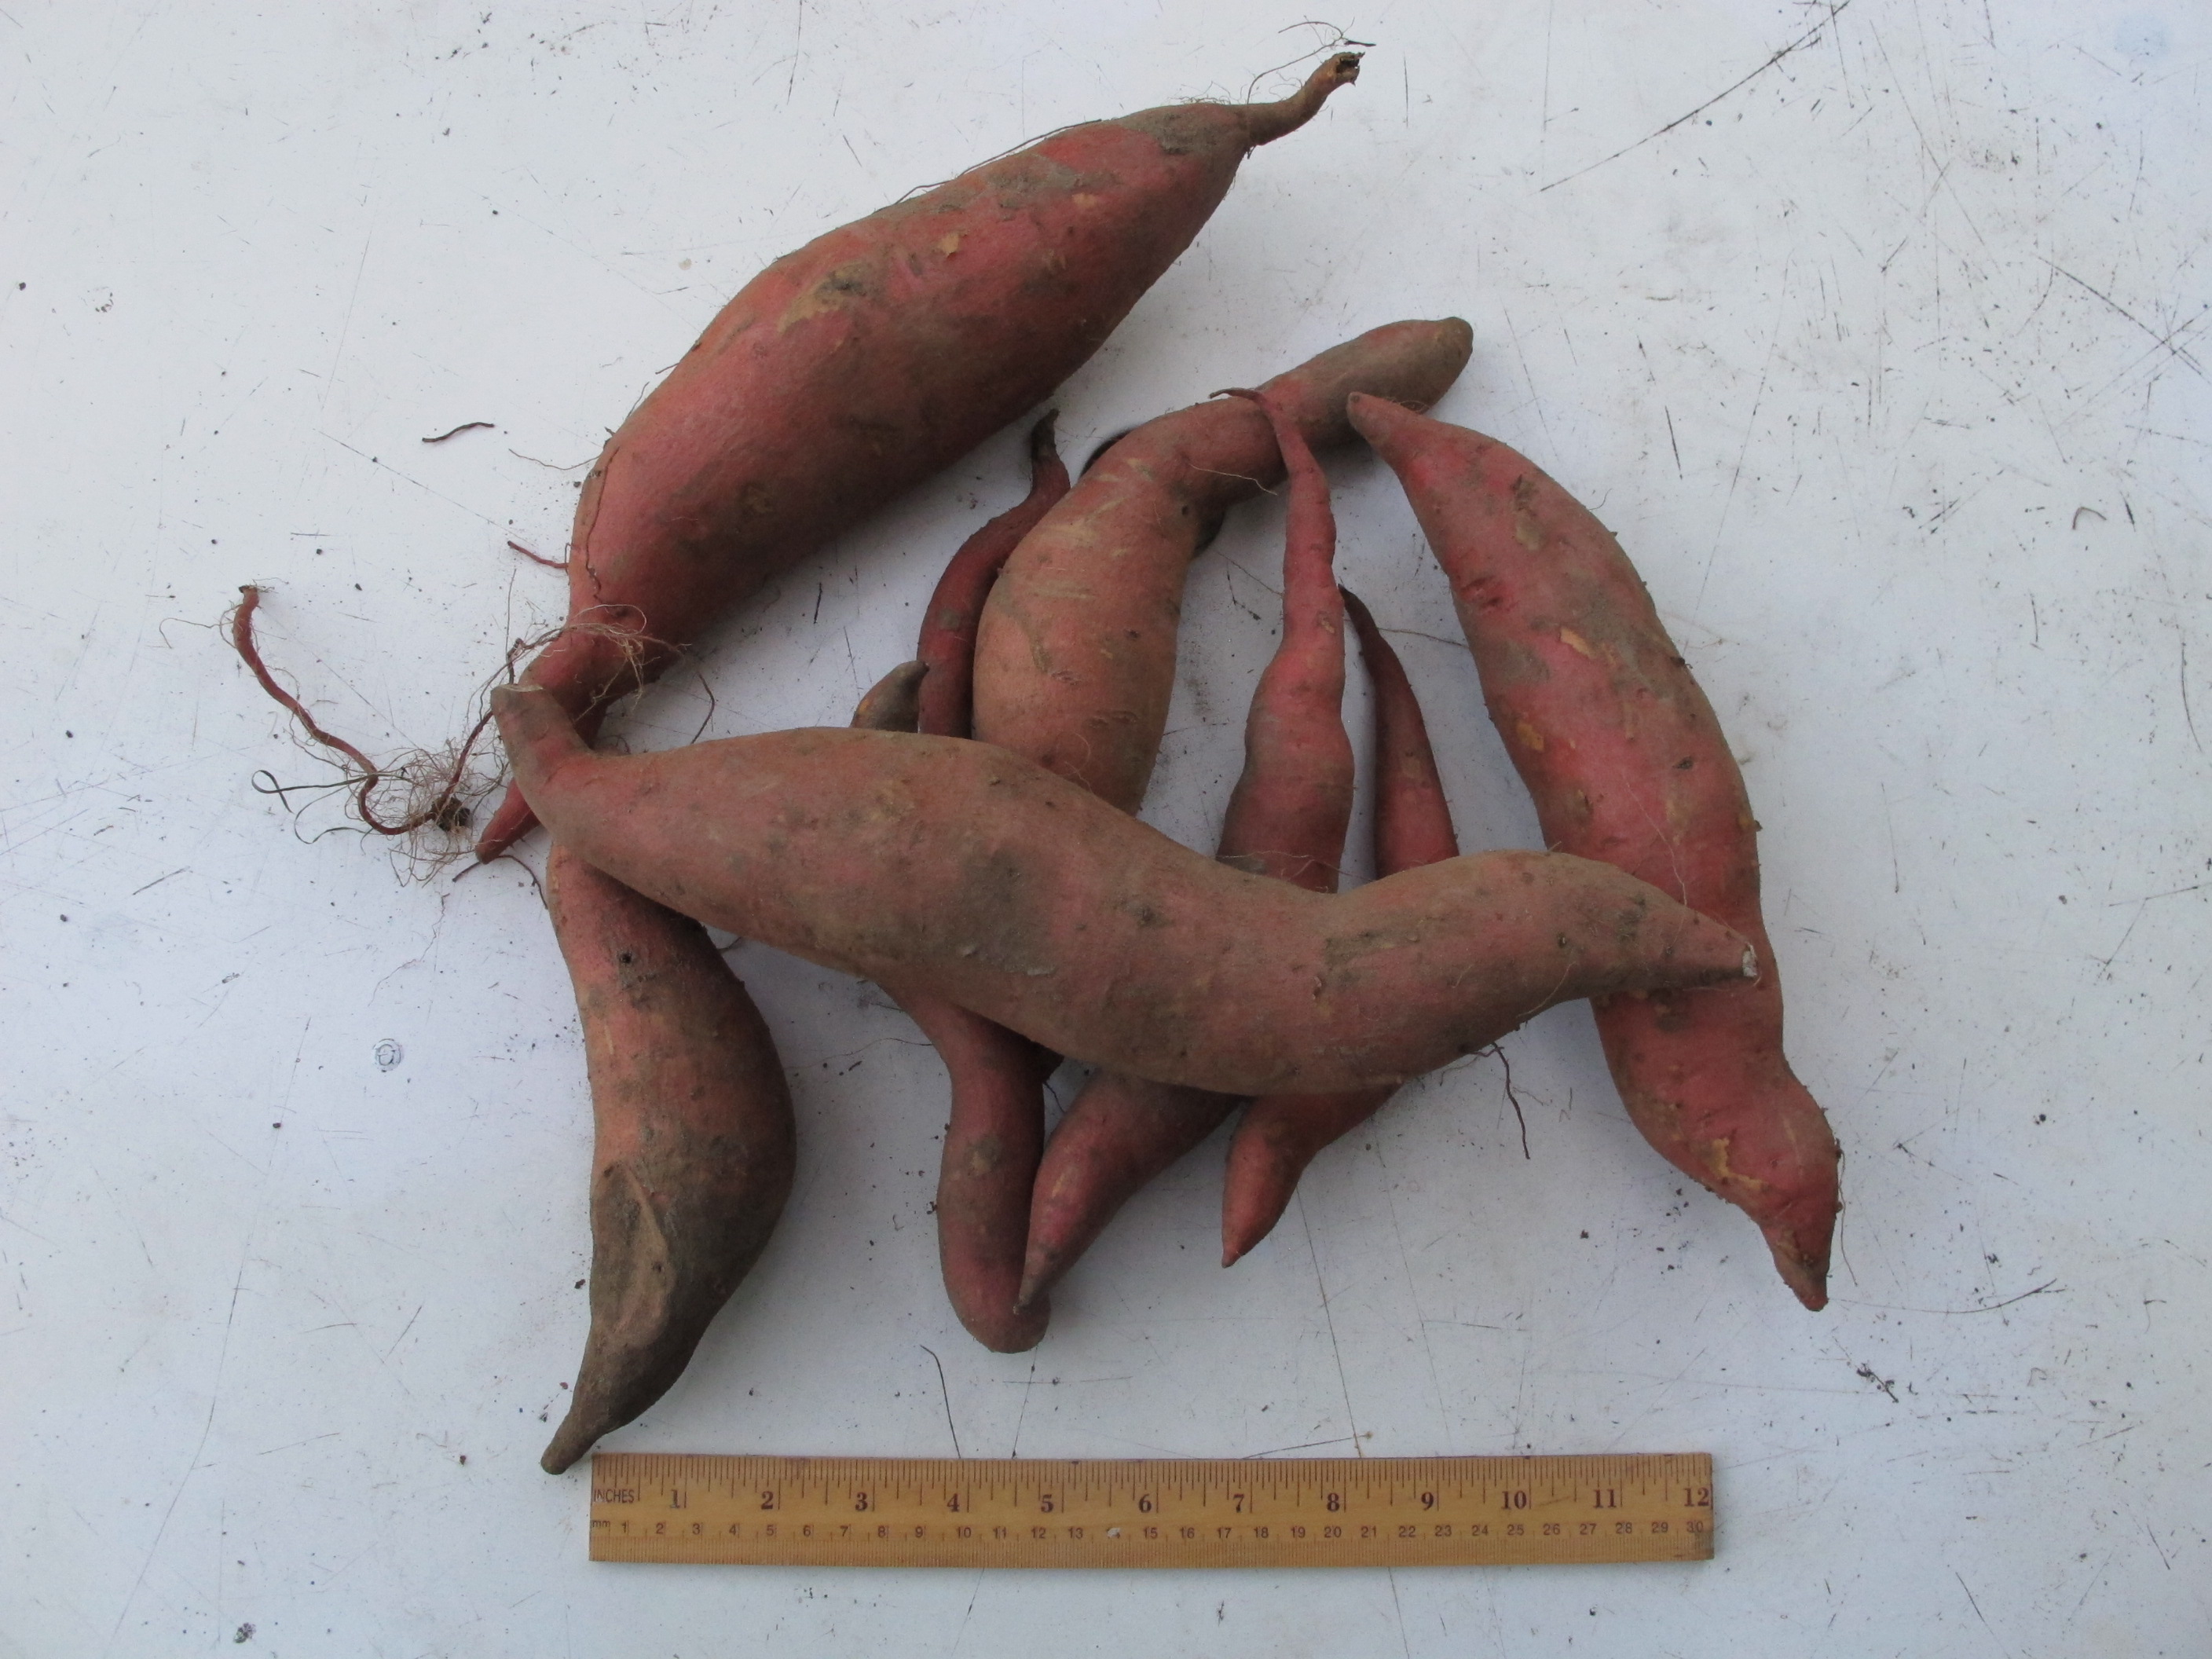
After a 15 year hiatus, I grew sweet potatoes this summer, and they were wonderful! Easy, productive and tasty! What more could a gardener want? When I tried them once before, I did not get much production, so I asked an expert before starting over. I called Geo Honninger of Hurricane Flats Farm in South Royalton, VT. Geo is an organic gardener who does real well with sweet potatoes and sells them at various farmers markets in my region.
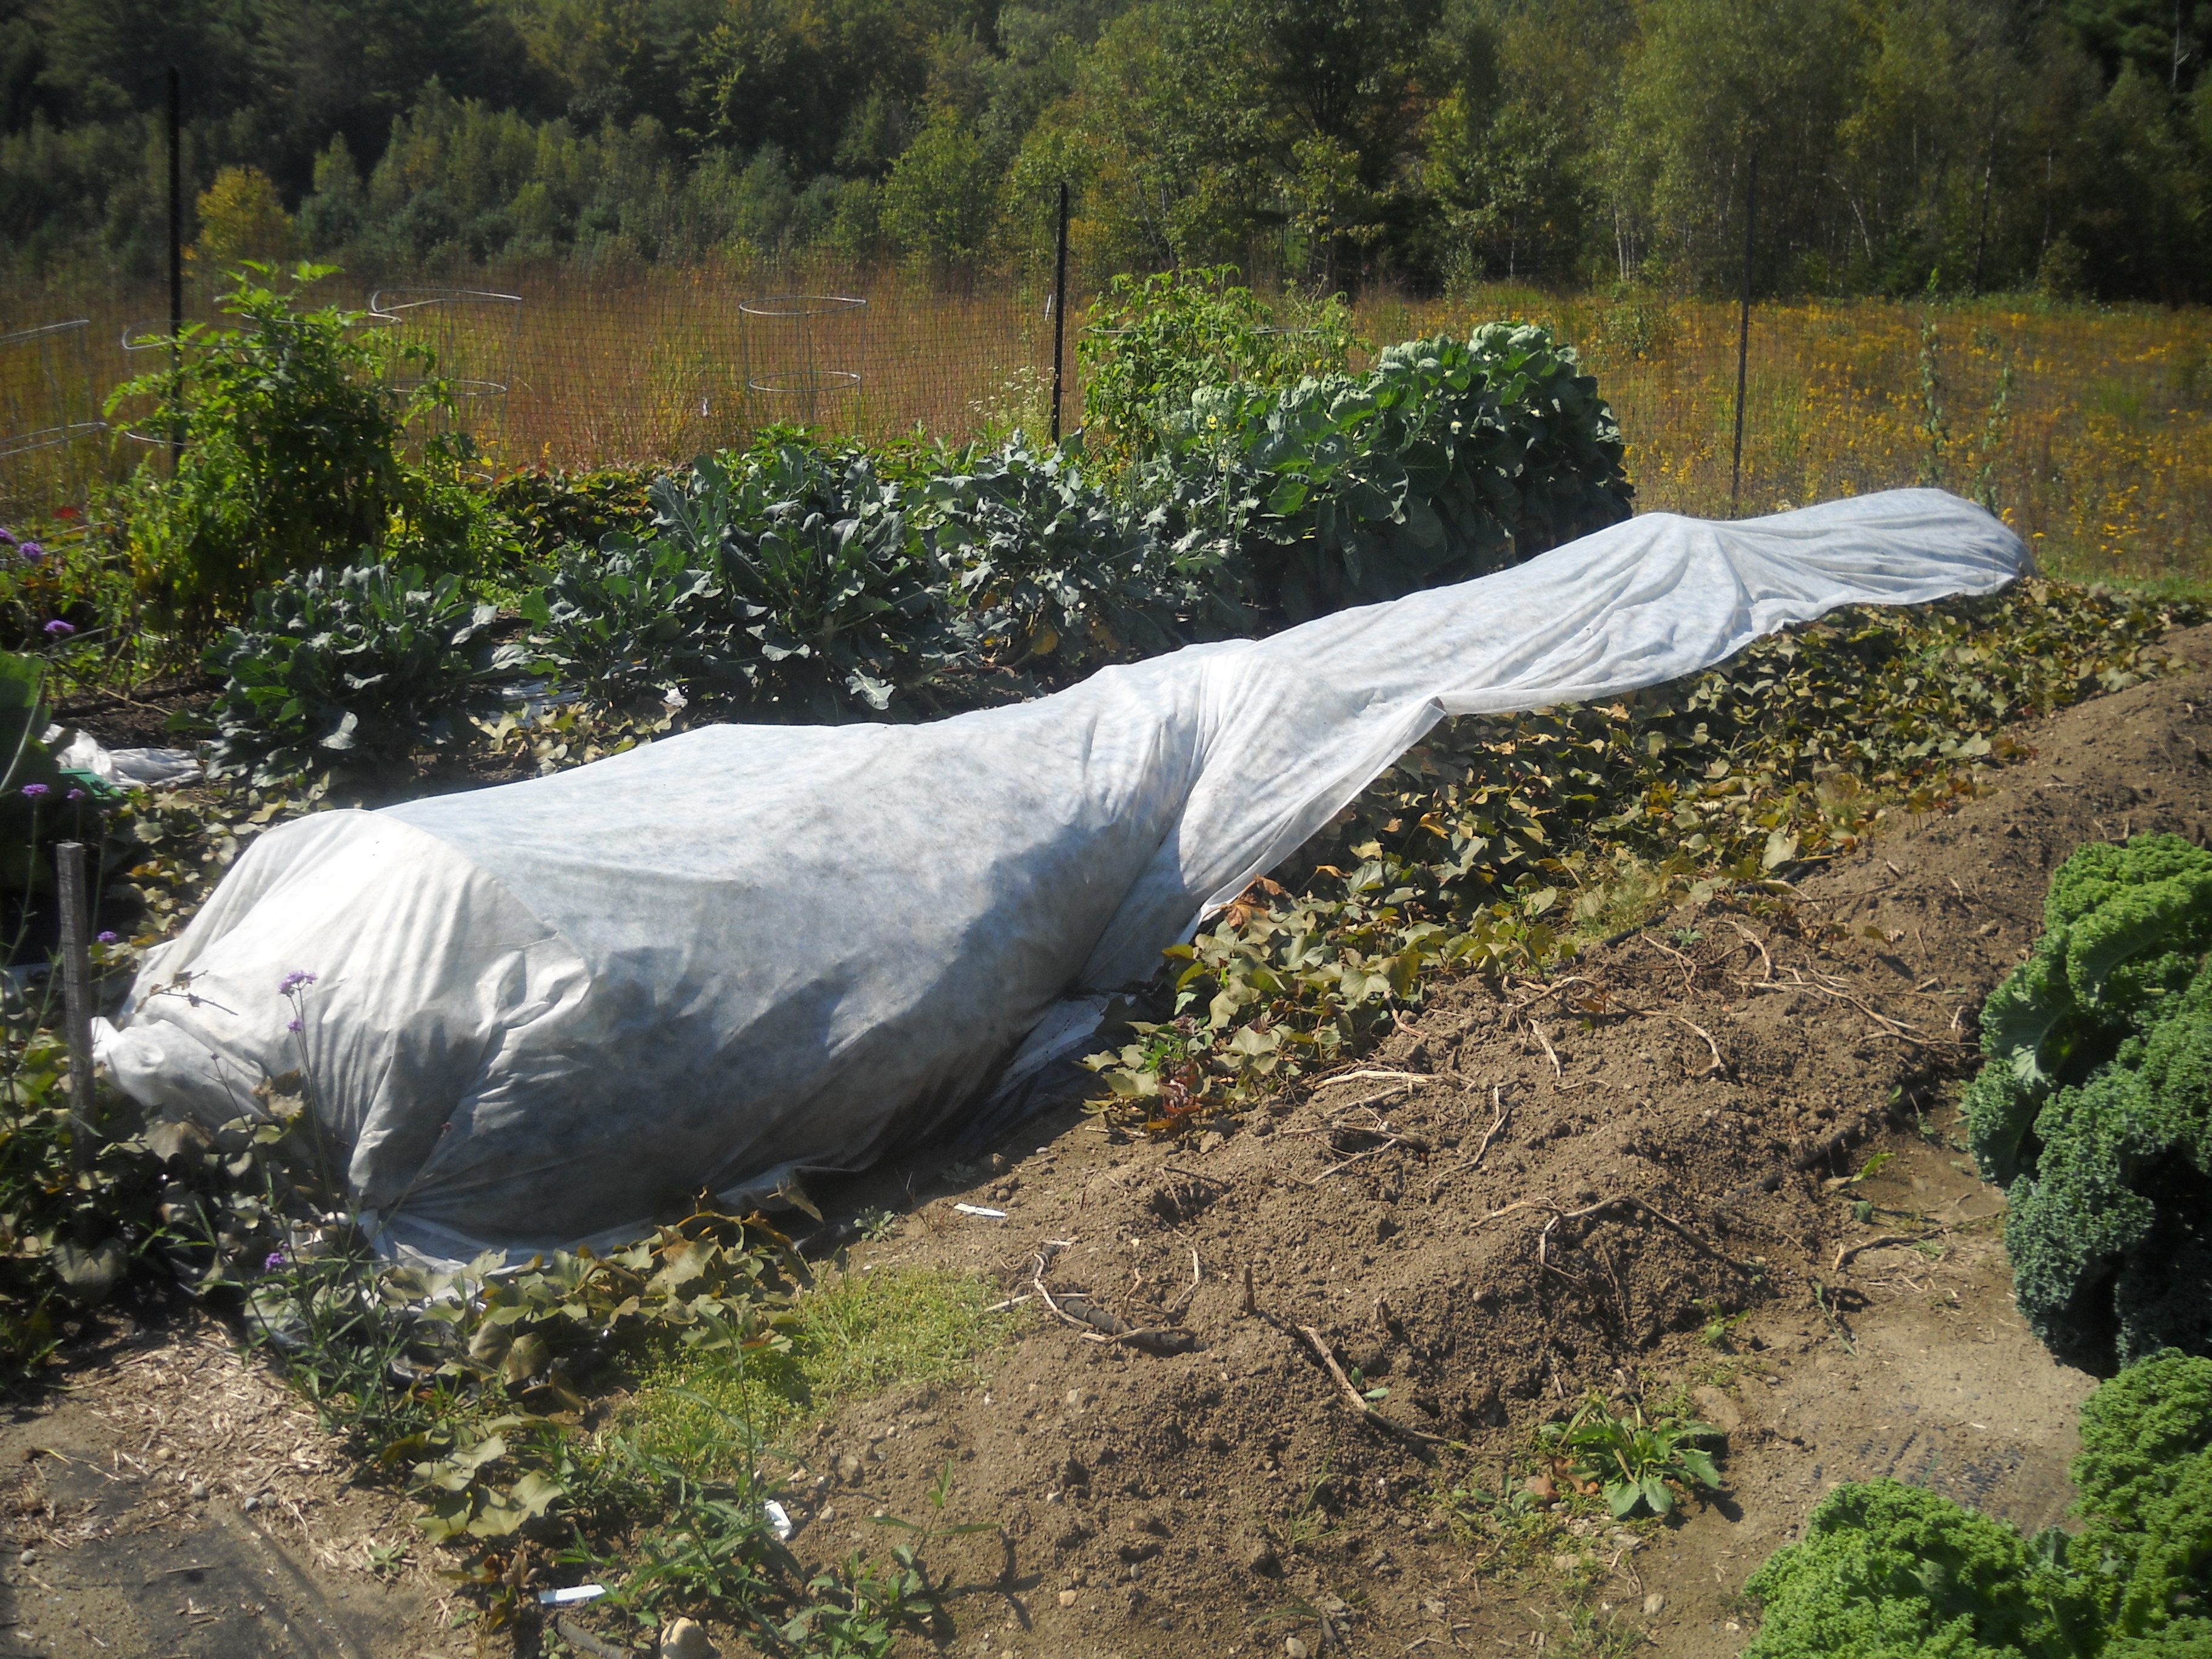
Geo said that sweet potatoes love rich soil, plenty of moisture, and most of all, heat. To do that in this climate takes some extra effort. He advised me to grow them in mounded raised beds (my normal way of planting) and to cover the beds with black plastic (which is not something I would normally do). The plastic absorbs the sun’s heat, and radiates it down through the soil to the roots. On a year like this, that was very important.
I mixed plenty of compost into the raised bed and ran a soaker hose along the surface so that I would be able to get water to the plants after the black plastic went down – the plastic keeps most rain water out.
Last spring I ordered “slips” of a sweet potato called Beauregard from Johnny’s Selected Seeds (www.johnnyseeds.com). Slips are anemic-looking little plants with some root and a little bit of stem and leaf. Not impressive at all, I had my doubts. Geo told me to rip a hole in the plastic every 18 inches or so, and plant a slip in each hole. I stirred in a little Pro-Gro organic fertilizer for each plant. I used a hand trowel to create the hole and planted the 8-inch long slips straight down.
Sweet potatoes covered with Row Cover
Finally I set up wire hoops about 4 feet apart and covered everything with row cover, and pinned down the edges to keep it from blowing away. Row cover is an agricultural fabric that breathes, but keeps in the heat and keeps out the bugs – though sweet potatoes are not bothered much by insects or diseases. Row cover allows moisture to pass through, but most rain rolls off the surface.
The vines filled up the space under the row cover, crawled out and got into the walkways. My watering system failed early in the summer, but that didn’t seem to matter. I guess water reached the plants by capillary action, absorbing it from the wet soil in the walkways.
The slips come in bundles of 25, 100 and 1,000. Not knowing how they would do (and not having much space) I opted for 25 plants, and 24 of them grew very well. A bundle of 25 costs $18.25 and fortunately, I had some black plastic and row cover in my barn. Still, it was more expensive than planting carrots or kale, that’s for sure. But the pay off was huge: I got about 60 pounds of food for the winter in a 32-foot row.
According to the Johnny’s catalog, I should have cured the sweet potatoes for 4-7 days unwashed in a well ventilated place with a temperature of 85 degrees. I didn’t do that, but even if I had read the recommendation, I don’t have such a place. But I do know that sweet potatoes should never go in the fridge. They should be stored in a humid, dark place at 60 degrees. The best I can come up with is to store them in brown paper bags in the house. My cellar is humid, but too cool.
What else did well for me? Celery root, also called celeriac, loves wet soil, so they did well. Bush beans were great – but I had low germination for my pole beans.
I got a pretty good crop of hot peppers, too, a French variety called Espelette. I wrote earlier that I tried planting some in the cavities of cement blocks. I’d heard that the blocks provided extra heat at night – which peppers love. I did some in blocks, and they produced peppers earlier than those planted in the ground. But the peppers planted in the ground ultimately produced many more fruits than those in cement block, so I won’t bother using blocks next year.
Growing your own food is a lot of work, but great satisfaction. And I know that I won’t get a big harvest of everything every year. But when I dug up the first sweet potato plant and pulled 3 one-pound potatoes I yipped and hollered like a boy who’d just gotten a brand-new red Schwinn bike.
Henry Homeyer is the author of 4 gardening books and a children’s fantasy-adventure about a boy born with a mustache and an ability to speak to animals. Learn more at www.henryhomeyer.com
Drying Fruits and Vegetables
This was a fabulous year for most fruits, particularly apples and pears. The abundance of it all made it impossible to eat all the fruit when ripe, so I have been processing fruit for the last few weeks. And
The Excalibur, by contrast, gets even heat and air on every tray because the fan/heater is in the back of the unit, so each tray gets equal air flow. The model I have has 9 trays, each measuring 15inches square. Not only that, the heater is programmed to fluctuate in temperature within a drying cycle to keep the fruit from getting too hot.
The NESCO unit uses 1,000 watts of energy per hour – that’s equivalent to a lot of curly light bulbs burning – but the Excalibur uses just 666 watts. Still a lot, but a lot less.
I compared the drying time for a batch of fruit, each dryer holding 15 sliced pears and 11 sliced apples. The NESCO dryer needed 9 trays for that amount of fruit, while the Excalibur needed only 7 trays. I left 2 trays empty in the Excalibur so that the 2 dryers would have equal quantities and I could compare drying times.
It’s difficult to estimate moisture content (to determine when a batch of dry fruit is adequately processed. I like the fruit chewy, not brittle. The bottom-heated NESCO dryer and the Excalibur dried the fruit in roughly the same amount of time – perhaps the Excalibur was a little quicker. The Excalibur is much quieter.
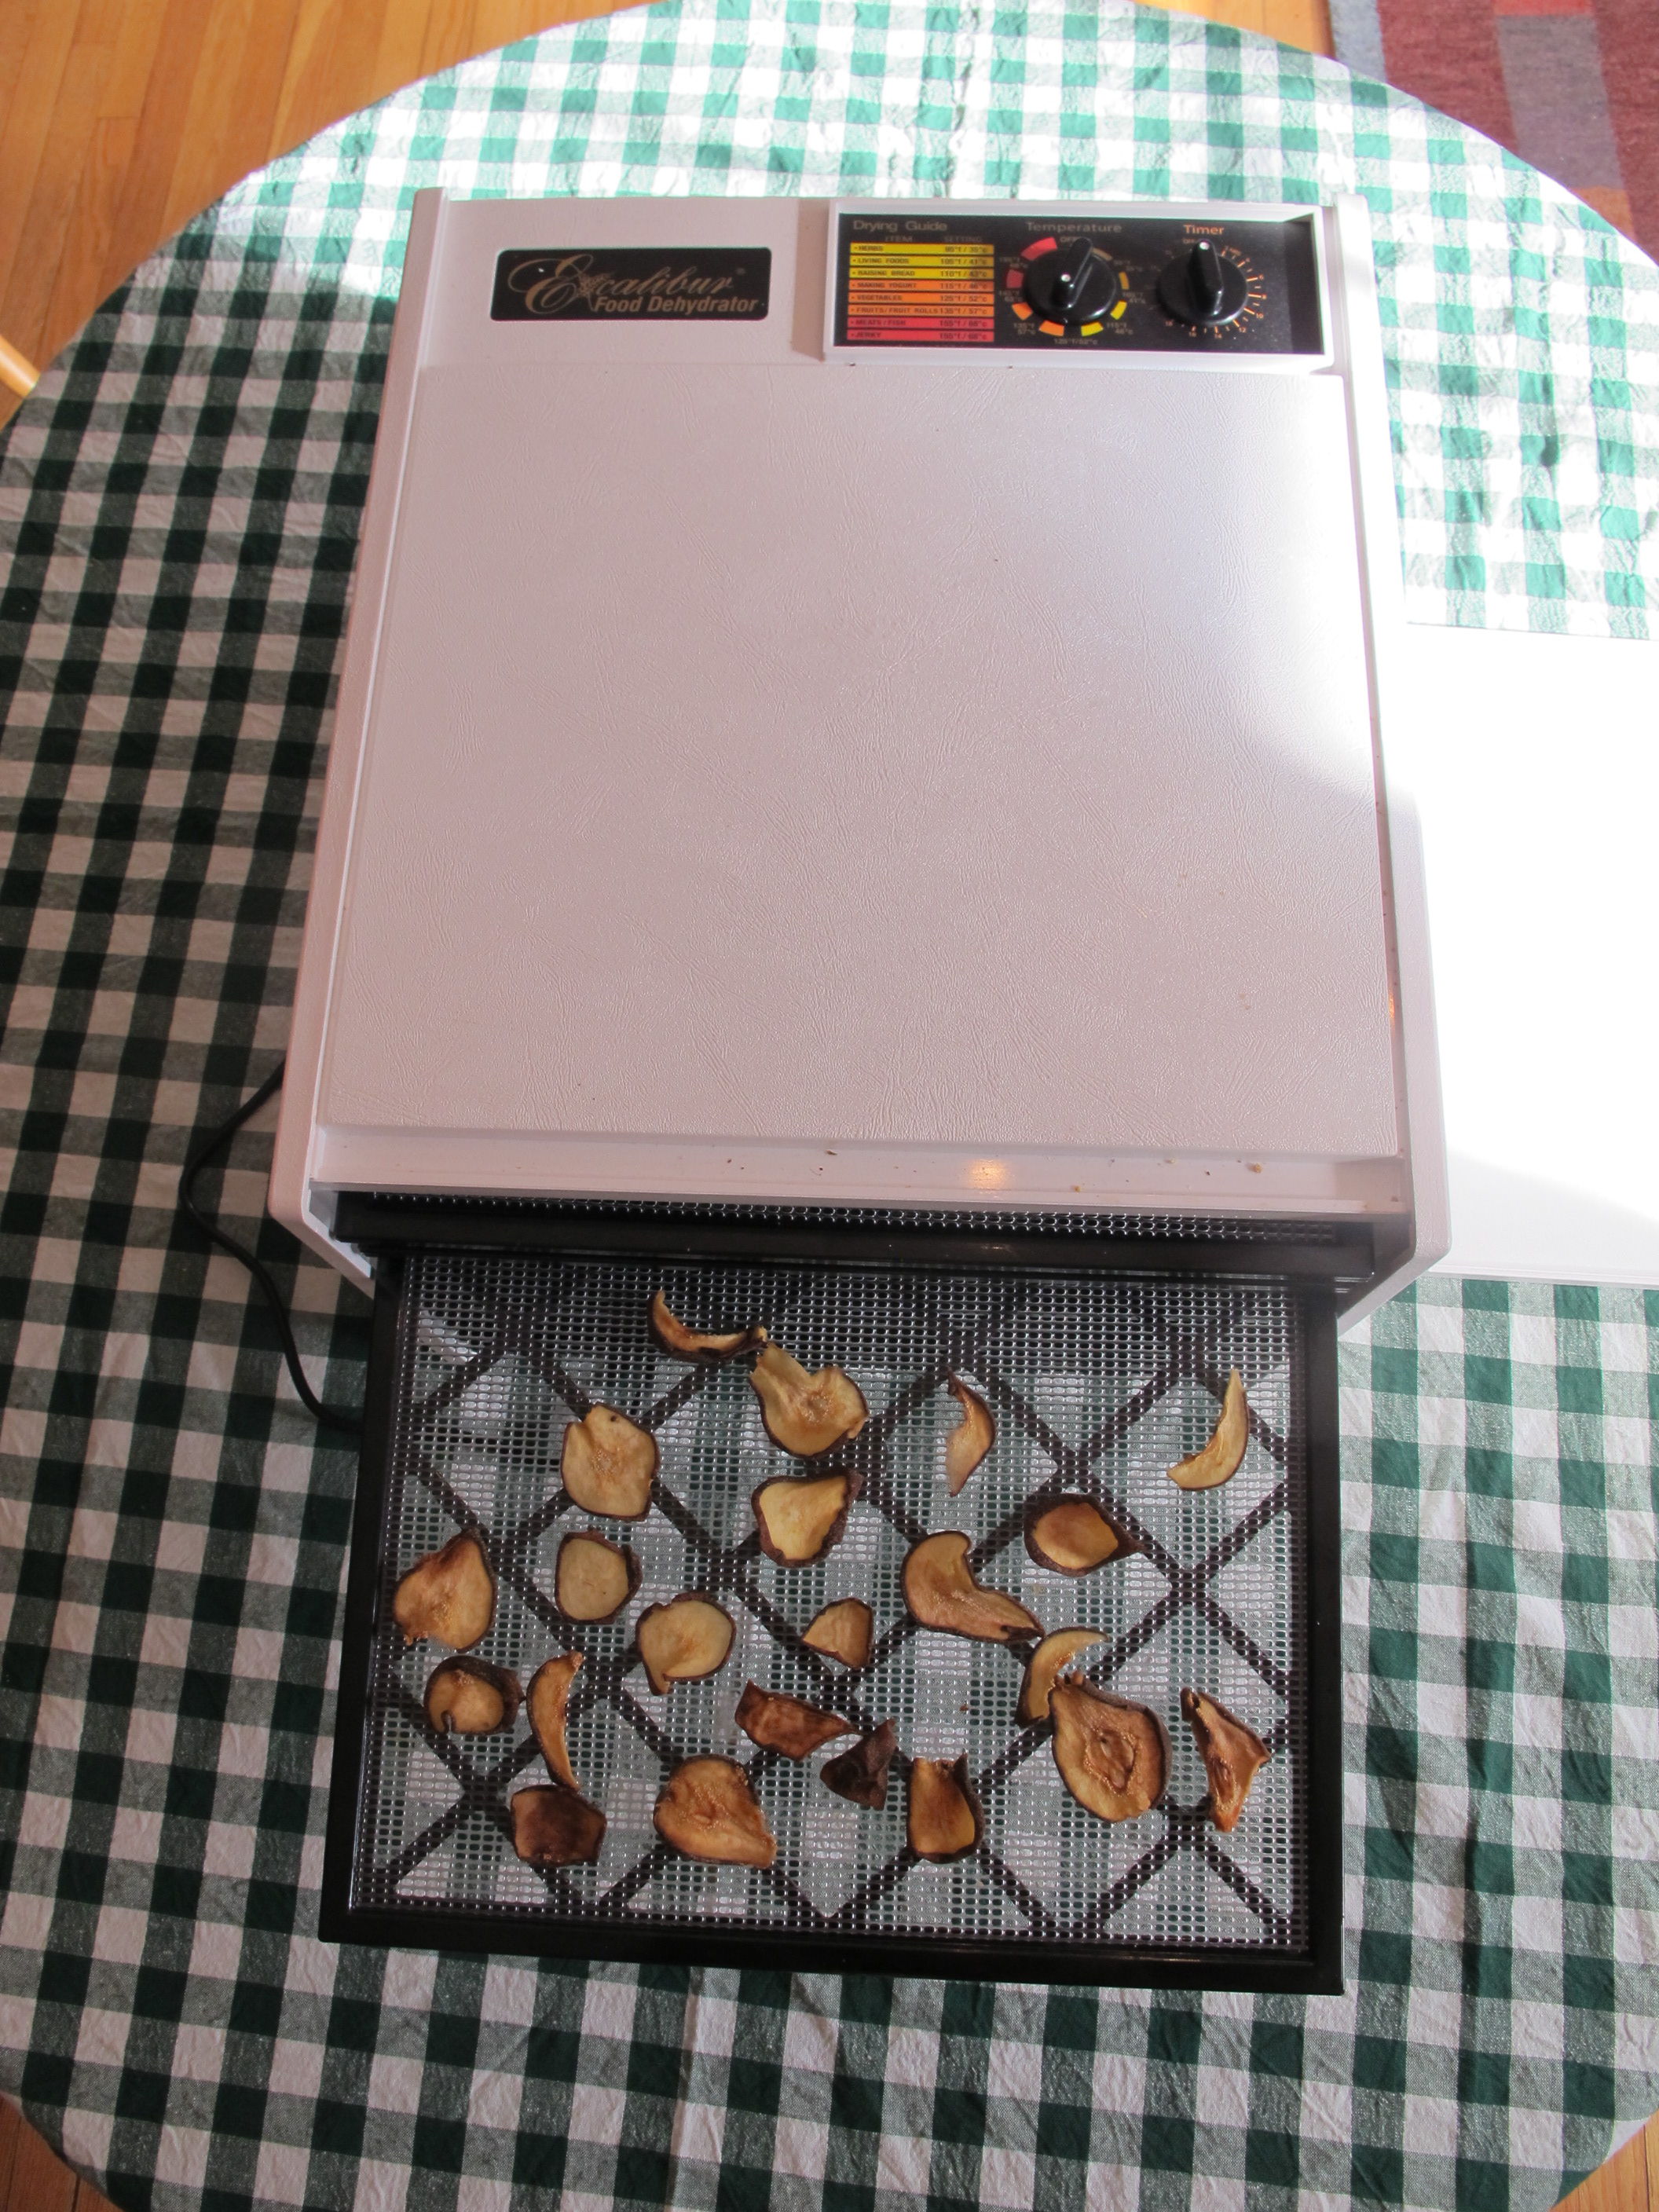
Excalibur with pears
In reading the instructions I learned that dried fruit is considered “raw food” if properly prepared. Too much heat can kill the enzymes of fruit, and that occurs, according to some research, at an internal fruit temperature of 140 degrees. But it is all right to start fruit at a higher temperature for the first two hours. There is a lot of water in the fruit at the onset – and the evaporation cools the fruit so the core temperature never hits 140 degrees – even if the machine is set at 155 degrees. This also shortens the drying time considerably, saving energy.
I have always dehydrated my hot peppers especially the very hottest ones. I dry them until they are brittle, and then put them –seeds and partitions included – in my coffee grinder. This allows me to sprinkle just a little bit of “heat” into a dish – or a lot, if it pleases me.
Blueberries have a waxy outer skin, and at lower temperatures they take forever to dry. But by cranking up the temperature for a while I can dry them in a reasonable time. I bet you could freeze them first – they often burst on freezing – then dry them.
Last weekend I finally pulled the last of my carrots. A few were damaged by rodents, or had cracked. I stored all the perfect ones and dried the others. I scrubbed them well, then cut them in thin slices. I started off doing the slicing with a knife, but soon switched to my food processor, which has a special “julienne” blade that did the job nicely. I will use the dried carrots in soups this winter.
I know that some gardeners like to make dried foods to take on the trail. You could dry carrots, green peppers, squash, tomatoes and onions – the start for a good stew. You can dry meat, too, or make jerky, but I’ve never tried that. Maybe this winter.
Dehydrating fruits and vegetables intensifies the flavors and brings out the sweetness. I love to nibble on my dried pears (which I make with skins-on) while driving the car. They provide me with great satisfaction – they’re as good as eating chocolate chips, but healthier.
Henry can be reached at P.O. Box 364, Cornish Flat, NH 03746 or henry.homeyer@comcast.net. His Web site is www.Gardening-Guy.com.
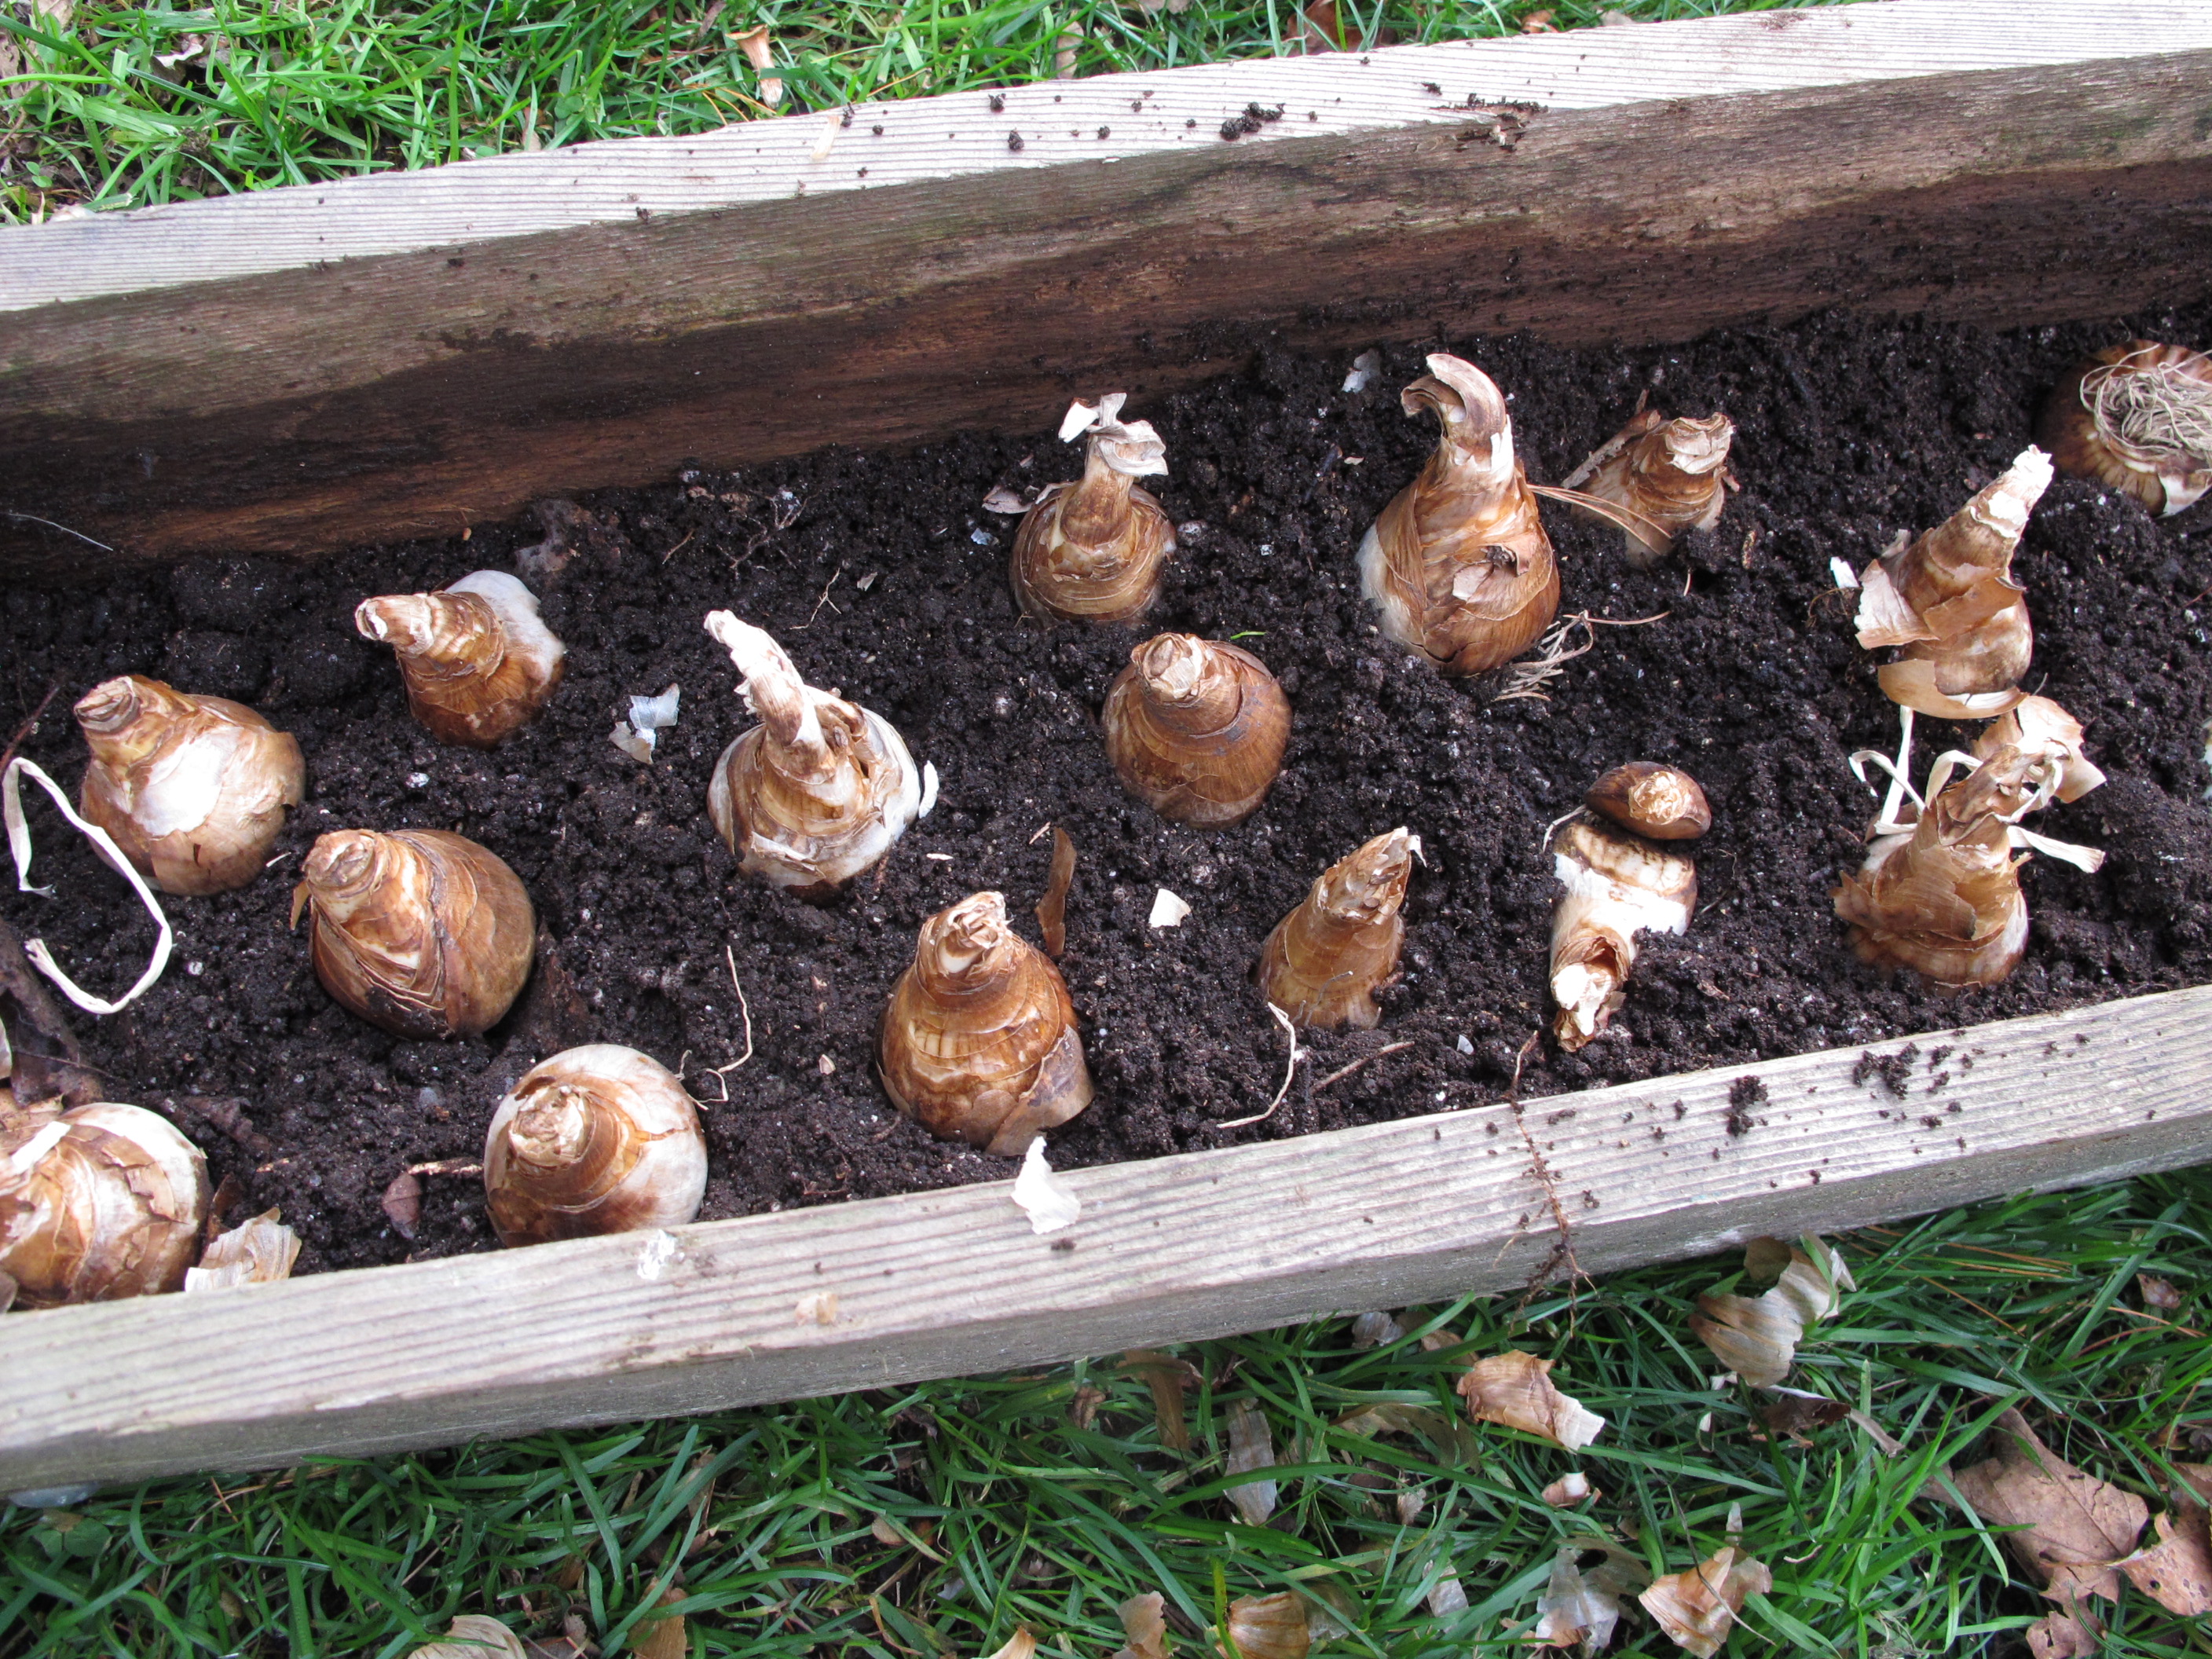
Preparing Bulbs for Forcing
Winters here can be long and cold. Sometimes they are burdensome for a guy like me who loves being outside playing in the garden – planting and picking flowers, or harvesting lettuce and berries. But like the squirrels, I’m planning ahead and burying some little round things for future enjoyment. Nuts? No, I’m not. I am planting bulbs in pots now so they will bloom indoors in February and March.
Each fall in early November I plant tulips and daffodils and sometimes crocus in pots, planters, and in a window box that I take down and bring into the basement where it’s cool and dark. Almost any spring bulb can be planted for forcing, and now is the time to do it.
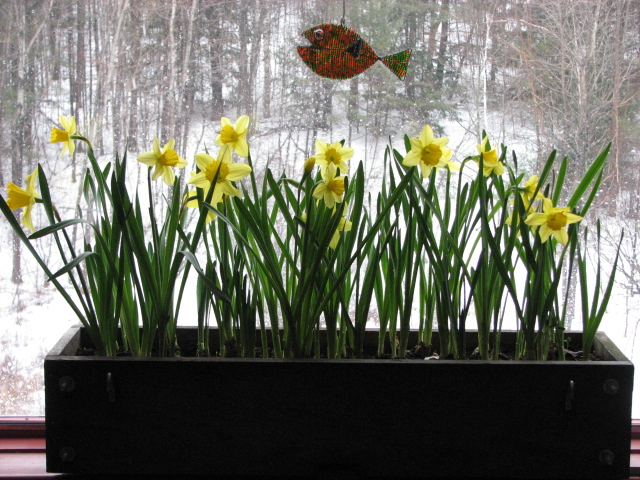
Daffodils for forcing
One nice thing about forcing bulbs is that the deer cannot get them. Tulips are like magnets for deer and rodents in many neighborhoods, though my fierce and determined Corgi, Daphne, does a pretty good job of deterring them for me. But tulips growing inside are unlikely to be bothered by anything. That said, one year rodents did get in my basement and dug up tulips that were in pots, so I sometimes cover containers of tulips with wire screening I get at the hardware store called hardware cloth.
My window box is one I built over 10 years ago out of cedar and it is still holding up nicely. (A nice winter project might be to make one yourself. Directions are in my first book, Notes from the Garden, which is now out of print but available at many libraries.) The box is 36 inches long and 7inches deep and 9 inches from front to back.
Outdoors I plant tulips and daffodils so that their tips are six inches below soil surface, and 2 to 3 inches apart. But in my window box I plant them closer together to cram as many bulbs as possible in the space given. I plant them in 2 inches of soil mix so that they have plenty of space for their roots, but this means their tips are just below the surface of the planting medium after I fill up the box.
I start the process by dumping out all the plants and soil from my window box. I take a stiff scrub brush (the one I use for cleaning out garbage cans) and clean the window box as often roots and dirt are sticking to it. I have drilled holes in the bottom of the box for drainage and I check to see that they’re not clogged.
Garden soil is great for growing bulbs outdoors but is not ideal in a container. In a pot it tends to get compacted by watering. So I make a mix that is 50% compost and 50% potting mix that I buy. That mix is very light and fluffy because it contains peat moss and perlite. Perlite is an expanded mineral – sort of a rock popcorn. It’s the white stuff that looks like Styrofoam in potting mixes.
Forced Daffodils
I planted 25 large daffodils in my window box, which was a bit of a squeeze, but will be dramatic when they bloom. Some years I plant 2 or 3 varieties of daffodils in it to stagger the bloom time, but this year I went for the “Big Bang” look – all blooming at once. I will bring the box out of the cold basement in early March.
After planting I water the mix lightly if it is dry. Bulbs won’t do well if sitting in soggy planting mix, but they also are living beings that are growing roots and that need some moisture. If the soil mix dries out too much, I sometimes do a light watering half way through their winter rest.
When selecting bulbs for forcing, “early-season” varieties are best. Some varieties will be listed as “good for forcing” and those are ideal. Daffodils I give a minimum of 90 days of rest before bringing them into a warm room to start the process of above-ground growth. Tulips I recommend 120 days – 4 months from now is mid-March. If you bring them up without proper rest, you will get foliage but no blossoms. Crocus are ready in 10 weeks or so, but can be planted in the same container as daffodils – as a second layer of bulbs above the daffodils.
Those 8-inch plastic pots that are used for perennials at the garden center make good pots for forcing, too. Half a dozen tulips in one will make a very nice display indoors while there is still snow on the ground. Plant several pots and bring one into the warmth every week for a continuous display.
Oh yes, temperature is important, too. The ideal temperature for forcing bulbs is 40-45 degrees. Anything over 50 is too warm, and below freezing is too cold. You might have a place in your garage or on the steps of the bulkhead, or even in an unheated mudroom. It is best to keep the pots in the dark, but you can create that by placing a plank over the top, I suppose.
So go get some bulbs and pot them up for a late winter delight. It’s easy, it’s not costly, and you can plant those bulbs in your garden after they have done their work – cheering you up.
Henry Homeyer is the author of 4 gardening books and a fantasy-adventure for children, Wobar and the Quest for the Magic Calumet. His Web sites are www.henryhomeyer.com and www.Gardening-Guy.com.